Play asset pack
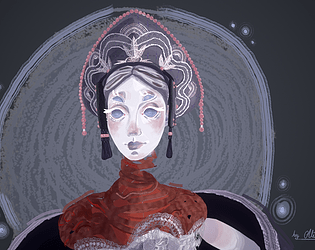
Marola: Goddess of Flesh and Fertility (RS 2023)'s itch.io pageResults
| Criteria | Rank | Score* | Raw Score |
| Research + Development | #1 | 5.000 | 5.000 |
| Overall | #11 | 4.133 | 4.133 |
| Creative Development | #12 | 4.000 | 4.000 |
| Final Presentation | #12 | 4.000 | 4.000 |
| Project Documentation | #16 | 4.333 | 4.333 |
| Technical / Workflow | #28 | 3.333 | 3.333 |
Ranked from 3 ratings. Score is adjusted from raw score by the median number of ratings per game in the jam.
Judge feedback
Judge feedback is anonymous and shown in a random order.
- Assessor Name: Caleb O’Brien – Character Artist @ Firesprite Amazing work, an extremely ambitious project and super unique final character, gives me Nyx and Chaos from Hades vibes! You’ve really put a lot of great effort into the research and development stage and absolutely nailed your chosen theme. It’s clear that you’re extremely passionate, with this shining through from just looking over your project and the attention to detail evident. One piece of advice I’d suggest is to establish some constraints to work within, consider the type of game the character would exist in such as platform, gameplay, animation etc. This will help inform your design and technical decisions as you will have an idea of what is required of the character in game. Great effort rigging and skinning to achieve some nice poses. The hand painted textures are really appealing too, and I love how you’ve successfully translated the concept into 3D. I’d have loved to see some further breakdowns in your final presentation, such as wireframe view with polycount, texture maps resolution etc. Overall, you’ve created a really interesting project and demonstrated a strong understanding of the character workflow for games. I’ve not had as much time as I’d have liked to rate projects, so please feel free to reach out to me if you have any questions or would like some further feedback on anything in particular!
- Excellent research and moodboards into your focused themes. I can easily see the influences you took in your final character. It’s great that you did research into materials, stylisation, anatomy and poses too - great stuff! I understand the time constraints but, the umbilical cord around the torso and neck is too high poly for a game setting - particularly for how little depth you see in the final renders. A couple options to how you could have approached this: ZRemesh it again until it’s as low as you could get it without it looking really janky Bake the swirls onto a mesh with transparency Convert the edgeloops into Curves in Maya and extrude a hexagon (or simpler mesh) along it: https://www.youtube.com/watch?v=ZxMwAWxXizw Even very high-end games aim for roughly 100k for a main character to be optimised. In future, perhaps use ZRemesher as a base to start retopology and then amend it in Maya. You can also use polygroups in ZBrush to manipulate edgeloops to your character (I’m not sure if you did this, but I’ll include it anyway in case it helps! https://www.youtube.com/watch?v=8D-xqasgUws) Tip for adding thickness in ZBrush, you can use ZRemesher to get workable topology and then use creases and edge loop panels to get thickness. This can be done dynamically: https://www.youtube.com/watch?v=9URnr0ItzyY or permanently: https://www.youtube.com/watch?v=l7Ojd0cnqb4 Since this character is built in isolation, it would have been more efficient to combine your 3 ‘Planes’ UV maps as you are only using about 30% maximum of the space. For games, you want to balance efficiency with quality, in this case, you would not have been compromising quality if you had combined the maps. Furthermore, you could have allocated more texel density to areas of high focus - like the face and eyes. In case you’d like a better look into what texel density is, check out this blog post by Anthony O’Donnel (Art Director at d3t: https://www.artstation.com/blogs/antodonnell/BppX/texel-density-is-back-it-seems) Great work with rigging and skinning Marola. I would have recommended potentially completing this after texturing to preview where stretching occurs, but you seem to have handled this well nevertheless. Your documentation is maybe a little messy in places and could have been tied into your character more. Despite this, it is easy to follow and clear to see your process. Texturing is incredible. I think you’ve got a real skill in hand painting and I genuinely couldn’t believe this was a 3D model when I first clicked on your project. Perhaps it would be nice to see some more intensive shadows on the ground or on her skirt to show how she’s existing in an environment. My only critique for the renders is that the overall composition is a little flat. The value of the character is the same as the circle in the background, it may have been a better creative choice to opt for a contrasting colour, or even changing the small grey orb highlights on the side.
- Contestant: Alicia Figueiredo Amaral / @DigitallyAbsurd Assessor: Tristan McGuire / @Draconic_Cowboy Tier: Rising Star Congrats on completing your project! Things that went well: ✧ Great research and development that lead to a very unique and beautifully drawn concept. ✧ Lovely manual retopology. Especially on the face. ✧ Rigging the model demonstrates skills above and beyond the domain of a character artist. ✧ Very effective final result with the texturing and great choice of using an unlit shader for this character. Things to consider next time: ✧ Next time you make a stylised model, think of how you can add more stylisation to the sculpt itself. ✧ It’s understandable to have used zremesher for some of the retopology to save time, but in future I would recommend doing as much as possible by hand for your portfolio pieces to showcase your abilities. ✧ When UV unwrapping, try to make the islands as straight and aligned to the grid as possible, as this allows you to pack them into the square more efficiently. Even an organic form can be cut in such a way that many of the parts can be straightened. As you are in the Rising Star tier, I hope this feedback can be used to inform how you approach future university projects and I would love to see you take part in the competition again next year! You can find me on the social medias in the link below. Feel free to reach out in the future. All the best! https://draconic-cowboy.carrd.co/ - Tristan, Character Artist at Airship Interactive.
Challenge Tier
Rising Star


Leave a comment
Log in with itch.io to leave a comment.