
Here's my walkthrough (game v1.1.18), with which max clears are easy. Intense spoiler heavy (probably will only want to read after completing everything yourself):
- What I love about this game is that it is like a mini-version in the spirit of FTL and Into the Breach. "The game is to learn the game." So below is what I have learned about it. With the walkthrough below, the joy of discovering the game might be taken away (at least if I had read this before playing, I would feel having lost something), so read at your own peril.
- Overall, fantastic game! I wish for a harder New Game+ mode with new monsters and patterns that one could attempt after completing a regular board, where one would really have to pause to make only the most calculated moves.
- You've probably learned all the monsters RPG patterns, many comments about those already. Knowing about the monsters is not really needed to get a max clear (but of course makes the game much easier). I did my first max score before picking up on that the board was not random.
- From the start, easy way to get past the first "missing XP to level up" hill is to explore immediately towards the egg. It is semi-easily locatable free +3xp, and helps avoid using a heart scroll at early game.
- Whenever board permits, speculate the play direction towards where the wizard's lair could lie. Since it is kind of big with its 2x3 cell pattern and always on the edge, its location is quite constrained. After finding the edge/corner, sniping the wizard is super beneficial for uncovering information, since it reveals the 2x3 cell and P5 enemies. Makes ruling out rat king easier as well.
- Plan so you never need to bash the walls (+1/3 xp per heart only) until at the end of the game when whole board is cleared. It won't be the end of the world if this happens, but it can't happen more than a few times to get a max clear.
- Do not kill an enemy if it does not provide new board information (unless you absolutely have to in order to avoid wasting hearts before leveling, or to avoid denomination problems, see below).
- Prefer to open board squares that cost least lives first. The game is all about paying hearts to buy board information, so you of course want to buy as cheap as possible. (there are tradeoffs of course which makes the game interesting, see below)
- The very moment you reach lv10, you should kill the mine king for the boost to XP. (as corollary, the game objective is to identify where mine king is before lv10 is reached) . If you have 10 hearts and use a heart scroll, while mine king is still alive, the play was suboptimal.
- If you don't know which corner the mine king is when you reach lv10, then if you want to live on the edge, you might calculate how many >P10 unidentified mines + mimic chest remain that could live in the corners, vs how many unknown squares exist, and if the odds are exceedingly in your favor, then just take a calculated guess and pick a random corner.
- If you have a choice of killing e.g. a P5 enemy or a P2+P3 enemy, there is an interesting complex tradeoff to be made:
a) do I prefer to kill the P5 enemy, so that I ensure that the lower denominations of 2 and 3 will remain available, to leave less chance of wasting hearts later on (due to not having the exact denomination to kill), or
b) assuming that the P2+P3 are both at the boundary of information, do I prefer to kill those two enemies rather than one P5, since the two enemies will provide one more square of board information for the same cost.
Early on in the game, a) seems to be more important.
At first I thought that a) would have always been more important (i.e. optimal play is bottlenecked on denominations throughout to the end), but after playing several max clears, it is apparent that in the middle game and later, one will already have plenty of P1, P2 and P3 denominations available to kill when needed, so then b) is more productive.
- Another example of a denomination tradeoff is e.g. when pondering if to kill a P4+P1 or a P3+P2. Assuming produced board information would be indifferent/equivalent, it is generally better to kill P3+P2, to keep the P1 for later to help with a denomination problem. (of course one can "read ahead" to the health bar, to know which denominations will be needed)
- Never commit to batch kill multiple enemies at once, but always re-evaluate the new board state after each kill, and only then make another move. (don't mindlessly commit to mass murder thinking "I've got 7HP so I'll kill those P3+P3+P1"). Maybe after killing the first P3, you realize that you don't gain info from killing the rest. Kill the enemies in the descending order of most info to least info.
- Before deciding to open a given board square, pause to think what new board information opening that cell can provide. I.e. ask "If I knew what number was in this cell, would it even help me deduce the power number of any adjacent cell?" If not, then opening that cell is not immediately productive. Prefer to open those cell squares first that do expand the information boundary, and leave the cell squares that do not for later.
- Use monsternomicon's "monsters of each type remaining" info to deduce complex two-cell patterns. Sometimes the monsternomicon's numbers fully reveal what two adjacent cells summing up to X will have to contain. (although not which one is which)
- Use Venn diagramming to deduce which cells cannot be empty, to give min-max power levels that a cell must contain. For example, this can be used to deduce the location of a Minotaur's chest, if your game is about to come crashing down: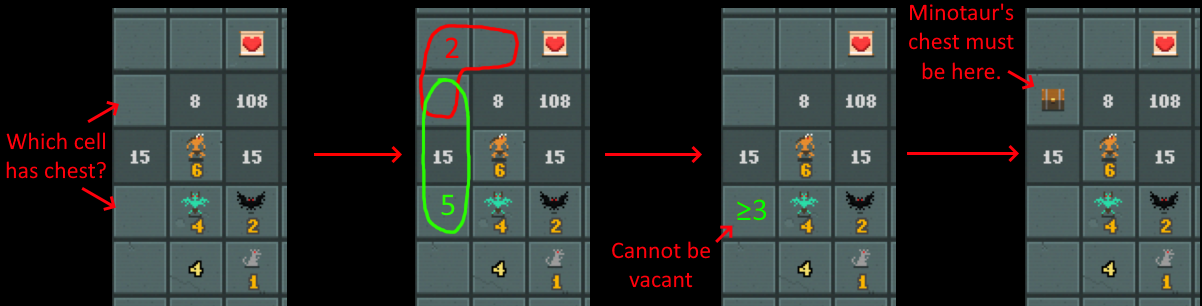
- At very early game, I like to build up small denominations to have available when needed. Towards the middle game, denominations won't be a problem, so maximizing boundary information is more important instead.
- There will be times when one has to guess. Some guesses are nonlethal ("whatever lurks here can't kill me"), and other guesses are lethal ("I might die if I click here"). Naturally make only nonlethal guesses, in the descending order of "most board information gained."
- In an unlucky run, one might have to make a lethal guess, but that does not seem to happen that often, which is a testament to the balance of the game. When going for the lovers+rats+egg stamp victory, this happens way more often, since the rats easily get in the way.
- At the very end, when all board cells have been identified, one will typically still have lots of monsters alive on the board, something like this:
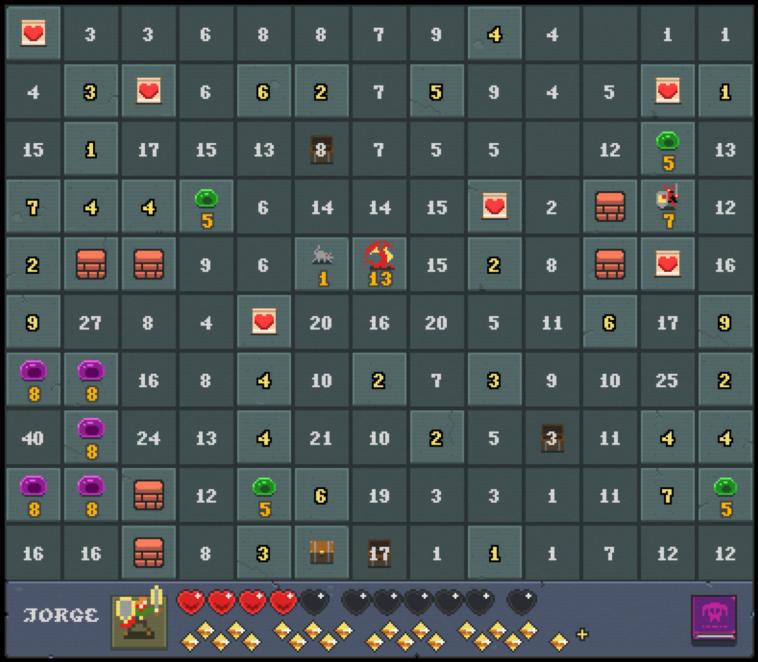
From here on, it is a mop up game, given that there are plenty of P1 and P2 and P3 still available to steer clear of running into denomination problems.
- There are always more hearts on the board than are needed to clear everything. My record is 10 hearts remaining at the end of a game.