Post your contact information, game, and a little blurb about your love of games and game development
Lost Astronaut Studios
Creator of
Recent community posts
I copied your stuff manually but you can also contribute directly to the repo
https://github.com/LAGameStudio/Tilemancer-Nodes
tutorial on pull requests:
1. Visit Tilemancer-Nodes
2. Edit a file (pencil icon) or Create File
3. Edit / add code
4. Submit / describe / create pull request
You can view the Lua in the Nodes folder https://github.com/LAGameStudio/Tilemancer-Nodes/blob/main/lighting.lua
Here's Border, that is similar to XYCutoff but is a simple square border around a tile
https://github.com/LAGameStudio/Tilemancer-Nodes/blob/main/border.lua
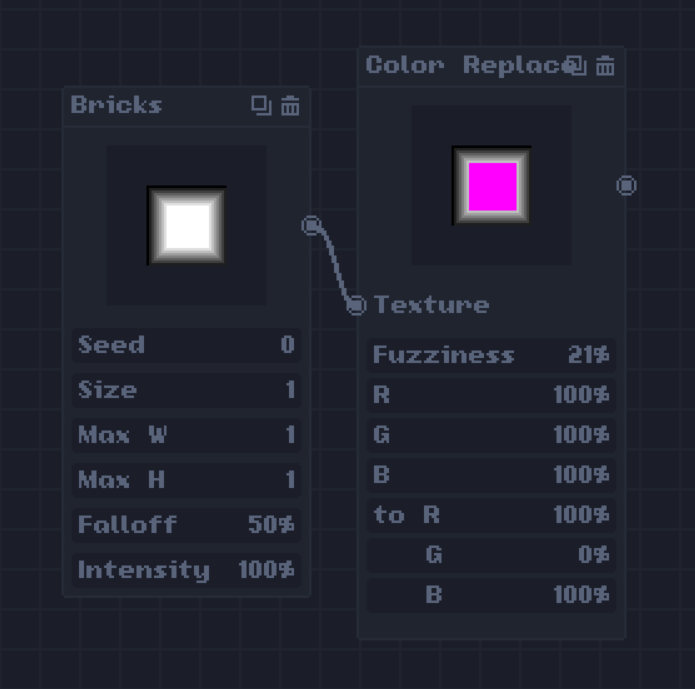
Usage example: (Border node format was refined after this, so takes up less screen space)
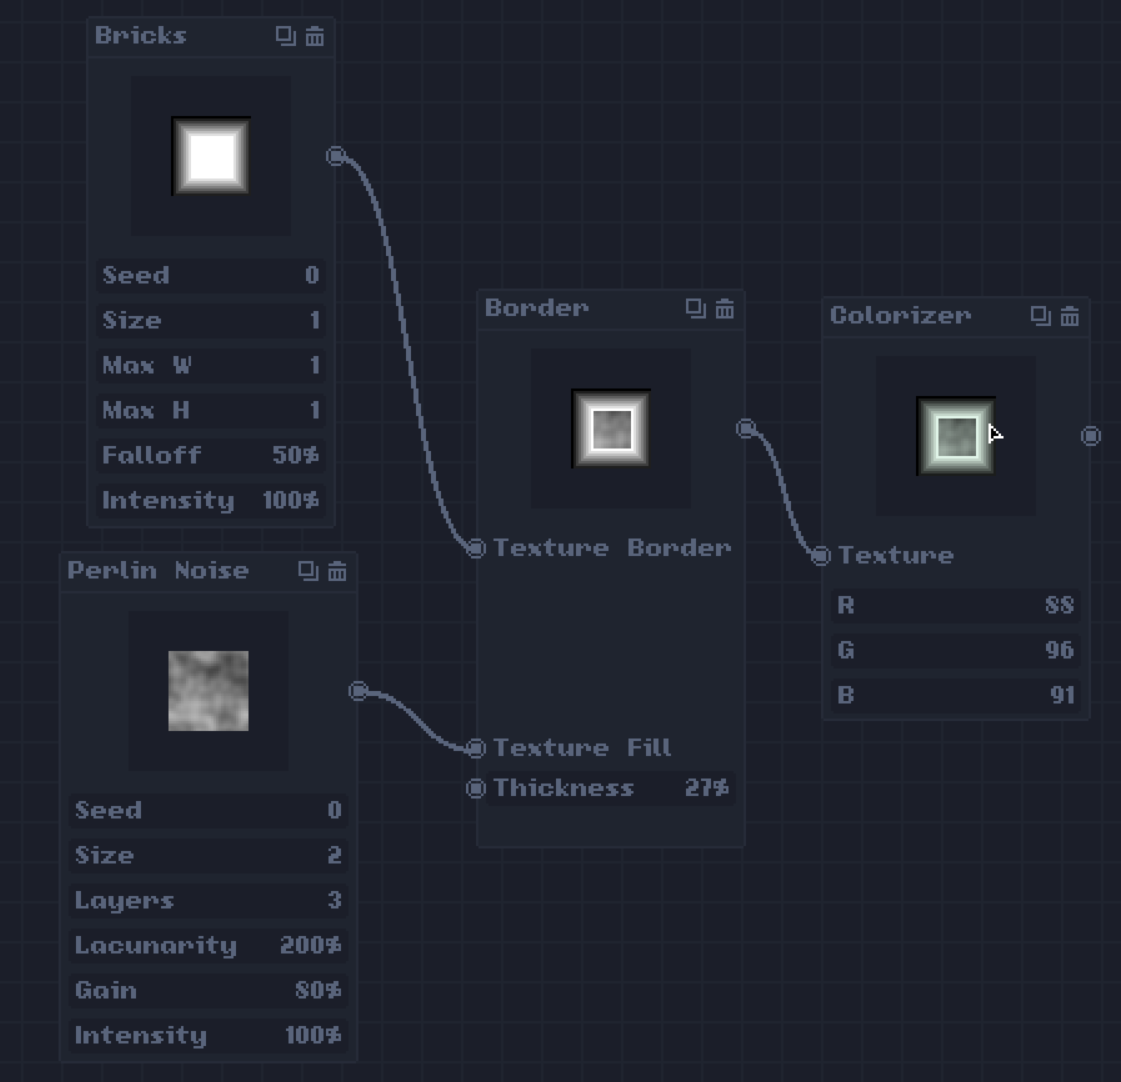
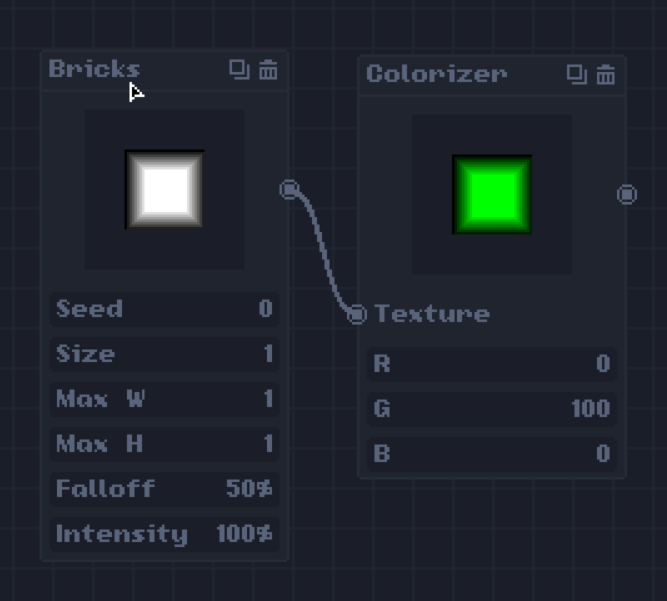
I noticed the Colorizer on my system did not work at all, nor did the "addCRamp", so I fixed it
https://github.com/LAGameStudio/Tilemancer-Nodes/blob/main/colorizer.lua
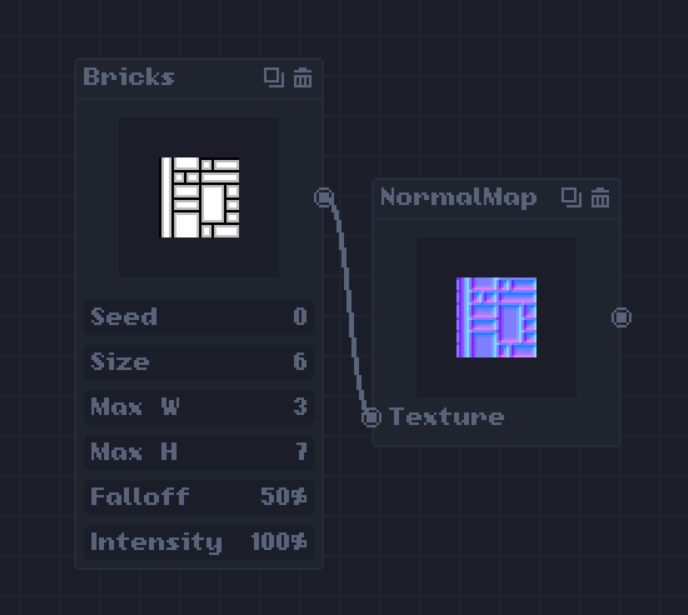
Normal Map (not the same as the one in Lighting)
https://github.com/LAGameStudio/Tilemancer-Nodes/blob/main/normalmap.lua
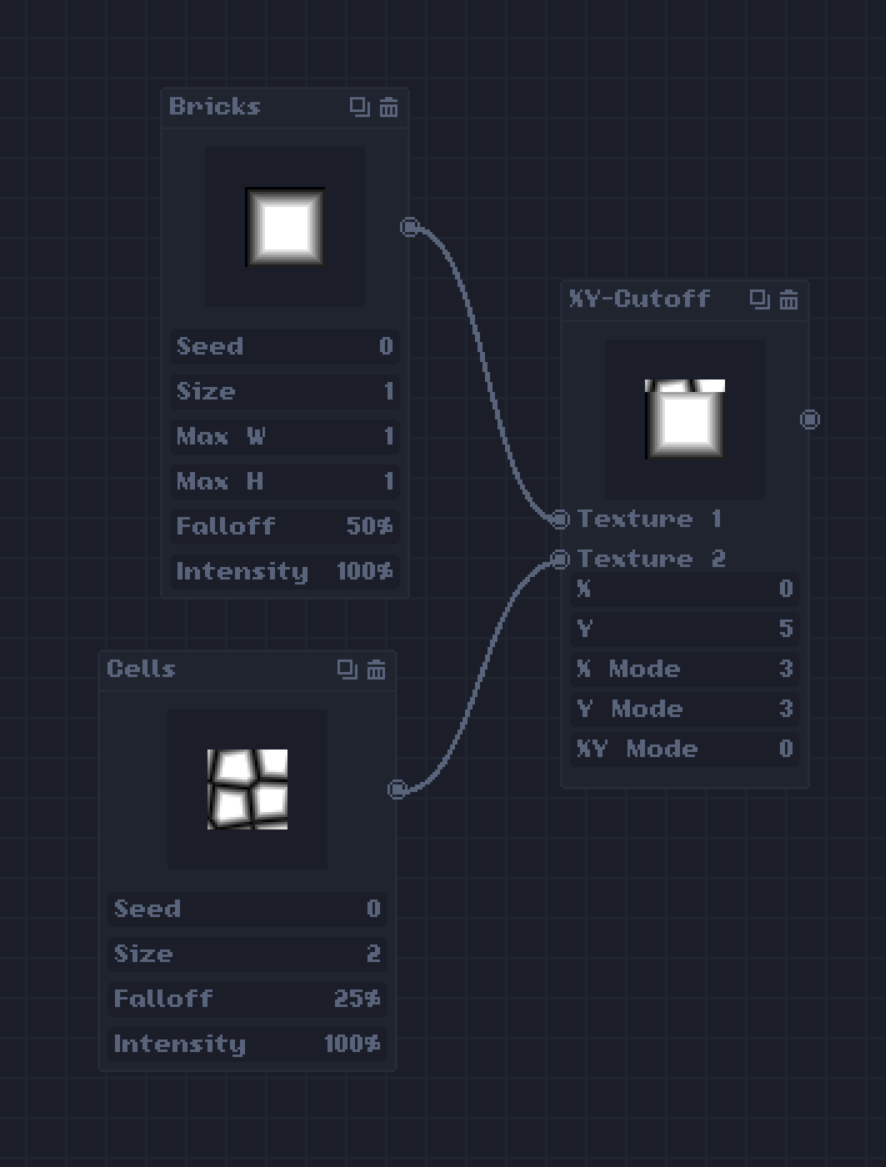
See the following pastebin for "XYCutoff" -- while it is similar to Crosscut takes a different approach
NODE XY-Cutoff Useful for creating platformer tiles by combining images
suggestions to Tilemancer author:
- Would like to see this tool produce tiles up to a larger size, so then I could do a node called "tilemap creator" using the standard tilemap format for platformers and 2.5d RPGs ... or perhaps you could just add that yourself .. like some way to combine tiles into a tilemap... ie maybe set up a template.. example https://www.google.com/search?q=standard+2d+tileset+formats&safe=off&rlz=1C1MSIM...
- Would also like to see mouse wheel scroll the left Node List
- See comments in this .lua (above) for a question re: parameters
Introducing Apolune: Generations
As you progress through kills, you also advance the game mechanics and work your way through various planned rewards.
The game is procedural, meaning that the ship graphics and the way interactions unfold do not always happen exactly the same way. There are, though, certain specific kill counts that unlock specific rewards.
When the game starts out, you are at generation 1 and your ship will slowly heal at a rate of 1 hit per minute. Your ship can barely turn and moves very slowly across the screen. In subsequent generations, these and other abilities will increase over time as you reach subsequent generations.
The first four generations are:
30 kills
50 kills
75 kills
100 kills
Technical Details of Launch Options
Advanced Launch Options
Did you know you can run Apolune at a variety of resolutions in Full-screen or
Windowed mode?
If you right click the application in the STEAM Client, you can use the
Advanced Launch Options to enter one or more options from the list below:
Please note that all of these options provided as command line parameters to
Apolune.exe should precede with a single minus sign (-).
For example, "-windowed" works but "window" won't work without the minus sign.
For example, to load in 720p mode in a window, enter the following into the
Steam client "ADVANCED LAUNCH OPTIONS" textbox:
-windowed -720p
Order does not matter, so this will also work:
-720p -windowed
Window Options
-window Disables use of full screen when creating the application window.
-windowed Same as above.
-borderless Create a borderless full screen window instead of GPU mode full screen
-bordered Create a bordered full screen window instead of GPU mode full screen
Engine Options
-nolimit
Do not limit the frame rate (will speed up time on some systems,
otherwise the frame sleep will fill frames that don't take up 17ms at 60FPS
Specific Resolutions
-320x200 -720x480
-1152x768 -1280x1024
-1600x1200 -320x240
-854x480 -1280x720
-1366x768 -1768x992
-320x400 -768x576
-1280x768 -1400x1050
-1920x1080 -320x486
-800x600 -1280x800
-1440x900 -480x320
-1024x600 -1280x854
-1440x960 -640x480
-1024x768 -1280x960
-1680x1050
HD Resolutions by Trade Name
-hd720
-hd720p
-720p
Sets 1280x768 (HD720p) as the resolution.
-hd1080
-1080i
-1080p
-1080
Sets 1920x1080 (HD 1080i) as the resolution
Specialty Resolutions
-cga Sets 320x200 (CGA) as the resolution
-tv Sets 320x400 (Classic scanline TV) as the resolution
-qvga Sets 320x240 (QVGA) as the resolution
-320x243 Sets 320x243 (pseudo NTSC) as the resolution
-ntsc Sets 320x486 (NTSC non-interlaced) as the resolution
-pal Sets 768x576 (PAL) as the resolution
-vga Sets 640x480 (VGA) as the resolution
-800x480 Sets 800x480 (WVGA) as the resolution
-wvga Sets 854x480 (WVGA) as the resolution
-svga Sets 800x600 (SVGA) as the resolution
-wsvga Sets 1024x600 (WSVGA) as the resolution
-xga Sets 1024x768 (XGA) as the resolution
-wxga Sets 1280x768 (WXGA) as the resolution
-sxga Sets 1280x1024 (SXGA) as the resolution
-sxga+ Sets 1400x1050 (SXGA+) as the resolution
-wsxga+ Sets 1680x1050 (WSXGA+) as the resolution
-uxga Sets 1600x1200 (UXGA) as the resolution
-qxga Sets 2048x1536 (QXGA) as the resolution
-cinema Sets 2560x1440 (Apple Cinema T) as the resolution
-wqxga Sets 2560x1600 (WQXGA) as the resolution
-qsxga Sets 2560x2048 (WSXGA) as the resolution
Support for Matrox Dual- and TripleHead2Go
-32godual1 1600x600 DualHead2Go Dual Mode 1
-32godual2 2048x768 DualHead2Go Dual Mode 2
-32godual3 2560x720 DualHead2Go Dual Mode 3
-32godual4 2560x768 DualHead2Go Dual Mode 4
-32godual5 2560x800 DualHead2Go Dual Mode 5
-32godual6 2560x800 DualHead2Go Dual Mode 6
-32godual7 2560x960 DualHead2Go Dual Mode 7
-32godual8 2560x1024 DualHead2Go Dual Mode 8
-32godual9 2720x768 DualHead2Go Dual Mode 9
-32godual10 2800x1050 DualHead2Go Dual Mode 10
-32godual11 3200x900 DualHead2Go Dual Mode 11
-32godual12 3200x1200 DualHead2Go Dual Mode 12
-32godual13 3360x1050 DualHead2Go Dual Mode 13
-32godual14 3840x1080 DualHead2Go Dual Mode 14
-32godual15 3840x1200 DualHead2Go Dual Mode 15
-32godual16 4096x1152 DualHead2Go Dual Mode 16
-32godual17 4096x1152 DualHead2Go Dual Mode 17
-32gotri1 1920x480 TripleHead2Go Triple Mode 1
-32gotri2 2400x480 TripleHead2Go Triple Mode 2
-32gotri3 2400x600 TripleHead2Go Triple Mode 3
-32gotri4 3072x768 TripleHead2Go Triple Mode 4
-32gotri5 3840x720 TripleHead2Go Triple Mode 5
-32gotri6 3840x768 TripleHead2Go Triple Mode 6
-32gotri7 3840x800 TripleHead2Go Triple Mode 7
-32gotri8 3840x960 TripleHead2Go Triple Mode 8
-32gotri9 3840x1024 TripleHead2Go Triple Mode 9
-32gotri10 4080x768 TripleHead2Go Triple Mode 10
-32gotri11 4098x768 TripleHead2Go Triple Mode 11
-32gotri12 4200x1050 TripleHead2Go Triple Mode 12
-32gotri13 4320x900 TripleHead2Go Triple Mode 13
-32gotri14 4800x900 TripleHead2Go Triple Mode 14
-32gotri15 5040x1050 TripleHead2Go Triple Mode 15
-32gotri16 5760x1080 TripleHead2Go Triple Mode 16
Activate cheat codes and commands
(will NOT set the Leaderboard and most achievements)
-cheating
Tips to Getting the Best Score
Try to minimize wasted ammunition. All ships can be hit in the very center within a circle diameter of 20 pixels. Some ships have other weak areas but they may not be predictable. Larger ships require more direct hits.
The larger your ship is, the more of a handicap is applied. A ship half the threshold decreases your scoring rate by half, whereas a ship twice the size of the threshold is worth 200% scoring bonus.
The term "Epigenetics" in the final score screen statistics is the amount of added up generations of all of the kills you have made. This also increases your score the higher it is. Ships with a higher generation will appear more complicated with more colorful configurations.
Ramming does not cause a shot to be recorded and is essentially a free set of non-moving bullets fired along the path you travel. This is also a way to avoid wasted ammunition penalties.
Take a screenshot of your score and share it on the game's profile on Steam to compare notes. Don't just click 'Again'! Catalog your scores and try to predict a better outcome based on your experiences. Take notes.
There is no real end to the game. There is no set generation at which it ends. At the 100th generation, the game begins to oscillate and may actually become easier for a time. If it is possible for you to survive long enough to reach the 100th level, 101 may not be as tough. The cap on active enemy ships is set to 200, but more can appear if they also bring "friends" to the party. This cap is reduced during the earlier generations.
Controllers and Keys
Keyboard
Keyboard versus controller input: It appears that, in the early levels at least, it is easier to shoot quickly by typing both CTRL keys with your right thumb or left pinky.
Keyboard commands are:
WASD (move)
Arrows (or numpad arrows) (Turn and move)
LCTRL RCTRL (shoot)
Second Player (Keyboard)
Unlike the primary ship, the second player cannot be hit by bullets but also has difficulty controlling their exact location. If a game is started and less than 30 ships have been killed, a second player may join by firing with the Y or U keys (or controller mapping).
On a keyboard, this maps to the keys:
FTGH (movement)
JKLI (aim)
YU (shoot)
Tip: Just tap a directional to "push off" as the astronaut, rather than trying to fly.
Controller
There are three developer-created controller settings recommended by the developer, though you may create your own and anyone can submit them to STEAM.
The three created by the developer are:
Apolune (Game) Developer Recommended
Designed to be widely compatible with generic USB SNES-style controllers and the STEAM controller.
- This one is set for "single player, single ship" mode -- lets the player use a Generic USB controller (not just a STEAM controller)
- Menu Systems: The mappings allow you to navigate all of the menus (except the "Continue" button in cheating mode) without using the mouse. You can also use a "joystick mouse" if you hold down what, on my iBuffalo USB SNES-style controller, looks like "Select", controlling the mouse with the left d-pad.
- The buttons on the right side of my iBuffalo classic turn and move the ship up and down. (like the arrow keys or numpad)
- The d-pad lets me move by thrusting the ship in the "directional" (cardinal directions). (WASD)
- The trigger 'shoulders' are like hitting the CTRL keys on the keyboard (shoot).
- While in play, the "Start" button is the same as hitting "ESC" which sacrifices your game.
Apolune (Game) 2nd Player Developer Recommended
Designed to be widely compatible with generic USB SNES-style controllers and the STEAM controller.
This sets up the controller input to map to the Second Player (Astronaut) controls. If a game is started and less than 30 ships have been killed, a second player may join by pulling the triggers or shoulder buttons (fire).
Unlike the primary ship, the second player cannot be hit by bullets but also has difficulty controlling their exact location. Tip: Just tap a directional to "push off" as the astronaut, rather than trying to fly.
On a keyboard, this maps to the keys FTGH (movement) JKLI (aim) YU (shoot)
Apolune (Game) 2 Players 1 Controller
Designed around the STEAM Controller.
For die hard fanatics, you can attempt to control both the ship and the primary player ship. The commands are complicated and mapped out in the configuration, but basically function like this:
- Top left circle on STEAM controller (top left DPAD or thumbstick): Move the astronaut
- Top right circle or buttons: Aim the astronaut
- Bottom left d-pad: Directional thrust of ship
- Bottom right circle on STEAM controller: Turn and move ship
- Left trigger will shoot the main ship,
- left and right shoulder moves the astronaut,
- right trigger is mapped to Left Mouse.
- Click the "back arrow <" button to activate the "mouse" control.
- Click the ">" arrow button to set self-destruct (same as ESC).
Spoiler: Specific Reward Levels
Once you reach 30 kills, you hyperspace to the second stage. Enemy ships will start to come faster and you will notice your directional movement increases slightly. After 30 kills you can no longer activate the Second Player option. If you aren't cheating, your personal score will be recorded in the 'regular' (single player) Global Leaderboards.
At 100 kills, enemy ships loaded with beacons can draw additional support craft if they are of a certain size. Larger ships will draw larger assistance vessels.
Jump Ability: After 150 kills, the "double tap" dodge/ram feature is activated. Double tap the directional to "jump" in a direction based on your rotation. If you "jump" through an enemy craft, you will hit them a number of times leading to a kill if your ship is strong enough and they are weak enough. The strength, duration and recharge rate of this feature will increase over time.
At 200 kills, you unlock the rapid fire weapon. This allows you to rest your weary fingers and spray-and-pray all you want, however the more missed shots the less the final score will be.
At 300 kills, you unlock the Triple Threat weapon (and the achievement, if you haven't earned it already) -- at 500 kills, it becomes a five-shot weapon (Quintuple Threat) and at 1000 kills
At 420 kills, your healing rate increases with each kill thereafter. The more you kill, the more you will heal.
At 1000 kills you gain a 10-shot weapon and at 2000 kills your weapon begins to aim differently, including backward fire. The final weapon reward is at 3000 kills.
Spoiler: Miscellaneous Nuances
Kill ships as far away as you can.
Stay in the middle of the screen and away from the edge at all times. You never know what is coming around the corner.
Probe unseen areas ("the darkness") with shots. While wasteful of ammunition it can help identify targets before they are too close and start shooting.
Prioritize targets. Keep slower moving ships around longer, deal with fast moving ships first.
If you fly over a ship, it may confuse the pilot. This is one way to cause a ship to lose trajectory and it pacifies it. This "bug" is actually a feature: you can pacify ships temporarily if you are being outnumbered. It's counter-intuitive to do this. You will want to back away from ships, don't: it only causes them to fire more bullets.
Don't give up.
Spoiler: Cheat Codes
Listen to the Space Game Junkie Podcast #277 for cheat codes and how they are activated, and what they do.
When you cheat, you will not be able to gain achievements that are not specifically for cheat codes, and no scores will be recorded to the Global Leaderboards. You will, however, gain a "Continue" button. Cheat codes help the developer test new features, and can help competitors practice and explore higher game levels. Consider it "experimentation" rather than "cheating" - which has a bad rap for a good reason.


