DAY 9
I started today with working on one of the goals mentioned yesterday, namely coding in enemy and player behaviour upon contact. In other words making the player character actually killable. Which I did succeed in achieving. The second goal I set for myself: namely coding behaviour for the goal object when the player touches it. In other words, screen and level transition. Since a demo is the goal for this jam this means transition to some sort of victory screen. I decided to move this entire goal to tomorrow instead as upon further research into making GUI with Godot it felt like a topic and goal that would need it's own day to be worked on properly as it involves many steps.
So knowing this I moved one of my later roadmap goals to today and that's learning how to make/import/work with tile sets in order to make level creation much easier. So I got to work in Asesprite on making a simple tile set that fit with the musical theme. So I went for on a classical concert hall inspired floor. My goal was to somehow convey over the atmoshere and visual aesthetic of early piano/jazz/blues/... concerts. I chose red, white and black as the primary three colours. Red to refer to the classic red carpet and curtains you often see in depiction of glamorous concert halls. The black and white as inspired by the grand piano up on the stage.
Once the final set was finished and exported as a .png file I started scouring through Godot's functions as to how to import it. And that ended up being a whole lot more convoluted for a first time user of the engine than I expected it to be. (I ended up having to search a tutorial) Here's a breakdown of the steps executed to reach this goal:
1. Make a new empty scene (no need to save it)
2. Add a root node onto which you attach a Sprite node
3. Attach a collision shape 2D and RigidBody 2D node to the Sprite node
4. Choosing the tileset .png file as the texture for your sprite
5. Open the texture editor at the bottom of the interface and set the height and width of the areas (in my case 16 by 16 pixels) of the sprite sheet I wanted to convert into a tileset to use in the tile map editor.
6. Select an individual sprite from the set and place it into the empty scene.
7. Copy the sprite placed and select a different sprite from the tileset .png file. (rinse and repeat this step until you have individual sprites for each sprite in your set)
8. Export the scene as a tile map.
9. Open the scene in which I want to use this tileset and add a Tilemap node to it's root node.
10. Clicking on the added node and choosing the tile map you saved earlier.
11. Next to the main scene view window a tile map editor will open with all included sprites in the tile set. You must click on the sprite you want to add and left click/hold (depending on how many of that sprite you want to place) on the spot where you want to add the sprite.
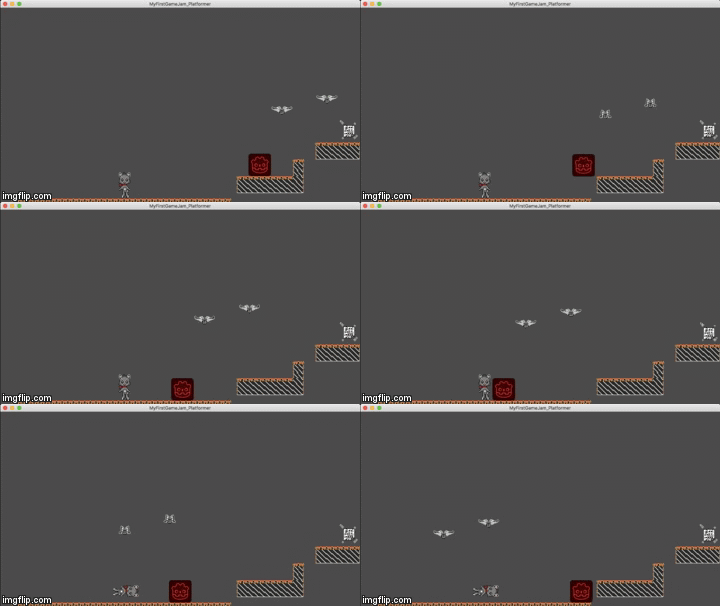
So yeah not exactly the most easy or efficient thing to do. Of course it's a lot more straightforward now that I know where everything is and how it works. Which means it'll go a lot faster and more efficient next time but as a first time Godot user (and inexperienced gamedev in general) this was quite a big list of things to do to accomplish a fairly straightforward goal. All in all this took a long time but after all that work I implemented it into my game. Here's how the game currently looks and plays with the enemy/player behaviour added in and the new tileset.

Again the gif doesn't do full justice to the actual look in-game (as for some reason the red has become orange here) but that aside. As you can see I messed around a bit with placing tiles, an additional bat,... That combined with the fact that the player can now actually die (of course the animation is not final, just keeping things simple for now to make sure everything works properly before fleshing it out) gives this a whole lot more of a "videogame" feeling in my opinion. I might use this particular scene as some kind of tutorial area in the final demo but we'll see. The goal for tomorrow is getting to work on the game UI with all the design and coding work that comes with it. A simple start screen where the player is taken to when opening the game, a game over screen (and by extension a lives screen when the player respawns) and an end screen upon finishing the demo are the primary three goals. Since I haven't fully decided on how to communicate to the player how much damage he/she can take/has taken I might or might not also include that into tomorrow's goals. I'm still debating having some kind of hit indicator on screen or not. A level indicator isn't needed at this point since the demo will most likely only have one level but we'll see how things go. If I could have some kind of rough but functioning beginning, game over and victory screen by the time I write a devlog tomorrow I'd be more than happy. I will have a lot more time than I had in the past two days to actually work on the game so who knows.
And that concludes another day of this wonderful gamejam for me ! Thanks for sticking around and reading this through to the end, I'll see you all tomorrow !

