
Hi Pat,
Are you trying to cut down to 5mm or 0.5mm? If you want to cut down to 0.5mm then that's the deepest cut you will get if you set Max Depth to that. You will get cuts in "Cut Depth" increments down to "Max Depth" at the bottom.
- Charlie
I am wanting to go to 0.5mm in 0.2mm increments. Your explanation is what I understand I *should* get, but I am not. I have attached a screenshot of the project. It is only showing 1 cut at 0.2mm.
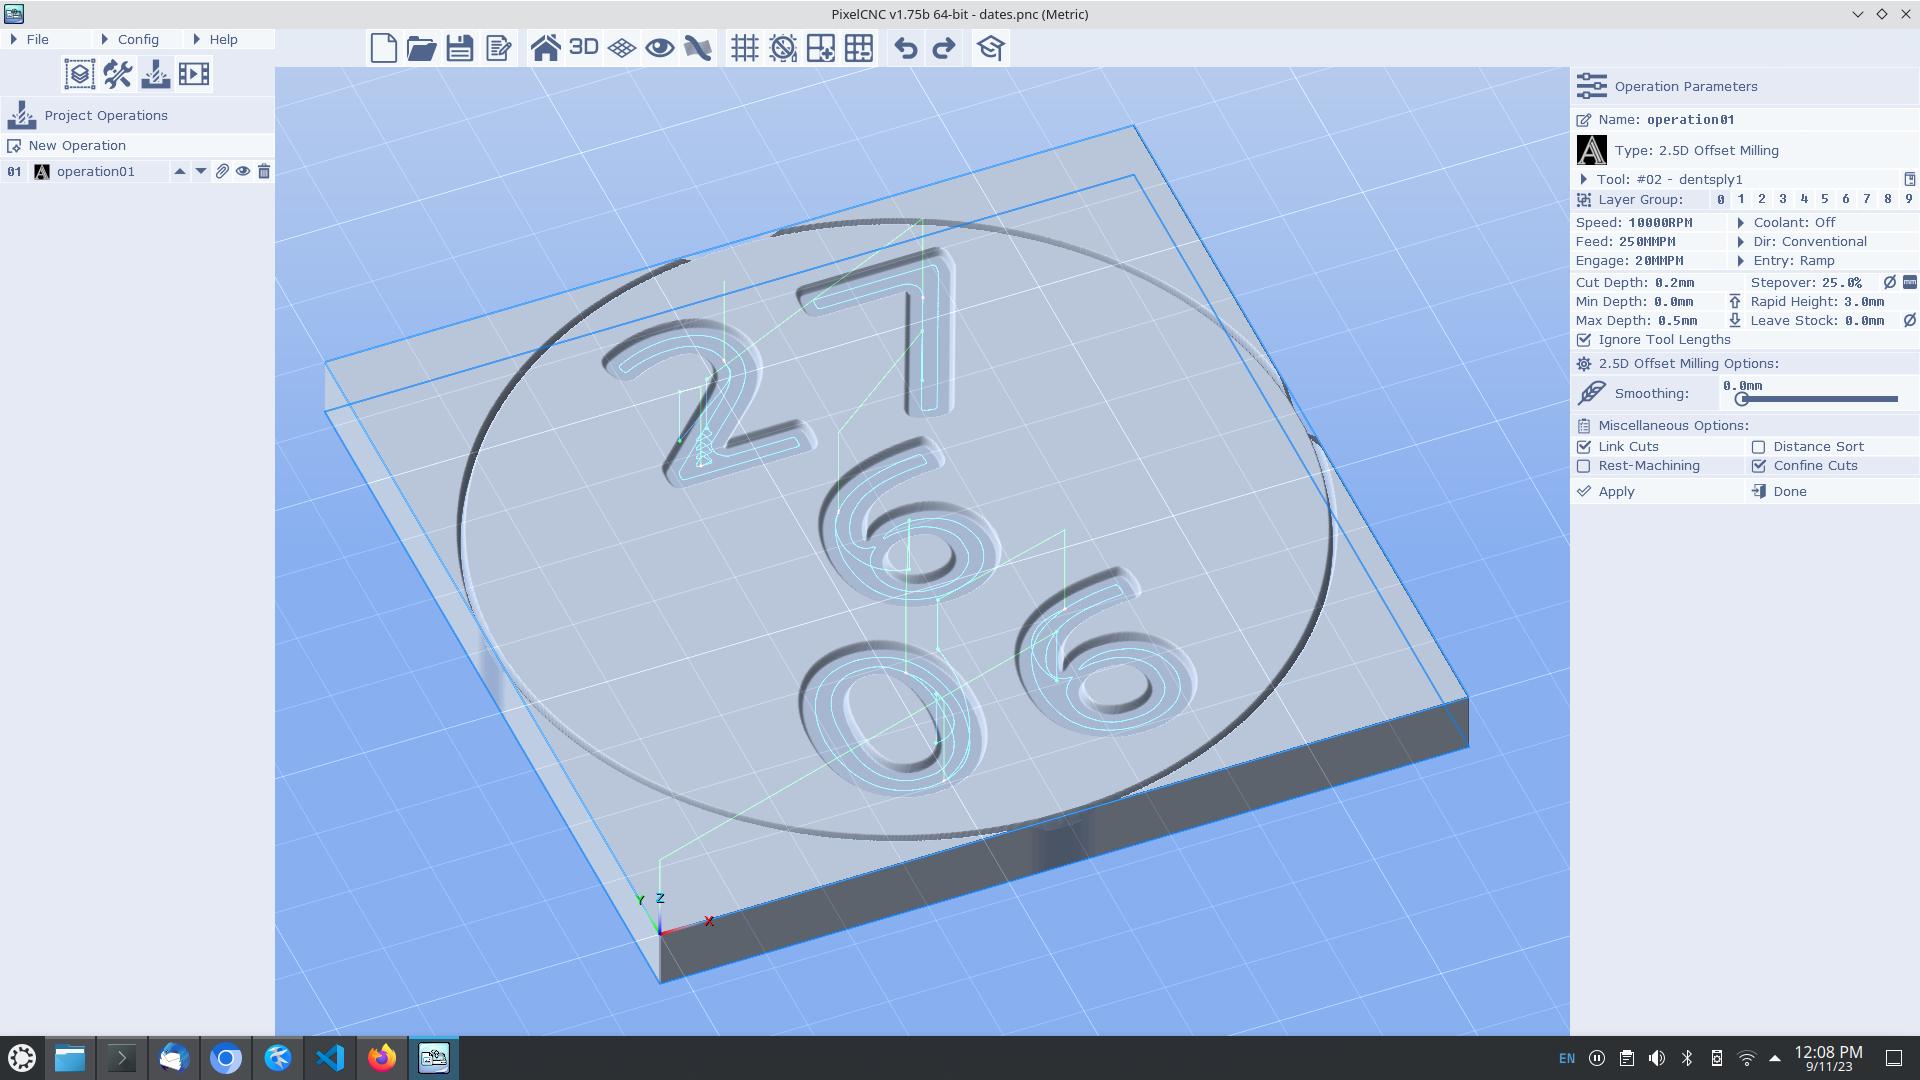
Ah, the situation is that the canvas does not have any empty space to cut at -0.4 and -0.5. Only if a contouring at the canvas at a multiple of Cut Depth will result in an area that's empty will cuts be generated there. So your numbers will need to go down to -0.5mm from the top of the canvas if you want them to be cut that deep.
Alternatively, you can use the 2D Offset Milling which will let you specify where along the Z axis to generate a cutting contour, and then an arbitrary Max Depth that ignores the canvas contents. For example:
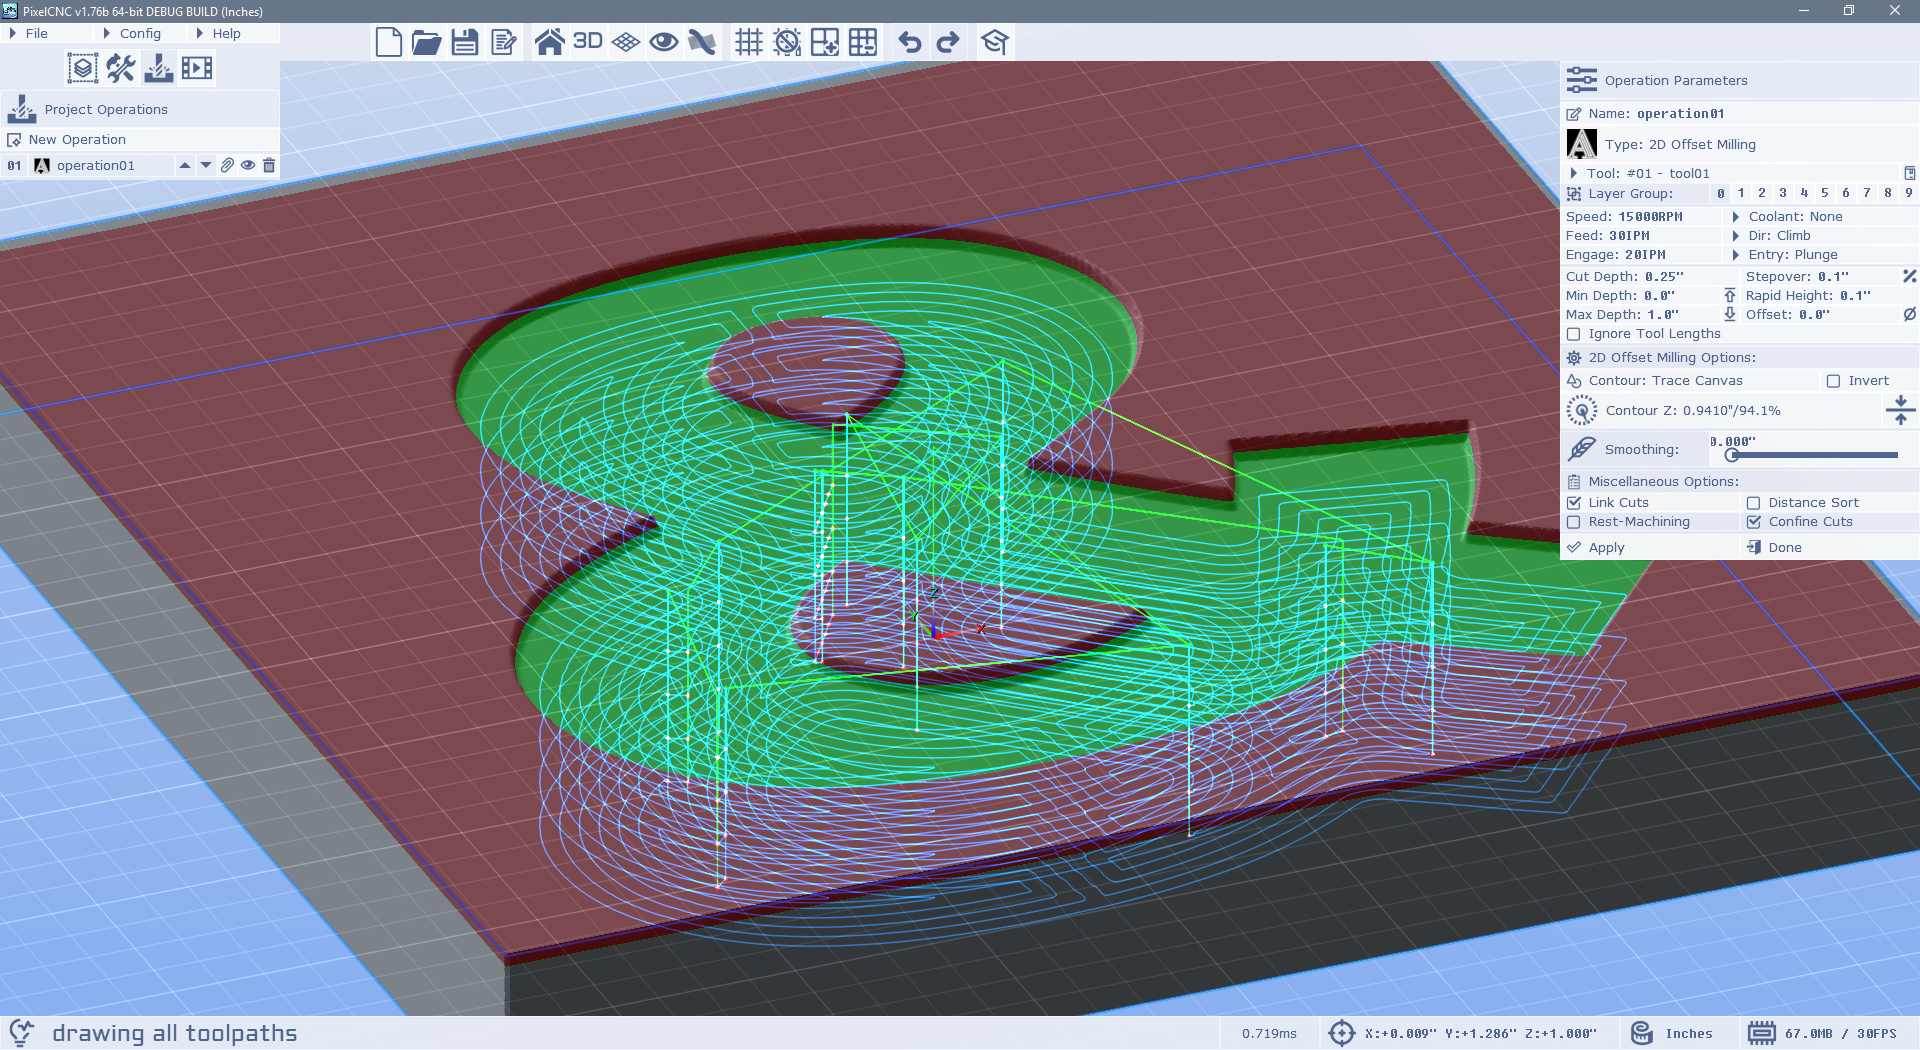
Here the ampersand only goes down 0.1" so I set my Contour Z on the 2D Offset Milling's parameters toward the top of the canvas where it intersects the contour of the ampersand at 0.95". Then I can set the Max Depth to reach the bottom of the canvas and have it generate cuts all the way down.
Hope that helps!
- Charlie
Thanks for your patience, I am new with PixelCNC and am still far down the learning curve...
I *think* I set the canvas to 0.5 depth correctly, if I haven't, please let me know what I have done wrong.
I switched to the 2D as you suggested, but curiously the calculations for the cutter size are different. With the same tool in 2.5D I get a cut of the full digit outline as shown in the last screenshot, but not to full depth. Using the same tool in 2D it only traces the widest part of the digits, but seems to go to the right depth:
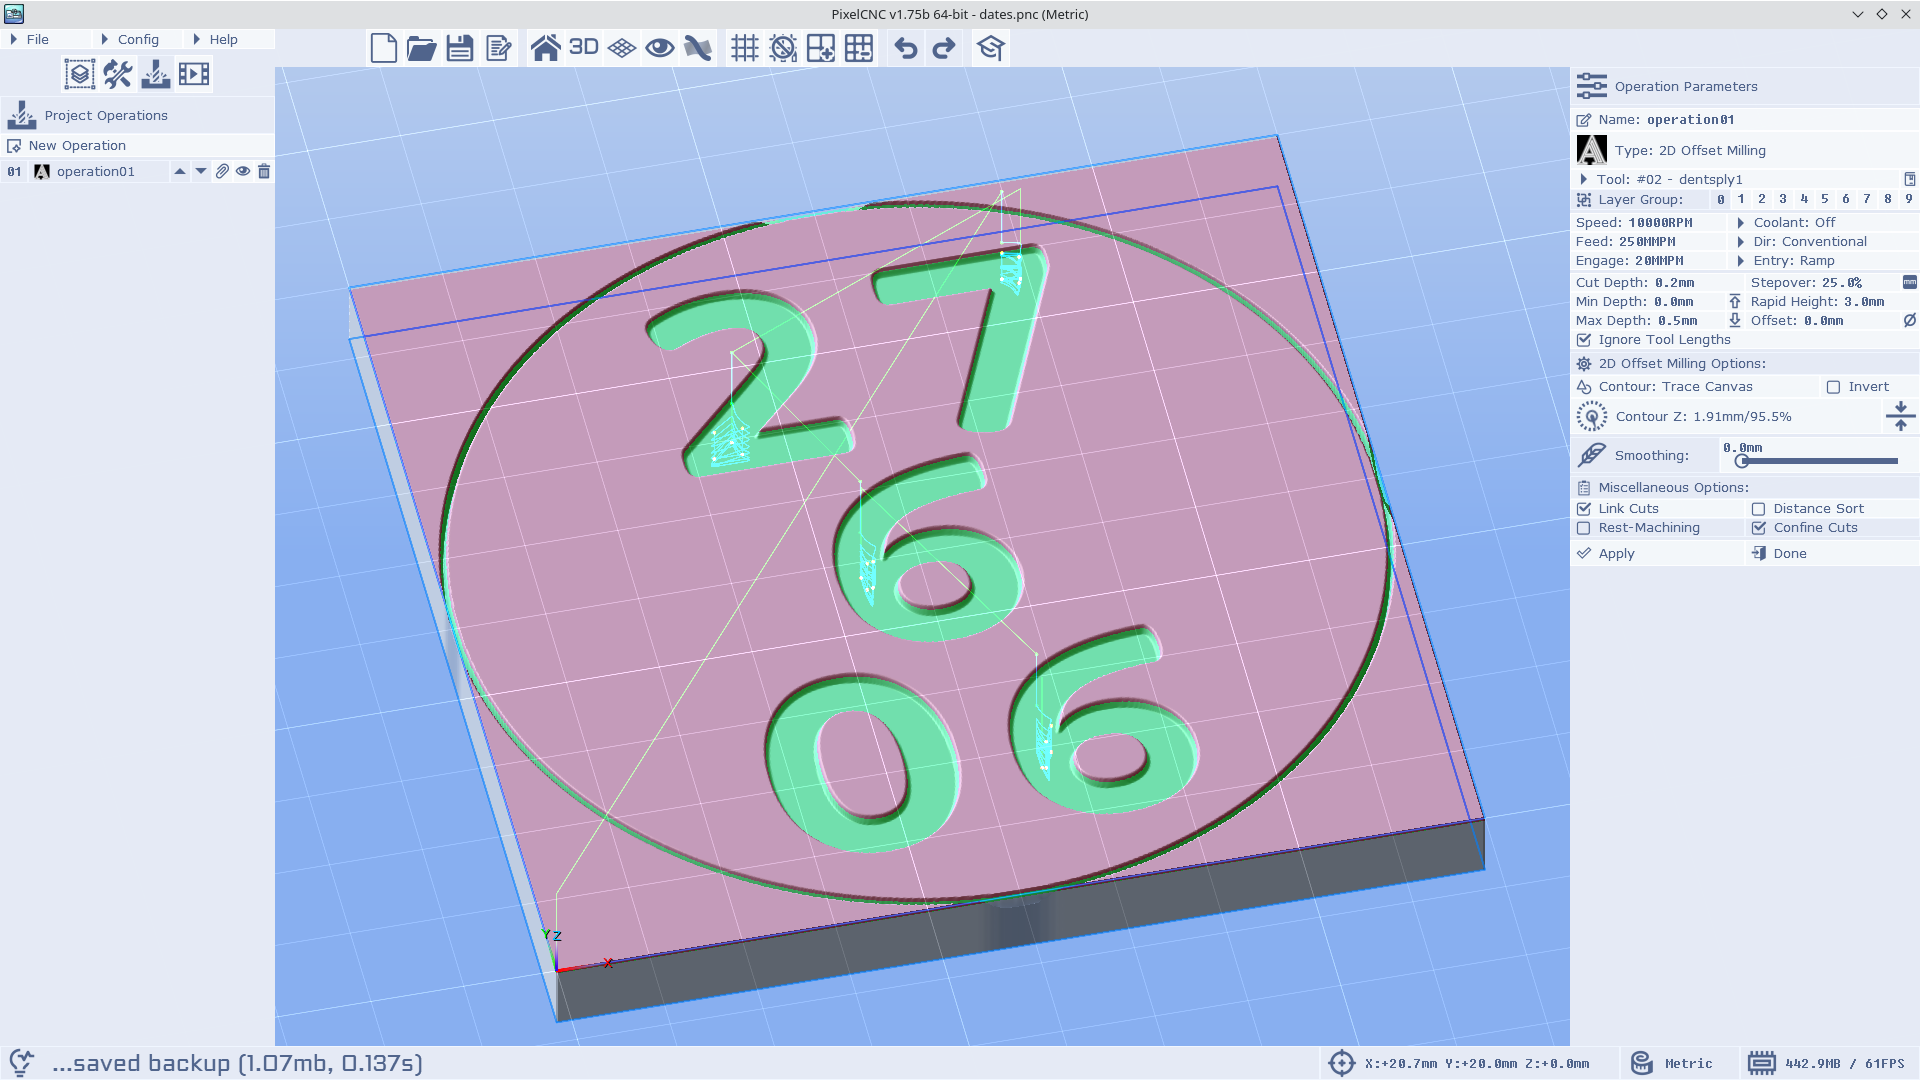
I need to reduce the tool diameter by about 1/2 to get it to trace the full digits:
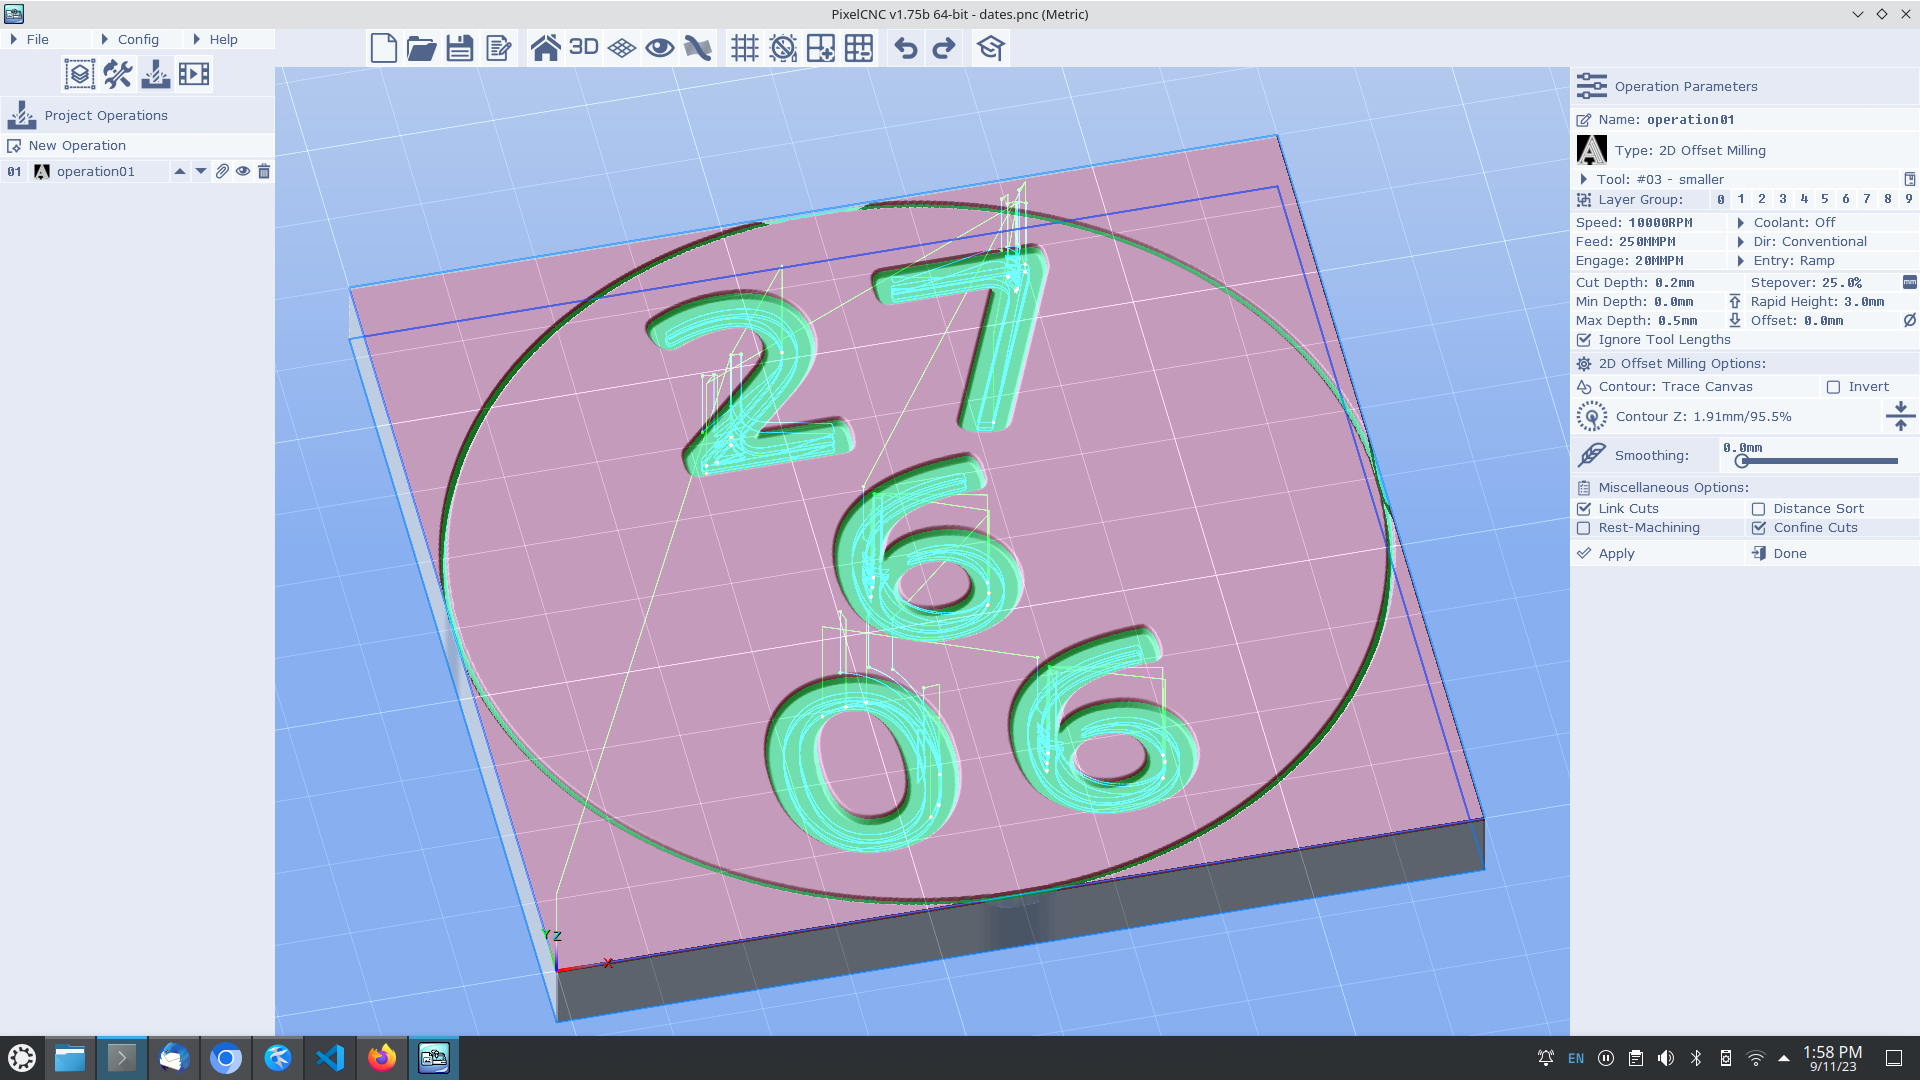
This seems very odd given that the two operations are attempting to do the same thing.
Thanks again for your help.
Pat
Hi Pat,
No worries, helping people make stuff happen with PixelCNC is all part of the job! ;)
So the canvas Z size is just the maximum potential depth cuts can be generated down to, but if there is content in the canvas volume that is higher than the bottom of the canvas then cuts will only be able to go down to that content with the 3D and 2.5D operation types. So if you want to cut some shapes into the workpiece they will need to be as deep was you want to cut when using a 3D or 2.5D operation. The canvas' Z size is the depth limit you'll be able to have shapes go, and why it's the Max Depth limit (unless the tool's length limits it first, and Ignore Tool Lengths isn't enabled).
With the 2D milling operations the canvas is only used to generate a 2D contour to generate cuts from, regardless of how shallow/deep that contour is generated at, and cuts will always go down to Max Depth.
I believe the reason you're seeing the cuts being offset way into the digits with the 2D offset milling operation is because of your tool definition. It automatically offsets the contour that cuts will be generated inside of by half of the cutter's diameter, where the diameter is the widest part of the flutes (typically the shank diameter for most tapered cutters). We might change this so that it only offsets cuts by the diameter of the cutter at Max Depth, rather than the full width of the cutter.
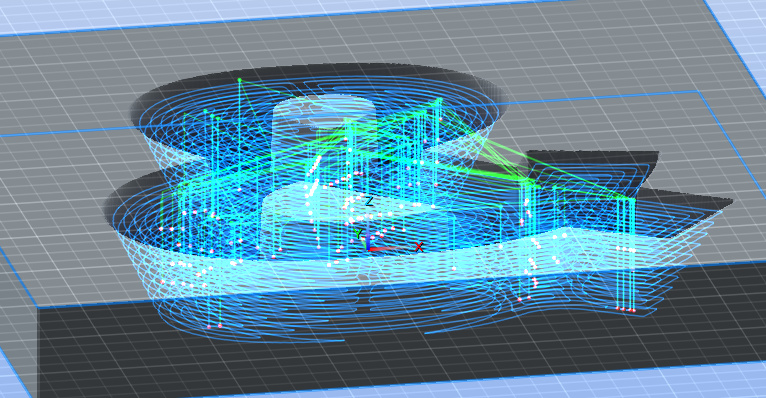
The 2.5D milling operations properly accommodate for the cutter's geometry at each cutting depth, so with a tapered cutter you will see cuts progress more toward the middle of pockets the deeper it cuts, as it's not able to keep the tool inside the boundary of the shape without moving it away from the edges of the shape at each successive cutting plane, like this:
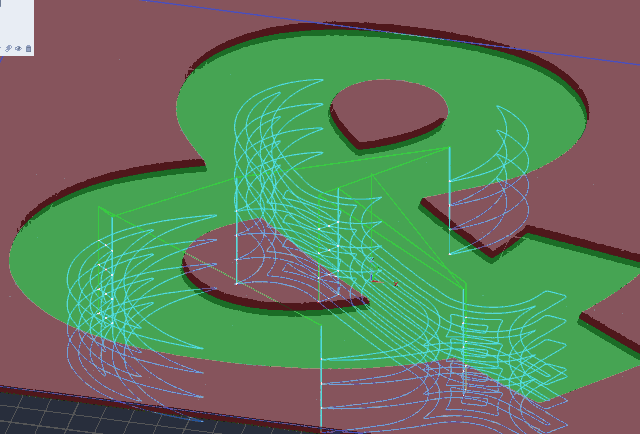
This is what happens when I generate a 2D offset toolpath with a big fat wide-angled tapered cutter, the cuts must be moved inward to accomodate the full diameter of the cutter:
So if it only cuts that top layer it will never reach the full diameter of the cutter, which is what you're seeing. You can fix this by creating a tool definition that only has a diameter for the depth you plan to cut, but I think I'll be changing it so that it automatically only uses the Max Depth the cutter will go to determine how far to offset the contour for a given tool.
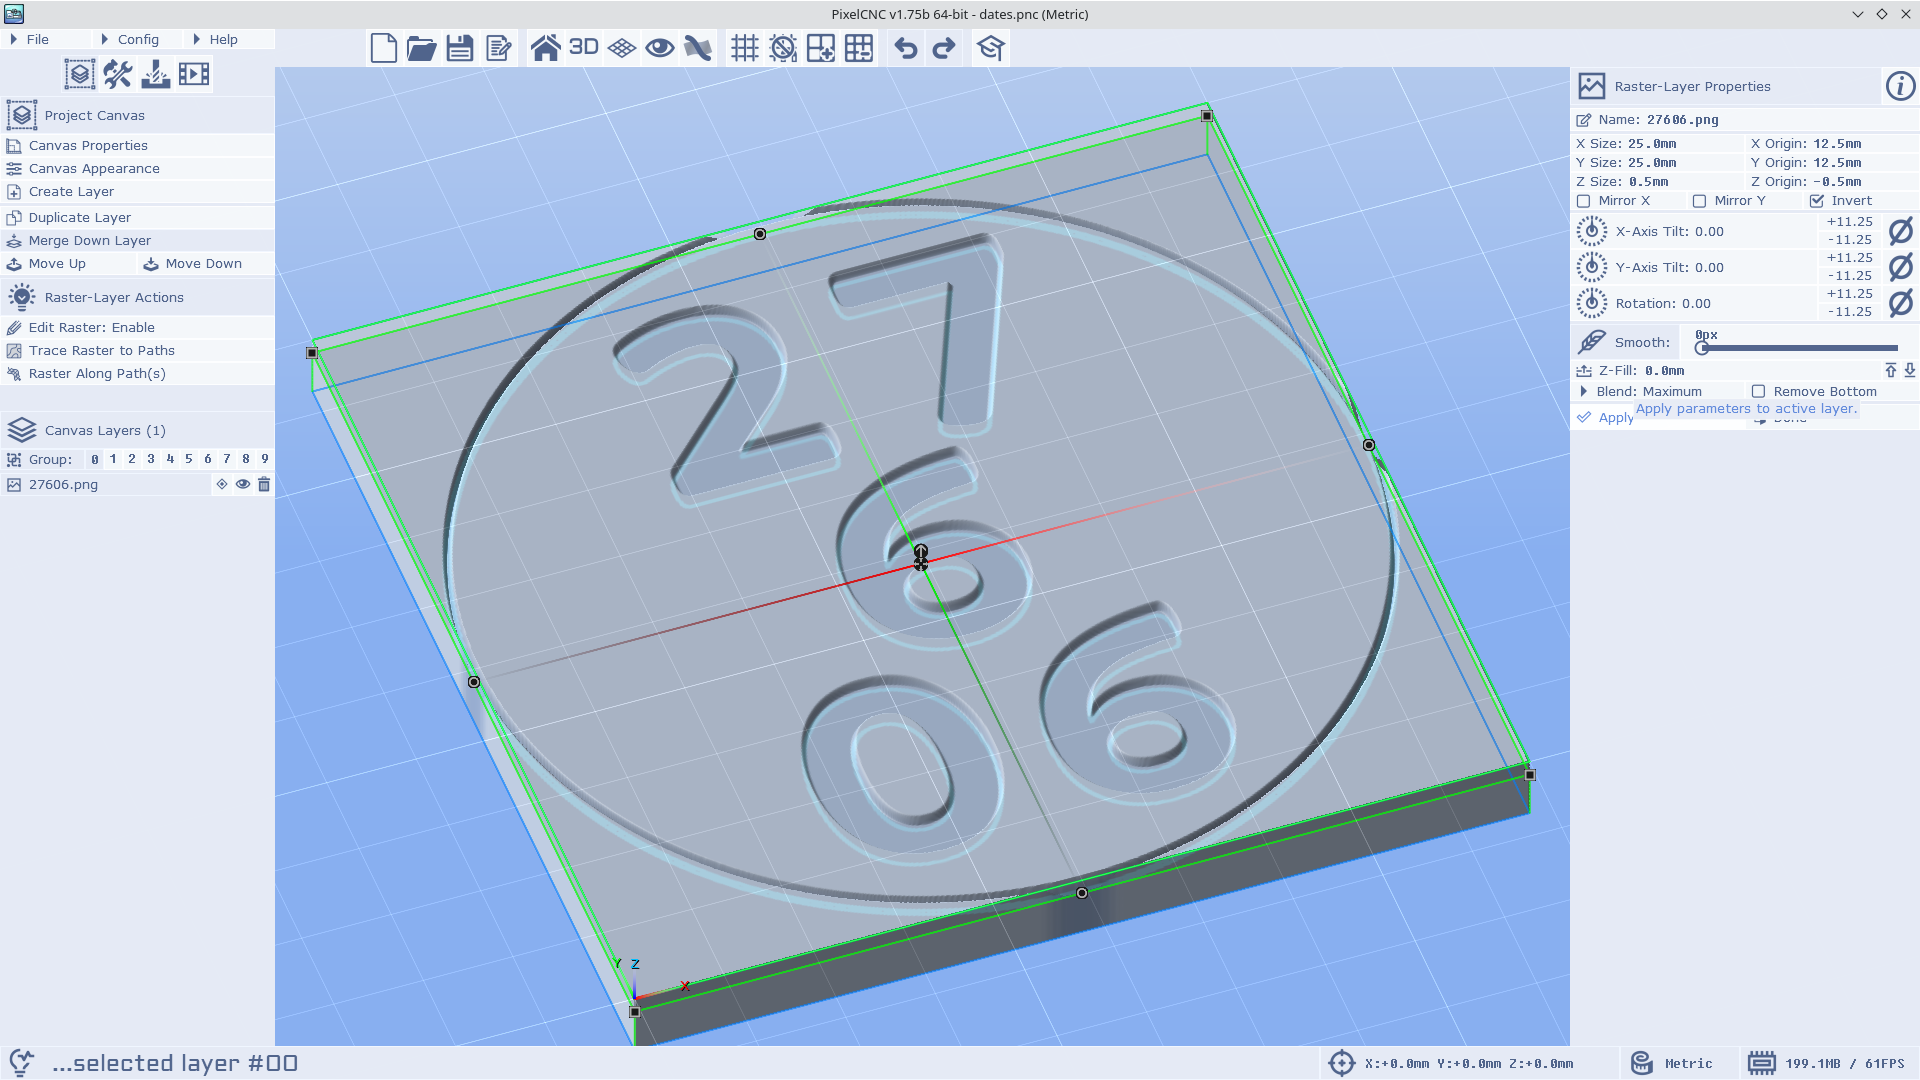
I think the best way to go is make sure that your digits are actually 0.5mm deep and use the 2.5D milling operation instead, to ensure that the tool is always cutting out to the edges for each cutting depth. You can see the depth of your canvas at any point by putting your cursor over the bottom of one of the digits and looking at the XYZ cursor position on the status bar, it will give you a readout of the coordinate (relative to the canvas origin) of the point on the canvas surface that the cursor is pointing to, like this:

This is with the canvas Z size set to 1 inch and the machine origin is at the bottom of the canvas, so with my ampersand being 0.1" deep the canvas surface only varies between 0.9" and 1.0" (from the Z origin at the bottom).
You *might* need to make your digits slightly deeper than 0.5mm, as there can also be a bit of contouring depth precision variance that results in the very bottom of a pocket not getting contoured even though it appears to be down to the Max Depth specified, because numerically it will looks like it's 0.000001mm above -0.5mm, due to floating-point rounding errors that can occur. We did add a tiny Z offset to a few operations' toolpath generation algorithm to mitigate this so you might be fine just making sure your digits are actually 0.5mm deep from the top of the canvas and calculating a 2.5D Offset Milling toolpath with a 0.5mm max depth.
Hope that helps!
- Charlie
I *think* I understand what you said, but will definitely need to read it a couple of times & spend some time on the machine to make sure I do. Your tip of rolling the mouse over to show the depth revealed the problem.
The circle around the perimeter was a different colour & it was 0.5mm deep as I would expect and as the layer properties showed. But the characters were black & I am guessing because of the greyscale creates heights thing were 0.2mm, which I didn't notice because the perimeter ring is very thin (markup only). Changing the imported image to all black has fixed the problem - everything is 0.5mm deep & the operation shows 3 cuts as expected.
I need to go back and work through the tutorial again, but I think that I am rolling now.
I appreciate your help, you have built a pretty powerful tool, it is going to take me a while to get to the bottom of what it can do.