
Learning to make a button required understanding how to make an interactable button that once pushed upon would output the fact and value of said push.
Using tutorials I started learning about using Overlapping actors, and moving component move to create a button that moves when the player pushed down on it using their controllers, this made a functional button for the player to interact with but would allow me to output the value of the button with further work.
To do this I start by creating a box, with a box collision on top, to act as the button and an arrow in the actor, the arrow will show the direction and how much the button will compress when pushed. Next, I created a button offset variable as this would be needed throughout the code to be used as the highest point of the button's compression. I then set the location of the arrow, button, and its offset using a SetrelativeLocation node.

Before I continue development into the event graph I need to set up the player's controller so that they actually have a collision and can interact with the box. The simplest way to do this is to give each hand its own sphere collision, a very simple solution but effective as this simple sphere will allow the player's hands to push against the box collision.
Moving onto the code in the event graph. The end goal is to have a button that will compress when the player pushes down on it with their controller. To do this I start by adding a GetOverlappyingActors node, as this outputs an array its output must be fed into an array length node to output how many actors are interacting with the button. Next, this value is passed into a greater-than node with the value set to zero which is then fed into a branch.
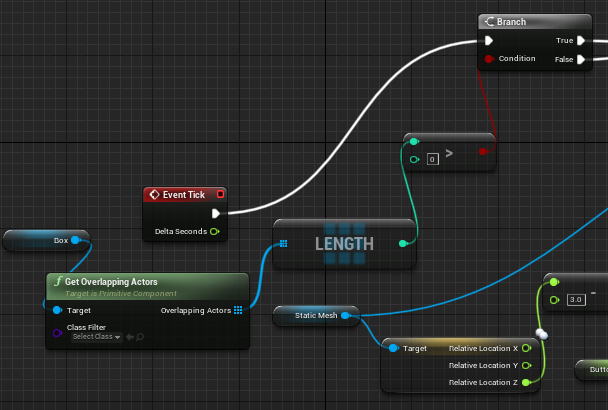
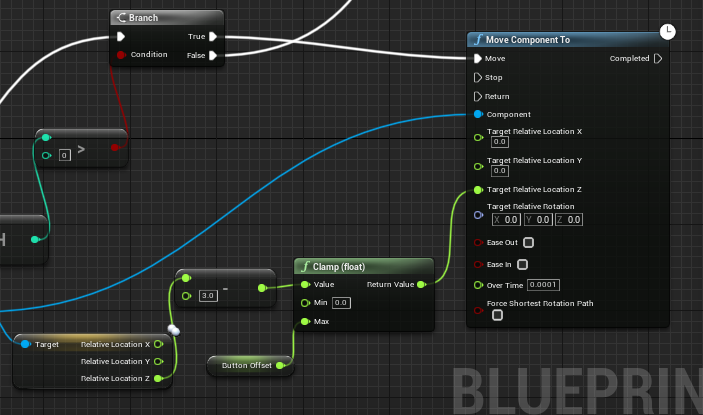
The true link of this branch passes into a Move Component To node, this node will do the actual moving of the button according to the player's input and requires two different inputs, the component, and the target relative location Z. The component is simply the static mesh that will move, which is in this case a cube, and the Target Relative Location Z is the position of the button on the Z axis, but the key fact is that this value can change and when it does the location of the button on the Z axis will change with it. To find this value we get the Z-axis location of the component, minus 3 from it to reduce the value of the Z-axis and push the static mesh downwards. Then we need to clamp this value between 0 and the button offset that was previously set, to do this we use a clamp(float), and finally, the output of this clamp is what is passed into the Target Relative Location z of the Move Component To node.
Moving onto the false link of the Branch it is a copy of the Move Component To node section however it is reversed, instead of subtracting from the Z axis it adds to it and therefore creates the decompression of the button once the player removes their hand from it.

Tutorial Used: VR Playground. (2021, December 3). Make a Button for Virtual Reality - Unreal Engine VR Tutorial. [Video]. Youtube. https://www.youtube.com/watch?v=30SgaL5CBB8&t=779s&ab_channel=VRPlayground
Moving on to lever creation:
Starting with the event tick node which will detect whenever the player grabs the handle and then will move the lever as a whole with the movement of the player's hand. Promoting a motion controller variable into to validate whether the handle has been grabbed is necessary to tell the code when and when not to move the lever.
Using GetWorldTransform to get the location, rotation, and scale of the handle and the motion controller we are able to make the relative transform of the handle equal to the movement of the player's hand, therefore creating the actual rotation of the lever.
Using and splitting the pins of the handles getworldtransform and makeRelativeTransform allows for adding the offset to the rotation.
To get this offset we use the combineRotators to offset the handle at the lever rotates, this is so that the handle actually tracks properly to the movement of the player's hand.
Because we know that our transform is centered around the handle that means that the handle is at the origin of the new transform, because of this we can just make a vector at the start instead of finding where it is manually.
The reason we set the origin to the handle is that we can use the XYZ values from the handle to add on the new rotation instead of just setting it to give a more seamless and dynamic movement to the lever.

Continues below.

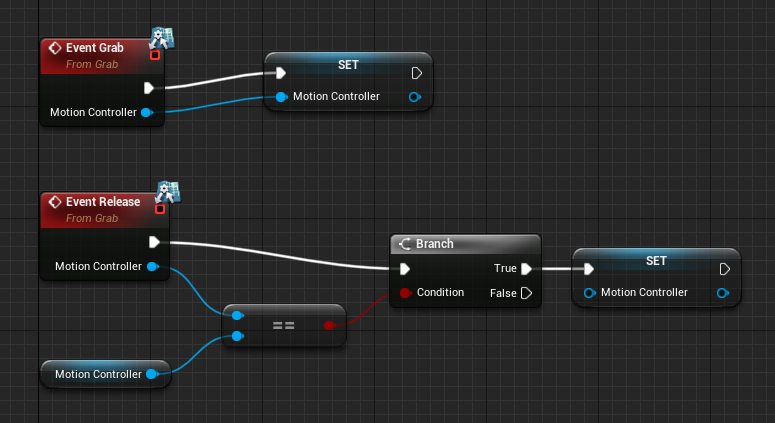
Creating the events was an entirely new concept to me, to do this I had to create a blueprint interface with two functions inside, grab and release. Both of these functions take inputs from a variable called MotionController which is a motion controller variable. Creating this interface allowed me to create the events for grabbing and releasing.
Creating grab was simple, all that was needed was to set the Motion controller variable so that it could start to interact with the lever's previous code.
Then oppositely release was also as simple, the motion controller had to be reset to null in order for it to stop affecting the lever, therefore getting the controller's original variable and just resetting the variable was all that was needed.
After finishing the lever and hand blueprints, I complied and found the lever movement with the user's hands whenever it wasn’t grabbed and when it was grabbed It would stop moving. I quickly realised the problem, in the blueprint I had accidentally switched up the Event Grab and Event release code, a quick switch back and the test showed a working lever ready to be used.
To actually use this code I need to be able to call the events. I will begin my getting the GrabLeft from the VR pawn blueprint, I'm going to add a sphereOverlapActors node, pass the motion controllers location in using the GetWorldLocation node, set the radius to 20, and finally pass in an array to the object type using the Make Array node and set it to world dynamic. Next, add a For Each Loop with Break node and a Does Implement Interface node and add the Grab interface into the interface section. This will keep running the code as the interaction is used and check if the interface is being used. Next, a branch is implemented to continue running the code only if the grab interface is being used. Next, I promote the Array element output into a variable name Left Grab Actor because this output is now the left motion controller using the grab interface, afterwards, I pass the Left Grab Actor variable into the Grab function along with the Motion controller left variable. Now I need to implement the release code as the player needs to be able to let go of the lever, from the released pin of the InputAction Grableft event node I make use of the left grab actor variable and convert it to a valid get, this will allow me to only run the release function if the Grableft is released. Finally, I add the Release function, pass in the left grab actor and the motion controller left variable, and then set the left grab actor back to null so that when it is released the player stops interacting with the lever.
This is all done the same for the right hand too, I just copy and paste the nodes but replace the left grab actor and the left montioncontroller variable with their right counterparts. At this stage, I did make a mistake and during testing, the right could not actually let go but this was only because i missed the last Set RightGrabActor node and therefore it was never set to null when letting go.

Continues below

Tutorial Used: VR Playground. (2021, December 17). How to make a lever for virtual reality with Unreal engine. [Video]. Youtube. https://www.youtube.com/watch?v=SXYlSNfoIdI&t=926s&ab_channel=VRPlayground