
Another beautiful piece from my favourite indie game developer! Do I want to play Baldurs gate 3? NAH! Do I want to play Helldivers 2? NAH! I want to play Static Angels. It's absolute poetry. In all seriousness this game it's lovely, is beautifully written and I really like the visuals. <3 >¦:)
A member registered Oct 19, 2021 · View creator page →
Creator of
A short game about walking. Made unity Unity without tutorials :). Move using WASD and interact using space.
Adventure
Play in browser

Play as a laser shooting shark and get enough points to face the ultimate final boss...
Action
Play in browser
Recent community posts
Wanting to create a 3D VR function player menu seemed like the hardest challenge yet.
It was definitely difficult, but mostly involved the use of UI in Unreal to make the screen and the buttons, then calling the script after the button was clicked which is a function inside unreal itself. On the first watching of a couple of tutorials, I really realised how much of a well-made and detailed game creation engine Unreal Engine is, If you are trying to make something that then the engine has been designed to accommodate it's such an intuitive and understandable tool.
Virtus Learning Hub. (2022, July 22). Build User Interfaces in VIRTUAL REALITY for Unreal Engine 5 [Video]. Youtube. https://youtu.be/kM27HYbpvc0
VR Playground. (2021, June 25). Create and Interact with UI for Vitual reality - Unreal Engine Virtual Reality Tutorial[Video]. Youtubehttps://www.youtube.com/watch?v=H5nVjSwM_Uk&ab_channel=VRPlayground
VR Playground. (2022, February 25). Pop-up User Interface for Your Wrist in Virtual reality [Video]. Youtube https://www.youtube.com/watch?v=lgsR1g-5HKE&ab_channel=VRPlayground
The tutorial I actually used: VR Playground. (2022, September 16). Make a Simple Main Menu for Virtual Reality![Video]. Youtube https://www.youtube.com/watch?v=WzNpasjj_VM&ab_channel=VRPlayground
After breaking down this barrier to entry by understanding that fundamentally the menu system will be the same UI system as it would be for any game made in Unreal engine I found it a lot easier to approach. My plan became to just make a simple UI of two buttons, the start and quit, this would display the fact that I could make the buttons but also that in future development could introduce new parts to the system. After the addition of the buttons all I would need to do is interact with the UI, my previous work in making VR games in Unity meant that I understood the common practice of using a raycast and displaying a beam between the player's controller and the menu. This all meant that beginning development using the tutorial I was able to focus on deconstructing what each node could do rather than trying to understand the idea behind the feature itself, and overall helped a great deal with the actual learning I took from this work.
Development of a main system begins with creating a UI widget blueprint and adding 3 essential components. First, a canvas to act as the base for the rest of the components, a vertical box to store to two buttons together so they can move as one object, and finally two buttons, one for starting the game and one for quitting. Making two simple buttons opens up the ability for future development. Both buttons have text to display start and quit on them. Moving over to the development of the actual functionality I switch to the graph editor and Drag out the two on-pressed events for the two buttons, for the start button all that was needed was an Open Level node, which opens a level according to its input when pressed.
Similarly, the Quit Button was very simple, the Quit Game node with the Get Player controller node fed into it as the specific player is all that is needed.

To make the menu display all I had to do was create a blueprint widget actor by creating a normal blueprint actor but adding the widget component and then setting its widget class as the main menu UI that I just created.
After creating a menu that is displayed and has functionality all I need is a way to interact with the menu, as previously stated I knew that creating an interactive line from the controller to interact with the menu from a distance is the best way to do this. In unity the use of a raycast to connect with the menu is the best option, however, I was unsure about its counterpart in Unreal.
Creating the WidgetInteraction code dove me headfirst into widget manipulation which was an aspect of Unreal that I hadn’t explored greatly before, this meant understanding this work process took a large amount of time as I didn’t just want to copy out what the tutorial said. To help with understanding this new function knowledge I read through the API listed below just to reinforce my understanding of the nodes used when interacting with widgets.
Unreal API writing Team. 2021. Break Hit result. https://docs.unrealengine.com/4.27/en-US/BlueprintAPI/Collision/BreakHitResult/
Unreal API writing Team. 2021. Mesh Component properties. https://docs.unrealengine.com/4.27/en-US/BuildingWorlds/BlueprintSplines/Reference/MeshComponentProperties/
Unreal API writing Team. 2021. Set Start and End. https://docs.unrealengine.com/4.26/en-US/BlueprintAPI/SplineMesh/SetStartandEnd/
Unreal API writing Team. 2021. Is Over Hit Test Visible Widget. https://docs.unrealengine.com/4.26/en-US/BlueprintAPI/Interaction/IsOverHitTestVisibleWidget/
Using unreal API to break down each node really helps to put into perspective and understand what inputs and variable types the node needs.
Drb1992. (2018). Is Over Hit Test Widget Returning True. https://forums.unrealengine.com/t/is-over-hit-test-visible-widget-returning-true/422023
I equally read through a couple of forum posts about different problems people had come across when using these nodes in case I came across similar situations.
Unreal API writing Team. 2021. Using the OnHit Event. https://docs.unrealengine.com/5.1/en-US/using-the-onhit-event/
Unreal API writing Team. 2021. How To Perform AR Hit Testing. https://docs.unrealengine.com/5.1/en-US/how-to-perform-ar-hit-testing-in-unreal-engine/
During this rabbit hole of extra understanding, I also came across using the same node In UE5 but also implementing it into an AR scenario which I found extremely interesting and will be revisiting.
Continuing with the development of widget interaction, I started by creating a new pawn, as a normal main menu level would not be the main level of development but instead a sub-level just for the menu, in this case, there’s no need for the actual VRpawn so a new pawn with just a camera and the Widget interaction components is needed.
I add a camera, and add two motion controllers, changing one's motion source to right as by default they are both left, for each of these I add a widget interaction component.
Now the tutorial addresses trace channels which can cause issues with the widget component if they aren’t on the same channel they may not be able to interact with each other. In this case, both the widget interactions and the main menu widget need to be set to world dynamic. Another small detail is changing the pointer index of one of the widget interaction components as if they are the same one or the other just won't work.
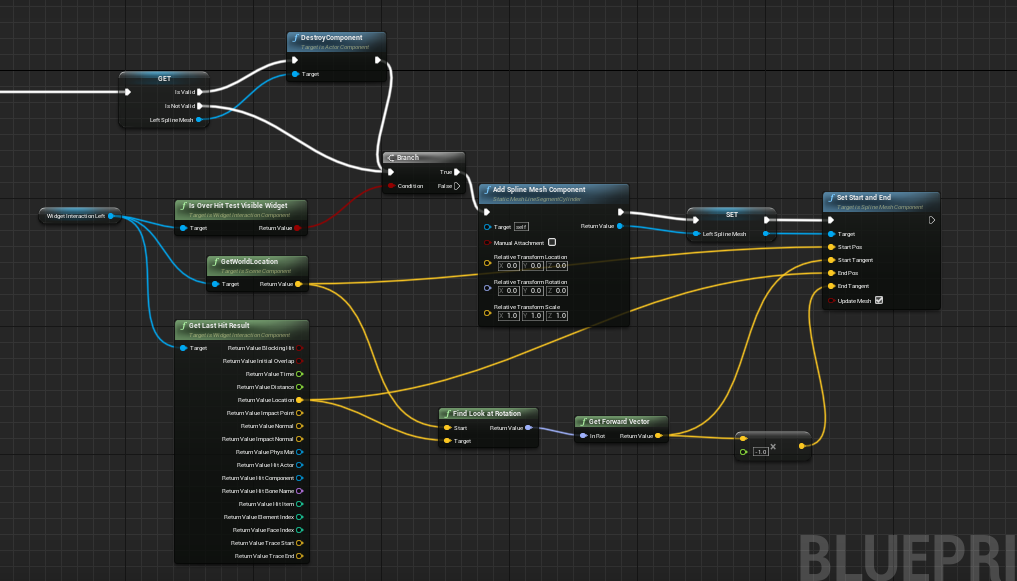
First I create a function for the widget interaction pointer. Starting with a sequence I bring in the left and right widget interaction components, using a Is Over Hit Test Visible Widget to make sure that the pointer is over an actually interactable menu item when it's shown and make sure it isn’t just constantly showing. Next, I need a Get World Location node to get the location of the widget interaction and a Get last hit Result to output what has been hit for reference checking. Using an Add Spline Mesh component and a branch that branches off the Is Over-hit Test Visible node. First off I give the Add Spline mesh Component a static mesh to show the interaction beam, in theis feature I used the LineSegmentCylinder as It's a good representation of a beam. However Initially I had trouble finding this static mesh and had to research into enabling Unreal’s engine content in the view option, this is very useful information for future development. Continuing off I promote the Spline mesh component to a variable, this will be used to set start and end points using the Set Start and End node. The start position will be the location of the player controller and the End point will be the Last hit location. The values are gotten from the Get World location and Get Last Hit result node. The start tangent needs the direction that the player controller is facing therefore I add a find look at the rotation node feed that’s output into a get Forward Vector to turn the rotation value from the find look at the rotation node into a vector. This conversion was necessary as the Start Tangent input must be a vector and the Find Look at rotation node outputs a rotation. Finally, the End tangent is simple seeing as I have already found the start tangent, all I need to do is multiply the start tangent by -1.
Before the interaction widgets are done all I need to do is take the Left Spline Mesh variable, convert it to an is valid and if it is valid I need to destroy the component. This is necessary as if the component wasn’t removed it would stay on the player's screen and would build up with more and more newly made ones as the player uses the menu. This code is all copied for the right pointer with the variables switched to work for the right instead of left.
Moving onto the event tick in the event graph I need to always run this function which is done by just feeling the event tick into the Widget interaction Pointer function.

Finally, to actually have the controller triggers interact with the buttons, I use the InputAction triggerLeft, which is the in-built event in unreal for when the player presses the left trigger. Using a Press pointer Key and release pointer key node for the widget interaction components and feeding in the pressed output of the triggerleft even and the widget interaction variable I am able to press and release the menu buttons.
All that is left is to set the Menu Pawn to auto posses and auto receive input from Player 0 and I have a working menu system.
Returning To improve the menu.
After working on the other features I wanted to return to the main menu to make explore Unreal's UI tools more and hopefully create a better looking Main menu instead of the simple white buttons I currently have in the scene, this started by using this tutorial linked below to learn about how to change the button when the player hovers over it, spacing between the buttons, and to create other menu pieces.
Reids Channel. (2020, December 9). Unreal Engine - 3D Menu Tutorial[Video]. Youtube https://www.youtube.com/watch?v=4sxxe9_w9Zs&ab_channel=ReidsChannel
I set the buttons up using the on hovered event to change to a red tint rather than just the normal white in order for the player to know which button they were about to select instead of having to guess when they had a button selected.
Next, I implemented space between the button just to move them apart so that the menu didn’t look so compact and used a border component above the vertical box to change its colour into a brown hue to make it blend more with the virtual environment.
Finally, I planned to use the transition to event and functions to switch between different menu options which would allow me to create an options menu with sliders.
Learning about making UI sliders I used these tutorials:
GameDev&Coding. (2022, May 31). HOW TO MAKE A SLIDER WITH CUSTOM COLORS/MATERIAL UE4[Video]. Youtube https://www.youtube.com/watch?v=nulVlIz1x9Y&ab_channel=GameDev%26Coding
VR Playground. (2021, December 10). Make a Slider For Virtual Reality - Unreal Engine VR tutorial[Video]. Youtube https://www.youtube.com/watch?v=If4JQOQYeD4&ab_channel=VRPlayground
Sadly at this point, I made my source control error and lost the whole Main menu system, and had to start from scratch. Because of time constraints which I had only myself to blame for I had to leave out the Improved menu features and just created the base one to prove I could create a menu that in future development could be made into more.
This was one of my biggest learning experiences from the whole development process and in the future, I will definitely be using applications like Github as source control so that I can’t lose all of my work in a simple mistake.
Dev blog for VR community · Created a new topic My next goal was to create and comfortably texture of house
The process of creating an in-game interactable building felt like the first development process in that I could do the majority without needing to use a tutorial, therefore I did less work before beginning development and later felt this come back to bite me as I struggled to properly texture the building.
Starting out I looked through the unity asset store to find some house assets that I could convert over to unreal, after finding a couple of asset packs, for example, I realised that most didn't have the inside of the houses included and were instead just boxes. After realising this wouldn't give me wanted I attempted to create a house of out cubes in unreal and texture it. I was able to create a house of simple cubes and texture it with textures found online but this create stretched textures and meant that in the end I was dissatisfied with the product and decided to restart.
For the final time, I decided to use Unreal assets as I have a module house asset pack already and it would allow me to build up houses with an inside space for furniture and therefore be the perfect asset to implement. Implementation was easy enough, downloading the assets into the scene and then dragging the actors into the worldview, and setting their textures properly were all problems i had overcome before and did not pose much of a challenge.
However, difficulty arose when trying to plan my methods for changing textures in real-time. I hadn't considered that the show itself would need to be a blueprint actor in order to change the textures affecting it.
In order to flip between two textures for the house I knew from previous work I'd have to use a dynamic material but didn't understand how I could make a system that flips between two different materials at the click of a trigger.
Unreal API writing Team. 2021. Set Material. https://docs.unrealengine.com/4.27/en-US/BlueprintAPI/Rendering/Material/SetMate...
The setMaterial node was the first I came across when attempting to set the material of the house to one of the others provided in the asset, the API was very vague and was unhelpful during development. Whilst when attempting to use a sequence to flick between the two different desired materials I found that after clicking the trigger the material would not be set to the next and instead stay on the material set to the static mesh when I added it to the blueprint.

I created the code seen above to switch between each material when the player pressed the trigger but instead nothing happened.
During research into how to get the controller input to actually affect the sequence and change the material I had a source control error where I lost a large amount of my work and started from scratch on the material-changing feature
After this loss of work, I decided to do the same as before up to the point of programming where I would just follow a tutorial and learn from that.
Tutorial Used: Dean Ashford. (2018, July 8). UE4 - tutorial - Change Textures at Run Time. [Video]. Youtube. https://www.youtube.com/watch?v=FY5P8-9MYfg&t=313s&ab_channel=DeanAshford
To start I had to initialise the base material as a dynamic material instance to allow the texture to change, to do this I added a Create Dynamic Material Instance and a Set material node, these two nodes paired together initialise the actors material as a dynamic material that can be changed in real-time. Then using an Enable Input node and feeding in the player's controller with the Get Player Controller node I am finally able to have the player trigger the switching of the textures.
Lastly, all that is needed now is to actually allow the player to trigger the switch, to do this I used the inputAction triggerLeft event which is an inbuilt event from unreal, then feed the pressed output into a flip flop node. Using a flip-flop will allow me to just flick between the textures with each press, eliminating the need to reset the material. Finally using the Set texture Parameter Value I can change the base color parameter of the actor. At first, this solution did not work for me but my new knowledge showed itself whilst I was debugging as I deconstructed the possible issues in my head and quickly realised that I must not be promoted the texture in the material to a parameter, which turned out to be correct.

Dev blog for VR community · Created a new topic Making a Brush and whiteboard tool and learning about many material tools
My initial idea for the brush and canvas feature was a table that could be drawn on, a similar idea to the planning map in Due Process where before the team start a mission or enter a fight they can draw their battle plan on said map and see a layout of the game map too.
To begin creating the drawing surface I needed a couple of things before I could start coding. First, two materials, one for the drawing surface and one for the drawing brush. The drawing surface material doesn’t particularly matter as later on once coding begins the surface texture will be overwritten. With that in mind all that is needed is a texture parameter so that it can be called later, the texture itself doesn’t matter.
The drawing brush material is equally as simple, just a vector colour parameter which decides what colour the player can draw with.


The next actor to set up was the actual drawing surface, starting by adding a plane into a normal blueprint class actor and giving it the drawing surface material all the pieces to begin development were prepped.
Firstly the plane and material needed to be set up with dynamic materials. This is because the player is going to be affecting the material of the plane in real-time, the plane, therefore, needs to be able to update dynamically with the player's drawing in order to actually enable drawing in the first place. To do this in the construction script we need to initialise the plane as the target for the drawing, the material of the plane as the dynamic material and the brush as the effecting dynamic material.
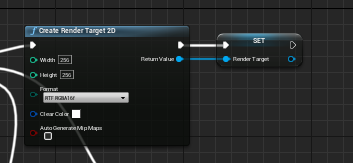
Using a create render target 2d node and promoting that into a variable I initialise the plane.
Using a Create Dynamic Material Instance, getting the drawing surface material using a Get Material node and passing the plane into that I instance the material created earlier as dynamic. Then passing that value into a Set Texture Parameter Value node and a Set Material node I can change the dynamic material. The Set Texture Parameter Value node is the reason the drawing surface material needed a parameter for the texture. Passing the render target in the Set texture parameter Value node and the Plane into the Set Material node means that the plane material is altered and the render target which was previously set, is set as a dynamic material whilst its parameter node “Texture” is altered.

Finally, the brush needs to be set as a dynamic material and output for later use, to do this I use a Create dynamic material instance node, pass the drawingBrush material as a parent and promote it to a variable.

Continuing after construction, I moved on to making the function that will use the constructed variables to draw onto the plane.
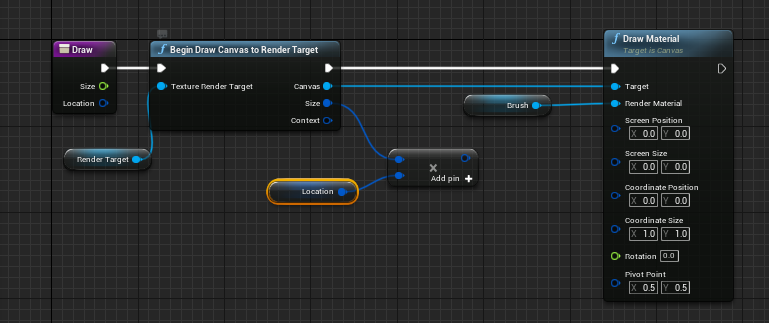
We start by using a Begin Draw Canvas to Render Target node and pass the render target into it, this outputs the render target(the plane) as three key values, the Canvas, size and context.
After using the begin draw canvas to render the target node which allows the player to actually interact with the canvas(plane) with the draw brush component and update the dynamic material, I became stuck.
Watching through the walkthrough I added a multiply, and because my knowledge of unreal is still developing I missed a very simple mistake, I added a vector2d multiplied by float multiply node. This meant that I couldn’t pull the vector2d value variable of the location and therefore could not actually draw accurately on the canvas and also not actually finish the code.

Debugging this took an embarrassingly long hour and a half but taught me a very valuable lesson. When looking through code to find problems start with the most simple but also most recent reason that the code could not be working and work backwards from there.
Working forwards from the start of this code which uses brand new nodes for me, for instance, the begin the draw canvas to render target and create dynamic material instances, sent me down a rabbit hole of reading through unreal engine API to find my problem and inevitably learning a lot but also not finding out how to fix the code.
Unreal API writing Team. 2020. Begin Draw Canvas to Render Target. https://docs.unrealengine.com/4.26/en-US/BlueprintAPI/Rendering/BeginDrawCanvastoRenderTarget/
Unreal API writing Team. 2021. Create Dynamic Material Instance. https://docs.unrealengine.com/4.27/en-US/BlueprintAPI/Rendering/Material/CreateDynamicMaterialInstance/
Unreal API writing Team. 2021. Instanced Materials. https://docs.unrealengine.com/4.27/en-US/RenderingAndGraphics/Materials/MaterialInstances/
Unreal API writing Team. 2021. Material Instance Editor User Guide. https://docs.unrealengine.com/4.27/en-US/RenderingAndGraphics/Materials/MaterialInstances/Editor/
The most valuable knowledge from reading these APIs, in my opinion, includes: understanding that materials can be changed as an object is being affected, meaning that for instance as something burns even though it’s not actually burning you can change the material dynamically to make it look burnt; Understanding that material hierarchies are parent-child relationships for future when creating complex materials; the fact that you can you nodes to affect the inputs of the material, like using a constant to change the roughness value; different parameters are used for each input of a material, like using a simple vector for colours but using scalar parameters for metallic and roughness values.
The list of API read knowledge continues with the information I didn’t think of using or use in my current development but think would be useful for future work, these include: using static parameters to switch between two different materials depending on a boolean true or false input could be useful for team colours e.g. if one team is red and the other is blue and you want to use the same material but the change between the colours; this documentation also details the uses of the create dynamic material instance node and helped me to understand it’s used for more than just what I’d been told, a material instance during gameplay, can be used in construction script but also event graph(handy), can be fed parameter materialised materials or constants, and all this allows you to effect and change the material of an object however you need during runtime.
Moving onto the Material Instance Editor, a tool in Unreal that I’d never really investigated before, Learning about this crucial part of the system became instantly necessary as I started to read. Learning about the details plane and how it can allow you to change parent material, physics material, adjust how this material Instance influences the lightmass build and override some properties from parent materials in the material being worked on.
This editor opens up a wide range of possibilities for working on materials in unreal, for example overriding material instance parameters, and being able to customise their parameters whilst also having a viewport where you can see the effect of these changes is an extremely useful tool for optimising workflow.
After finally noticing the float input of the multiply variable and changing it to a vector2d multiplied by a vector2d I was able to take the location variable and continue with development.
In the next step of development, I instantly added a subtract by float node instead of vector2d but this time noticed and corrected my mistake.
Moving onto the final inputs for the draw material node, splitting the struct pin of the screen size allows me to add a flat as the variable instead of a vector2d and for this, I input the size variable. For the screen position, it’s a little trickier, because screen position is a vector2d that can’t be changed, I, therefore, have to divide size by two and input this value into the split struct pin of the subtract variable. This then converts there float variables with the location vector2d variable into a vector2d variable which outputs the size and the position of the canvas.
After this, I am not able to draw on the surface and the only thing left to do is to stop drawing, to do this all that is needed is to pull the context from the draw canvas to render target node into an end draw canvas to render target node and add it to the end of the code.

Finishing off this feature involved just setting up the player's trigger so that the right hand can draw on the canvas.
Learning to use the lineTraceByChannel node to create an interactive line between the controller and the canvas which will allow the player to draw on the canvas without having to put their controller right up to the canvas itself.
The logic behind deciding where the point of the line will start and where it will end is simple, just get the location of the motion controller by calling its variable and then using the getWorldLocation node and setting its location as the start. Then by using the GetforwardVector to get the direction that the controller is facing and then multiplying it by a number and then add said output to the world location of the motion controller, with this value which is now the location of the motion controller by a set amount ahead of it this becomes the endpoint and sets the range of the draw tool.
Using a break hit result node which outputs the actor that is hit by the line from the linetracebychannelnode, I pass the actor into the CastTodrawingSurface object which allows the player to draw and finally output the hit into the find collision UV to pass the UV of the actor into the draw function to be used.
The code then passes in the as drawing surface from the CastToDrawingSurface node into the Draw function, the function has all of the variables it needs and the player is able to draw.

In this screenshot, there is one simple error that meant once I started to test the drawing function nothing happened.

I forgot to attach the gate output to the start of the LineTraceByChannel node and therefore the rest of the code, meaning nothing happened, after a quick check over all code created for this feature I found the problem and learnt another lesson, don’t fully trust in the compile to flag problems.
Here's the finished code block for this section:

The tutorial used: VR Playground. (2022, November 4). Drawing on Surfaces in Virtual reality. [Video]. Youtube. https://www.youtube.com/watch?v=oggaY0ZlJJE&ab_channel=VRPlayground
Learning to make a button required understanding how to make an interactable button that once pushed upon would output the fact and value of said push.
Using tutorials I started learning about using Overlapping actors, and moving component move to create a button that moves when the player pushed down on it using their controllers, this made a functional button for the player to interact with but would allow me to output the value of the button with further work.
To do this I start by creating a box, with a box collision on top, to act as the button and an arrow in the actor, the arrow will show the direction and how much the button will compress when pushed. Next, I created a button offset variable as this would be needed throughout the code to be used as the highest point of the button's compression. I then set the location of the arrow, button, and its offset using a SetrelativeLocation node.

Before I continue development into the event graph I need to set up the player's controller so that they actually have a collision and can interact with the box. The simplest way to do this is to give each hand its own sphere collision, a very simple solution but effective as this simple sphere will allow the player's hands to push against the box collision.
Moving onto the code in the event graph. The end goal is to have a button that will compress when the player pushes down on it with their controller. To do this I start by adding a GetOverlappyingActors node, as this outputs an array its output must be fed into an array length node to output how many actors are interacting with the button. Next, this value is passed into a greater-than node with the value set to zero which is then fed into a branch.
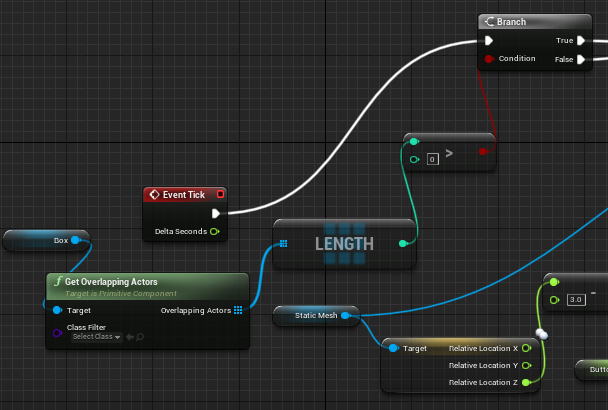
The true link of this branch passes into a Move Component To node, this node will do the actual moving of the button according to the player's input and requires two different inputs, the component, and the target relative location Z. The component is simply the static mesh that will move, which is in this case a cube, and the Target Relative Location Z is the position of the button on the Z axis, but the key fact is that this value can change and when it does the location of the button on the Z axis will change with it. To find this value we get the Z-axis location of the component, minus 3 from it to reduce the value of the Z-axis and push the static mesh downwards. Then we need to clamp this value between 0 and the button offset that was previously set, to do this we use a clamp(float), and finally, the output of this clamp is what is passed into the Target Relative Location z of the Move Component To node.
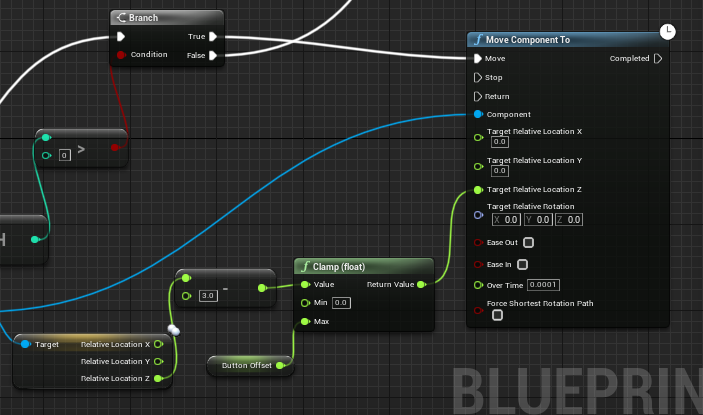
Moving onto the false link of the Branch it is a copy of the Move Component To node section however it is reversed, instead of subtracting from the Z axis it adds to it and therefore creates the decompression of the button once the player removes their hand from it.

Tutorial Used: VR Playground. (2021, December 3). Make a Button for Virtual Reality - Unreal Engine VR Tutorial. [Video]. Youtube. https://www.youtube.com/watch?v=30SgaL5CBB8&t=779s&ab_channel=VRPlayground
Moving on to lever creation:
Starting with the event tick node which will detect whenever the player grabs the handle and then will move the lever as a whole with the movement of the player's hand. Promoting a motion controller variable into to validate whether the handle has been grabbed is necessary to tell the code when and when not to move the lever.
Using GetWorldTransform to get the location, rotation, and scale of the handle and the motion controller we are able to make the relative transform of the handle equal to the movement of the player's hand, therefore creating the actual rotation of the lever.
Using and splitting the pins of the handles getworldtransform and makeRelativeTransform allows for adding the offset to the rotation.
To get this offset we use the combineRotators to offset the handle at the lever rotates, this is so that the handle actually tracks properly to the movement of the player's hand.
Because we know that our transform is centered around the handle that means that the handle is at the origin of the new transform, because of this we can just make a vector at the start instead of finding where it is manually.
The reason we set the origin to the handle is that we can use the XYZ values from the handle to add on the new rotation instead of just setting it to give a more seamless and dynamic movement to the lever.

Continues below.

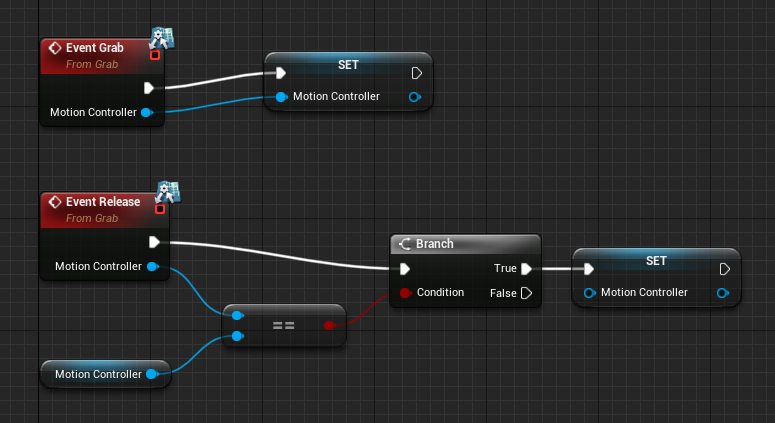
Creating the events was an entirely new concept to me, to do this I had to create a blueprint interface with two functions inside, grab and release. Both of these functions take inputs from a variable called MotionController which is a motion controller variable. Creating this interface allowed me to create the events for grabbing and releasing.
Creating grab was simple, all that was needed was to set the Motion controller variable so that it could start to interact with the lever's previous code.
Then oppositely release was also as simple, the motion controller had to be reset to null in order for it to stop affecting the lever, therefore getting the controller's original variable and just resetting the variable was all that was needed.
After finishing the lever and hand blueprints, I complied and found the lever movement with the user's hands whenever it wasn’t grabbed and when it was grabbed It would stop moving. I quickly realised the problem, in the blueprint I had accidentally switched up the Event Grab and Event release code, a quick switch back and the test showed a working lever ready to be used.
To actually use this code I need to be able to call the events. I will begin my getting the GrabLeft from the VR pawn blueprint, I'm going to add a sphereOverlapActors node, pass the motion controllers location in using the GetWorldLocation node, set the radius to 20, and finally pass in an array to the object type using the Make Array node and set it to world dynamic. Next, add a For Each Loop with Break node and a Does Implement Interface node and add the Grab interface into the interface section. This will keep running the code as the interaction is used and check if the interface is being used. Next, a branch is implemented to continue running the code only if the grab interface is being used. Next, I promote the Array element output into a variable name Left Grab Actor because this output is now the left motion controller using the grab interface, afterwards, I pass the Left Grab Actor variable into the Grab function along with the Motion controller left variable. Now I need to implement the release code as the player needs to be able to let go of the lever, from the released pin of the InputAction Grableft event node I make use of the left grab actor variable and convert it to a valid get, this will allow me to only run the release function if the Grableft is released. Finally, I add the Release function, pass in the left grab actor and the motion controller left variable, and then set the left grab actor back to null so that when it is released the player stops interacting with the lever.
This is all done the same for the right hand too, I just copy and paste the nodes but replace the left grab actor and the left montioncontroller variable with their right counterparts. At this stage, I did make a mistake and during testing, the right could not actually let go but this was only because i missed the last Set RightGrabActor node and therefore it was never set to null when letting go.

Continues below

Tutorial Used: VR Playground. (2021, December 17). How to make a lever for virtual reality with Unreal engine. [Video]. Youtube. https://www.youtube.com/watch?v=SXYlSNfoIdI&t=926s&ab_channel=VRPlayground
Beginning this week I want to finish the door completely, starting with this goal I decided to deconstruct the solution to help me to learn as much about Unreal during my process.
During the process of deciding what kind of door to create, I considered my 3 choices, an automatic door that detects when the player is near and opens, an interactive door that when interacted with (triggered) opens on an axis, or a door that the player can push to open.
I started by developing the automatic door, the tutorial showed process for this option was simple enough, using a collider on the actor to trigger when the player gets near and using the matinee editor and making the rotation of the door stored in the actor. I assumed that applying this rotation would be easy as it is just an actor being affected by another actor and therefore can just be done using the level blueprint. I first searched for an OnEnterTrigger node and realised that was a part of Unity's toolset. After a quick search, I found the OnActorBeginOverlap and hooked it up to the play node which was directed toward the matinee actor. I checked using the actor to make sure that the door would open and then I checked the document tutorial to make sure
Beginning the development of the second option I wanted to try to create the door by myself, this development was done a few weeks after the first and also after I'd made the first iteration of the button and therefore I had a wider knowledge base than a few weeks prior. I began by duplicating the last door but removing the trigger box and the blueprint editor code that went with it. Once I had the door base I used the knowledge of how to interact and move an object I had just learned from making the button, I added the cube collider to the door with means that I could push it using the VR hand controllers. This is where I began having problems in development. I'd forgotten how to use the matinee editor and spent some time looking through my notes realising that I should spend a large amount of time developing my base skills
Unreal API writing Team. 2021. Setting Up a Door. https://docs.unrealengine.com/4.27/en-US/AnimatingObjects/Matinee/HowTo/MHT_1/
Using a static mesh of a door from the asset set I'm using for the house and texture changing function I had the door model with its pivot changed to the edge of the door so that it can rotate properly. Starting by adding a physics constant inside a blueprint, then I added a small cube next to the static mesh as the tutorial I was watching uses another object to rotate the door itself around its axis. Adding the static mesh and cube to the constraints of the physics constraint was the first step as this allows them to move with each other, then we set the angular limit as I am setting up a swing and not a linear movement. Next, lock swing 2 and twist and set swing 1 to limited. Finally, I enabled simulate physics. At this point I had a door, a grabbable and pushable door, however, I wasn’t happy with how it functioned. It felt to me like the player had to get far too close to the door to interact with it. Additionally, my idea for each feature took inspiration from a game called Due Process, in this scenario walking up to a door and just pushing it wouldn’t be ideal so I planned to design a door that the player could walk up to, press a button and if the player was in range the door would open.
The tutorial used: Sir Fransi. (2020, April 27). How to make VR door and opening it (unreal engine VR tutorial)[Video] https://www.youtube.com/watch?v=_HULVPAOj6Y&ab_channel=SirFansi
Unfortunately, it was at this stage where my source control error took its effect and I lost all work after finishing the automatic door and was back to square one with the grabbable door. However, this wasn’t particularly bad for me as I decided I didn’t like the pushable door anyway so I set out to create an automatic door that opened when the player pressed something.
Using the previous knowledge I research event overlap nodes in order to find one to attach the sphere to detect when the player enters said sphere, I found the On Component Begin Overlap and its counterpart the On Component End Overlap node.
Unreal API writing Team. 2020. On Component Begin Overlap. https://docs.unrealengine.com/4.26/en-US/BlueprintAPI/Collision/OnComponentBeginOverlap/
This node would allow me to trigger the door opening whenever the sphere overlapped but also trigger the door closing whenever the overlap ended.
Next, I wanted an elegant solution to replace the use of the matinee editor, I had previously made the lever feature so was planning on using the SetRelativeRotation node as I had before, now I just needed a node to create the rotation.
Matt Taylor. (2018, April 14). Unreal Engine 4 - Quick! How to: Use the basic Rotational Nodes in BP. https://www.youtube.com/watch?v=nbu95VBwe4c&ab_channel=MattTaylor
This video displayed the use of different rotation nodes, the video showed me a large number of choices for the actual setting of the rotation of the object instead of planning the rotation and feeding that into the SetRelativeRotatinon node as I had planned to do.
Moving onto the next video I looked through I found that the majority of tools were made so that the code pulled the rotation of the object, added an amount, and then set the relative rotation of said object using the event tick to actually rotate it continuously. However helpful this new knowledge about different rotation nodes was It wasn’t what I was looking for.
Finally, I found this Reddit post below which outlined the use of a timeline node to play and reverse as ticks passed at run time.
Ryan Chuaa. (2021) Question About rotating an object with a timeline. https://www.reddit.com/r/unrealengine/comments/il1uuh/question_about_rotating_an_object_with_timeline/
AttemptID. (2014) Can you rotate an object with a timeline. https://forums.unrealengine.com/t/can-you-rotate-an-object-with-a-timeline/287901
With this new information and the forum post linked above I added the timeline and used it with a make rotator to rotate the door along the Z axis when the player moved into the sphere.

After finally being able to make the door rotate smoothly without needing to rely on a tutorial I wanted to add the press of the grab event whilst inside the sphere to then open the door. Unfortunately, after trying to use an AND node and additionally trying to pass the two events through different nodes to get them to function together I realised that I was running out of time and had to leave this part of the feature up to future development.

Dev blog for VR community · Created a new topic Practising door opening mechanics from online sources.