
My initial idea for the brush and canvas feature was a table that could be drawn on, a similar idea to the planning map in Due Process where before the team start a mission or enter a fight they can draw their battle plan on said map and see a layout of the game map too.
To begin creating the drawing surface I needed a couple of things before I could start coding. First, two materials, one for the drawing surface and one for the drawing brush. The drawing surface material doesn’t particularly matter as later on once coding begins the surface texture will be overwritten. With that in mind all that is needed is a texture parameter so that it can be called later, the texture itself doesn’t matter.
The drawing brush material is equally as simple, just a vector colour parameter which decides what colour the player can draw with.


The next actor to set up was the actual drawing surface, starting by adding a plane into a normal blueprint class actor and giving it the drawing surface material all the pieces to begin development were prepped.
Firstly the plane and material needed to be set up with dynamic materials. This is because the player is going to be affecting the material of the plane in real-time, the plane, therefore, needs to be able to update dynamically with the player's drawing in order to actually enable drawing in the first place. To do this in the construction script we need to initialise the plane as the target for the drawing, the material of the plane as the dynamic material and the brush as the effecting dynamic material.
Using a create render target 2d node and promoting that into a variable I initialise the plane.
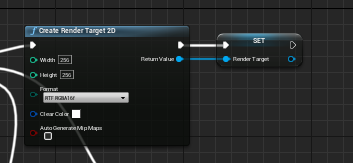
Using a Create Dynamic Material Instance, getting the drawing surface material using a Get Material node and passing the plane into that I instance the material created earlier as dynamic. Then passing that value into a Set Texture Parameter Value node and a Set Material node I can change the dynamic material. The Set Texture Parameter Value node is the reason the drawing surface material needed a parameter for the texture. Passing the render target in the Set texture parameter Value node and the Plane into the Set Material node means that the plane material is altered and the render target which was previously set, is set as a dynamic material whilst its parameter node “Texture” is altered.

Finally, the brush needs to be set as a dynamic material and output for later use, to do this I use a Create dynamic material instance node, pass the drawingBrush material as a parent and promote it to a variable.

Continuing after construction, I moved on to making the function that will use the constructed variables to draw onto the plane.
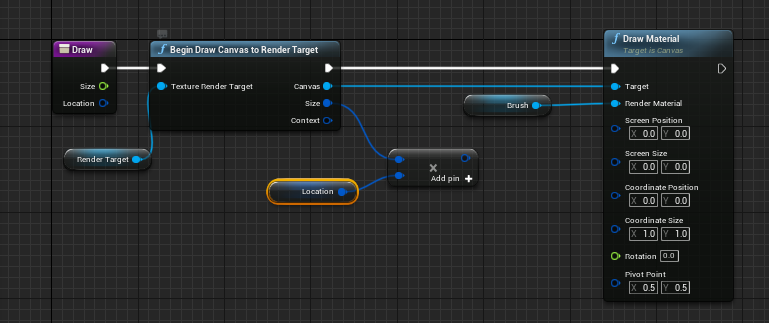
We start by using a Begin Draw Canvas to Render Target node and pass the render target into it, this outputs the render target(the plane) as three key values, the Canvas, size and context.
After using the begin draw canvas to render the target node which allows the player to actually interact with the canvas(plane) with the draw brush component and update the dynamic material, I became stuck.
Watching through the walkthrough I added a multiply, and because my knowledge of unreal is still developing I missed a very simple mistake, I added a vector2d multiplied by float multiply node. This meant that I couldn’t pull the vector2d value variable of the location and therefore could not actually draw accurately on the canvas and also not actually finish the code.

Debugging this took an embarrassingly long hour and a half but taught me a very valuable lesson. When looking through code to find problems start with the most simple but also most recent reason that the code could not be working and work backwards from there.
Working forwards from the start of this code which uses brand new nodes for me, for instance, the begin the draw canvas to render target and create dynamic material instances, sent me down a rabbit hole of reading through unreal engine API to find my problem and inevitably learning a lot but also not finding out how to fix the code.
Unreal API writing Team. 2020. Begin Draw Canvas to Render Target. https://docs.unrealengine.com/4.26/en-US/BlueprintAPI/Rendering/BeginDrawCanvastoRenderTarget/
Unreal API writing Team. 2021. Create Dynamic Material Instance. https://docs.unrealengine.com/4.27/en-US/BlueprintAPI/Rendering/Material/CreateDynamicMaterialInstance/
Unreal API writing Team. 2021. Instanced Materials. https://docs.unrealengine.com/4.27/en-US/RenderingAndGraphics/Materials/MaterialInstances/
Unreal API writing Team. 2021. Material Instance Editor User Guide. https://docs.unrealengine.com/4.27/en-US/RenderingAndGraphics/Materials/MaterialInstances/Editor/
The most valuable knowledge from reading these APIs, in my opinion, includes: understanding that materials can be changed as an object is being affected, meaning that for instance as something burns even though it’s not actually burning you can change the material dynamically to make it look burnt; Understanding that material hierarchies are parent-child relationships for future when creating complex materials; the fact that you can you nodes to affect the inputs of the material, like using a constant to change the roughness value; different parameters are used for each input of a material, like using a simple vector for colours but using scalar parameters for metallic and roughness values.
The list of API read knowledge continues with the information I didn’t think of using or use in my current development but think would be useful for future work, these include: using static parameters to switch between two different materials depending on a boolean true or false input could be useful for team colours e.g. if one team is red and the other is blue and you want to use the same material but the change between the colours; this documentation also details the uses of the create dynamic material instance node and helped me to understand it’s used for more than just what I’d been told, a material instance during gameplay, can be used in construction script but also event graph(handy), can be fed parameter materialised materials or constants, and all this allows you to effect and change the material of an object however you need during runtime.
Moving onto the Material Instance Editor, a tool in Unreal that I’d never really investigated before, Learning about this crucial part of the system became instantly necessary as I started to read. Learning about the details plane and how it can allow you to change parent material, physics material, adjust how this material Instance influences the lightmass build and override some properties from parent materials in the material being worked on.
This editor opens up a wide range of possibilities for working on materials in unreal, for example overriding material instance parameters, and being able to customise their parameters whilst also having a viewport where you can see the effect of these changes is an extremely useful tool for optimising workflow.
After finally noticing the float input of the multiply variable and changing it to a vector2d multiplied by a vector2d I was able to take the location variable and continue with development.
In the next step of development, I instantly added a subtract by float node instead of vector2d but this time noticed and corrected my mistake.
Moving onto the final inputs for the draw material node, splitting the struct pin of the screen size allows me to add a flat as the variable instead of a vector2d and for this, I input the size variable. For the screen position, it’s a little trickier, because screen position is a vector2d that can’t be changed, I, therefore, have to divide size by two and input this value into the split struct pin of the subtract variable. This then converts there float variables with the location vector2d variable into a vector2d variable which outputs the size and the position of the canvas.
After this, I am not able to draw on the surface and the only thing left to do is to stop drawing, to do this all that is needed is to pull the context from the draw canvas to render target node into an end draw canvas to render target node and add it to the end of the code.

Finishing off this feature involved just setting up the player's trigger so that the right hand can draw on the canvas.
Learning to use the lineTraceByChannel node to create an interactive line between the controller and the canvas which will allow the player to draw on the canvas without having to put their controller right up to the canvas itself.
The logic behind deciding where the point of the line will start and where it will end is simple, just get the location of the motion controller by calling its variable and then using the getWorldLocation node and setting its location as the start. Then by using the GetforwardVector to get the direction that the controller is facing and then multiplying it by a number and then add said output to the world location of the motion controller, with this value which is now the location of the motion controller by a set amount ahead of it this becomes the endpoint and sets the range of the draw tool.
Using a break hit result node which outputs the actor that is hit by the line from the linetracebychannelnode, I pass the actor into the CastTodrawingSurface object which allows the player to draw and finally output the hit into the find collision UV to pass the UV of the actor into the draw function to be used.
The code then passes in the as drawing surface from the CastToDrawingSurface node into the Draw function, the function has all of the variables it needs and the player is able to draw.

In this screenshot, there is one simple error that meant once I started to test the drawing function nothing happened.

I forgot to attach the gate output to the start of the LineTraceByChannel node and therefore the rest of the code, meaning nothing happened, after a quick check over all code created for this feature I found the problem and learnt another lesson, don’t fully trust in the compile to flag problems.
Here's the finished code block for this section:

The tutorial used: VR Playground. (2022, November 4). Drawing on Surfaces in Virtual reality. [Video]. Youtube. https://www.youtube.com/watch?v=oggaY0ZlJJE&ab_channel=VRPlayground