
Wanting to create a 3D VR function player menu seemed like the hardest challenge yet.
It was definitely difficult, but mostly involved the use of UI in Unreal to make the screen and the buttons, then calling the script after the button was clicked which is a function inside unreal itself. On the first watching of a couple of tutorials, I really realised how much of a well-made and detailed game creation engine Unreal Engine is, If you are trying to make something that then the engine has been designed to accommodate it's such an intuitive and understandable tool.
Virtus Learning Hub. (2022, July 22). Build User Interfaces in VIRTUAL REALITY for Unreal Engine 5 [Video]. Youtube. https://youtu.be/kM27HYbpvc0
VR Playground. (2021, June 25). Create and Interact with UI for Vitual reality - Unreal Engine Virtual Reality Tutorial[Video]. Youtubehttps://www.youtube.com/watch?v=H5nVjSwM_Uk&ab_channel=VRPlayground
VR Playground. (2022, February 25). Pop-up User Interface for Your Wrist in Virtual reality [Video]. Youtube https://www.youtube.com/watch?v=lgsR1g-5HKE&ab_channel=VRPlayground
The tutorial I actually used: VR Playground. (2022, September 16). Make a Simple Main Menu for Virtual Reality![Video]. Youtube https://www.youtube.com/watch?v=WzNpasjj_VM&ab_channel=VRPlayground
After breaking down this barrier to entry by understanding that fundamentally the menu system will be the same UI system as it would be for any game made in Unreal engine I found it a lot easier to approach. My plan became to just make a simple UI of two buttons, the start and quit, this would display the fact that I could make the buttons but also that in future development could introduce new parts to the system. After the addition of the buttons all I would need to do is interact with the UI, my previous work in making VR games in Unity meant that I understood the common practice of using a raycast and displaying a beam between the player's controller and the menu. This all meant that beginning development using the tutorial I was able to focus on deconstructing what each node could do rather than trying to understand the idea behind the feature itself, and overall helped a great deal with the actual learning I took from this work.
Development of a main system begins with creating a UI widget blueprint and adding 3 essential components. First, a canvas to act as the base for the rest of the components, a vertical box to store to two buttons together so they can move as one object, and finally two buttons, one for starting the game and one for quitting. Making two simple buttons opens up the ability for future development. Both buttons have text to display start and quit on them. Moving over to the development of the actual functionality I switch to the graph editor and Drag out the two on-pressed events for the two buttons, for the start button all that was needed was an Open Level node, which opens a level according to its input when pressed.
Similarly, the Quit Button was very simple, the Quit Game node with the Get Player controller node fed into it as the specific player is all that is needed.

To make the menu display all I had to do was create a blueprint widget actor by creating a normal blueprint actor but adding the widget component and then setting its widget class as the main menu UI that I just created.
After creating a menu that is displayed and has functionality all I need is a way to interact with the menu, as previously stated I knew that creating an interactive line from the controller to interact with the menu from a distance is the best way to do this. In unity the use of a raycast to connect with the menu is the best option, however, I was unsure about its counterpart in Unreal.
Creating the WidgetInteraction code dove me headfirst into widget manipulation which was an aspect of Unreal that I hadn’t explored greatly before, this meant understanding this work process took a large amount of time as I didn’t just want to copy out what the tutorial said. To help with understanding this new function knowledge I read through the API listed below just to reinforce my understanding of the nodes used when interacting with widgets.
Unreal API writing Team. 2021. Break Hit result. https://docs.unrealengine.com/4.27/en-US/BlueprintAPI/Collision/BreakHitResult/
Unreal API writing Team. 2021. Mesh Component properties. https://docs.unrealengine.com/4.27/en-US/BuildingWorlds/BlueprintSplines/Reference/MeshComponentProperties/
Unreal API writing Team. 2021. Set Start and End. https://docs.unrealengine.com/4.26/en-US/BlueprintAPI/SplineMesh/SetStartandEnd/
Unreal API writing Team. 2021. Is Over Hit Test Visible Widget. https://docs.unrealengine.com/4.26/en-US/BlueprintAPI/Interaction/IsOverHitTestVisibleWidget/
Using unreal API to break down each node really helps to put into perspective and understand what inputs and variable types the node needs.
Drb1992. (2018). Is Over Hit Test Widget Returning True. https://forums.unrealengine.com/t/is-over-hit-test-visible-widget-returning-true/422023
I equally read through a couple of forum posts about different problems people had come across when using these nodes in case I came across similar situations.
Unreal API writing Team. 2021. Using the OnHit Event. https://docs.unrealengine.com/5.1/en-US/using-the-onhit-event/
Unreal API writing Team. 2021. How To Perform AR Hit Testing. https://docs.unrealengine.com/5.1/en-US/how-to-perform-ar-hit-testing-in-unreal-engine/
During this rabbit hole of extra understanding, I also came across using the same node In UE5 but also implementing it into an AR scenario which I found extremely interesting and will be revisiting.
Continuing with the development of widget interaction, I started by creating a new pawn, as a normal main menu level would not be the main level of development but instead a sub-level just for the menu, in this case, there’s no need for the actual VRpawn so a new pawn with just a camera and the Widget interaction components is needed.
I add a camera, and add two motion controllers, changing one's motion source to right as by default they are both left, for each of these I add a widget interaction component.
Now the tutorial addresses trace channels which can cause issues with the widget component if they aren’t on the same channel they may not be able to interact with each other. In this case, both the widget interactions and the main menu widget need to be set to world dynamic. Another small detail is changing the pointer index of one of the widget interaction components as if they are the same one or the other just won't work.
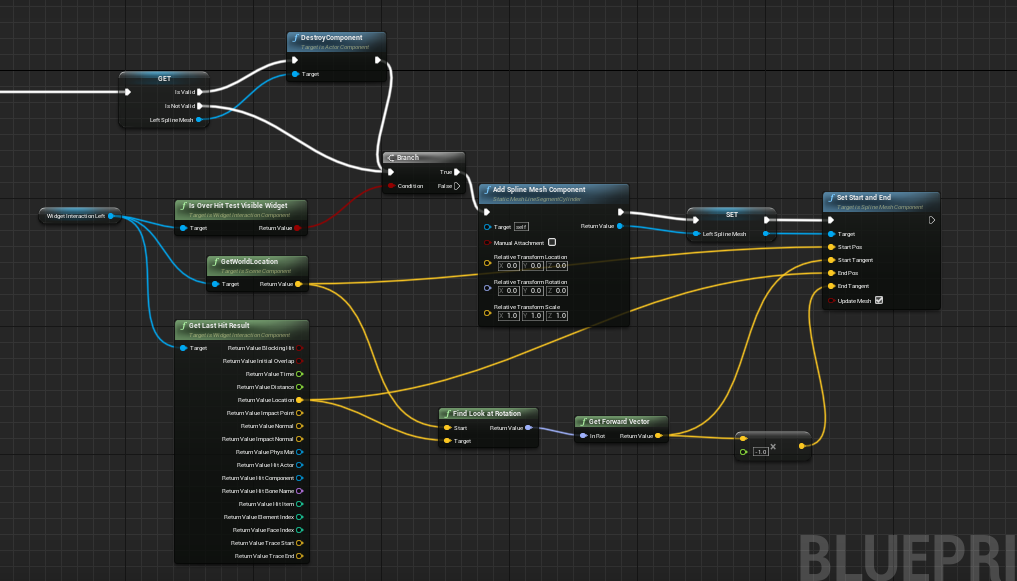
First I create a function for the widget interaction pointer. Starting with a sequence I bring in the left and right widget interaction components, using a Is Over Hit Test Visible Widget to make sure that the pointer is over an actually interactable menu item when it's shown and make sure it isn’t just constantly showing. Next, I need a Get World Location node to get the location of the widget interaction and a Get last hit Result to output what has been hit for reference checking. Using an Add Spline Mesh component and a branch that branches off the Is Over-hit Test Visible node. First off I give the Add Spline mesh Component a static mesh to show the interaction beam, in theis feature I used the LineSegmentCylinder as It's a good representation of a beam. However Initially I had trouble finding this static mesh and had to research into enabling Unreal’s engine content in the view option, this is very useful information for future development. Continuing off I promote the Spline mesh component to a variable, this will be used to set start and end points using the Set Start and End node. The start position will be the location of the player controller and the End point will be the Last hit location. The values are gotten from the Get World location and Get Last Hit result node. The start tangent needs the direction that the player controller is facing therefore I add a find look at the rotation node feed that’s output into a get Forward Vector to turn the rotation value from the find look at the rotation node into a vector. This conversion was necessary as the Start Tangent input must be a vector and the Find Look at rotation node outputs a rotation. Finally, the End tangent is simple seeing as I have already found the start tangent, all I need to do is multiply the start tangent by -1.
Before the interaction widgets are done all I need to do is take the Left Spline Mesh variable, convert it to an is valid and if it is valid I need to destroy the component. This is necessary as if the component wasn’t removed it would stay on the player's screen and would build up with more and more newly made ones as the player uses the menu. This code is all copied for the right pointer with the variables switched to work for the right instead of left.
Moving onto the event tick in the event graph I need to always run this function which is done by just feeling the event tick into the Widget interaction Pointer function.

Finally, to actually have the controller triggers interact with the buttons, I use the InputAction triggerLeft, which is the in-built event in unreal for when the player presses the left trigger. Using a Press pointer Key and release pointer key node for the widget interaction components and feeding in the pressed output of the triggerleft even and the widget interaction variable I am able to press and release the menu buttons.
All that is left is to set the Menu Pawn to auto posses and auto receive input from Player 0 and I have a working menu system.
Returning To improve the menu.
After working on the other features I wanted to return to the main menu to make explore Unreal's UI tools more and hopefully create a better looking Main menu instead of the simple white buttons I currently have in the scene, this started by using this tutorial linked below to learn about how to change the button when the player hovers over it, spacing between the buttons, and to create other menu pieces.
Reids Channel. (2020, December 9). Unreal Engine - 3D Menu Tutorial[Video]. Youtube https://www.youtube.com/watch?v=4sxxe9_w9Zs&ab_channel=ReidsChannel
I set the buttons up using the on hovered event to change to a red tint rather than just the normal white in order for the player to know which button they were about to select instead of having to guess when they had a button selected.
Next, I implemented space between the button just to move them apart so that the menu didn’t look so compact and used a border component above the vertical box to change its colour into a brown hue to make it blend more with the virtual environment.
Finally, I planned to use the transition to event and functions to switch between different menu options which would allow me to create an options menu with sliders.
Learning about making UI sliders I used these tutorials:
GameDev&Coding. (2022, May 31). HOW TO MAKE A SLIDER WITH CUSTOM COLORS/MATERIAL UE4[Video]. Youtube https://www.youtube.com/watch?v=nulVlIz1x9Y&ab_channel=GameDev%26Coding
VR Playground. (2021, December 10). Make a Slider For Virtual Reality - Unreal Engine VR tutorial[Video]. Youtube https://www.youtube.com/watch?v=If4JQOQYeD4&ab_channel=VRPlayground
Sadly at this point, I made my source control error and lost the whole Main menu system, and had to start from scratch. Because of time constraints which I had only myself to blame for I had to leave out the Improved menu features and just created the base one to prove I could create a menu that in future development could be made into more.
This was one of my biggest learning experiences from the whole development process and in the future, I will definitely be using applications like Github as source control so that I can’t lose all of my work in a simple mistake.