

There were no instructions for how to actually use more colors in Bitsy Color, so here is a tutorial:
Basic Coloring:
Figure out what color you want to add. Click on "tools" then "game data" and scroll down a little. You'll see something like this:
PAL 0
204,74,90
128,159,255
255,255,255
NAME blueprint
Copy paste more color codes in there, and label them. You can find color codes in any image editing software or a site like: https://www.colorbook.io/colorschemes. Sample list:
PAL 0
243,51,170 // 0 - hot pink or transparent (see below in "Transparent" section)
255,0,0 // 1 - red
255,142,0 // 2 - orange
253,255,0 // 3 - yellow
28,130,0 // 4 - dark green
0,99,132 // 5 - dark blue
77,0,81 // 6 - purple
175,137,105 // 7 - brown
0,0,0 // 8 - black
255,255,255 // 9 - white
NAME blueprint
Create a new DIALOG, save this labelled list in it because Bitsy deletes code notes. Also copy-paste this list to your game data section. Close out of the code box. Your room might look messed up - just copy your game data (in case it gets lost) and refresh the page.
Coloring Tiles: Visual Method
Open your dialog box which contains your labelled list of colors. Rearrange the list so the most commonly used color is first (so you don't constantly scroll the list).
Go to "Paint" for sprites. Below the image you'll see "Grid" and "brush color". I now have 10 colors in my "blueprint" palette so the brush color will go in order from top to bottom: color 0 is 243,51,170 (hot pink) and so on. Change the number in that box to the number of the color you want to draw on the cat. Click on a pixel on the cat, it will "disappear", click again, it will reappear as the new color without having disturbed any of your colors anywhere else.
Coloring Tiles: Faster Method
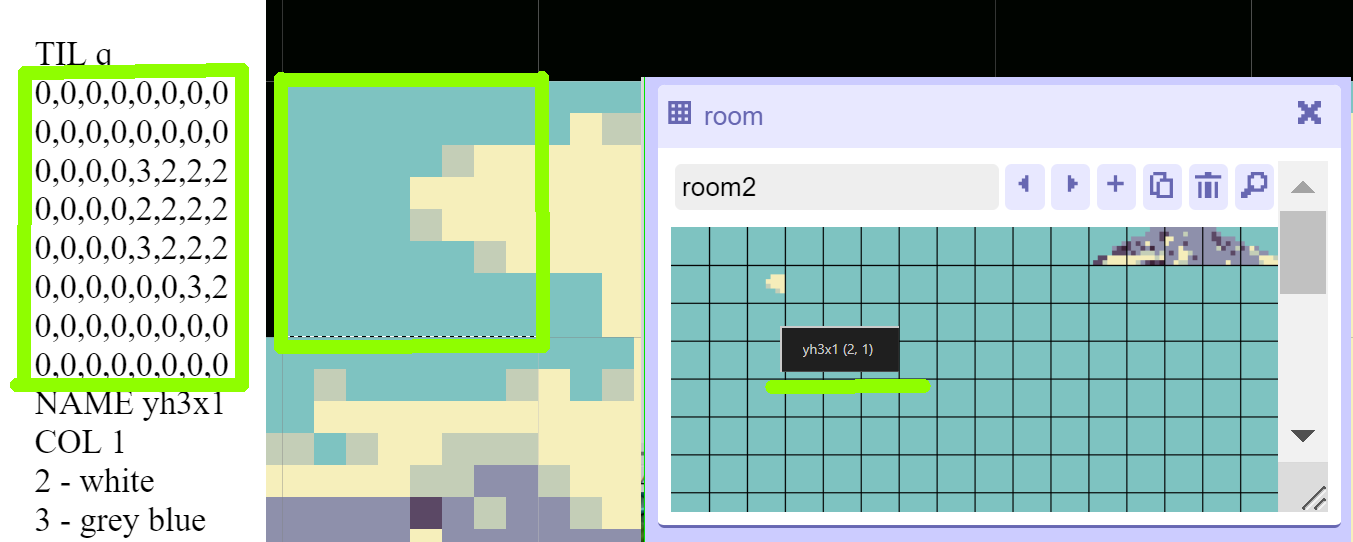
This is a blank 8x8 tile. TIL = short for "tile", q = tile ID which bitsy inserts into scene maps to know which tile goes where (bitsy automatically makes new tile IDs in alphabetical order like p q r s), NAME is how it appears in the editor in-game, COL 1 - you can ignore this:
TIL q
0,0,0,0,0,0,0,0
0,0,0,0,0,0,0,0
0,0,0,0,0,0,0,0
0,0,0,0,0,0,0,0
0,0,0,0,0,0,0,0
0,0,0,0,0,0,0,0
0,0,0,0,0,0,0,0
0,0,0,0,0,0,0,0
NAME yh3x1
COL 1
If you have your image open in an image editor with an 8x8 grid on as a visual guide, you can manually rename the tile to something new, then just TYPE in the numbers that correspond to each color, or copy-paste bits of matching tiles together, which in some cases is much faster. Name it an abbreviation for the room (in mine - yh for Yellow House) and then the x-y coordinates for where it is to be placed on-screen (in mine - row 3 column 1). Hover over a tile in Bitsy to see its coordinates pop up.
Coloring Items:
Items don't have a box where you can choose the color option, but the color number you choose on the "tiles" screen will carry over to the pen color used on the "items" screen. So navigate to "tiles", type in a color number, then navigate back to the item you are editing and draw like normal.
Coloring Text:
The same color codes work for text. Just replace {clr 0} with 1, 2, 3, 4, etc the same as when coloring a picture. But let's say you want to color every word in a sentence a different color. Bitsy suggests you sandwich the word in code elements like this:
{clr 0}I{/clr} {clr 1}am{/clr} {clr 2}a{/clr} {clr 3}cat{/clr} {clr 4}.{/clr}
You can also keep them all open and close them at the end:
{clr 0}I {clr 1}am {clr 2}a {clr 3}cat{clr 4}.{/clr}{/clr}{/clr}{/clr}
After you do this, again your room might be all messed up, or your game might not "play" when you hit play. Nothing is lost or broken. Just copy all your game data, refresh the page, and if necessary paste all the game data in again.
Coloring Item or Sprite Images as Text:
Same as text, but you must click "show code" and write it there, it does not work if you write it in the normal dialog box:
{clr 8}{drwi "fish"}{/clr}
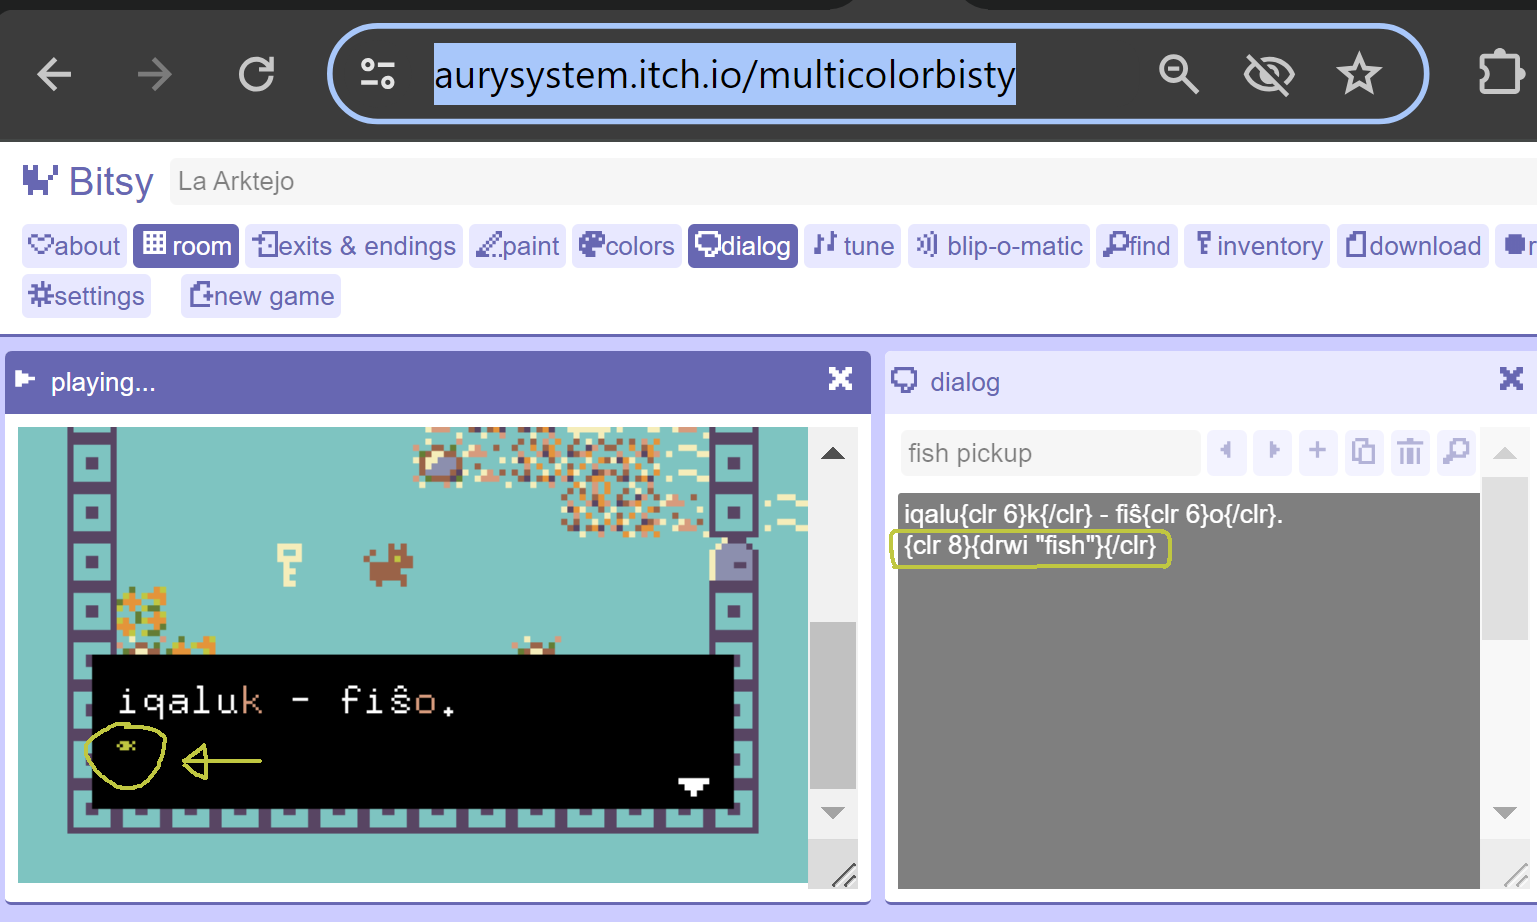
As you can see, the "image as text" IS colored but is also really tiny - this is the Bitsy engine's fault. You can change this via hacks if you know JavaScript.
Coloring Backgrounds:
First you might want to run a photo through Pixelicious to pixellate it: https://www.pixelicious.xyz/.
(Photo) ー> (Pixelicious round 1) ー> (Round 2)
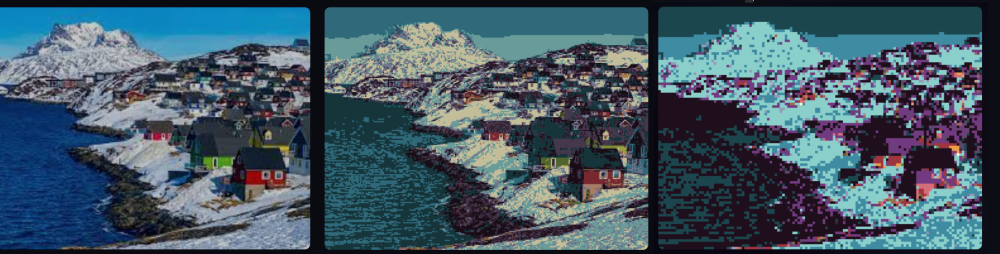
And a good color reducing tool: https://onlinejpgtools.com/reduce-jpg-colors
Note that RGBitsy (https://janosc.itch.io/rgbitsy) does not currently (Jan. 2024) work with Bitsy Color at all. Pixsy (https://ruin.itch.io/pixsy) only works if you start with a blank game, insertion into an existing game currently doesn't work.
Mass Recoloring (Pseudo paint bucket fill tool):
1) Backgrounds: Open "game data", copy-paste to duplicate the palette for your scene, replace a color number in the palette to change all tiles using that color.
2) Sprites, Items, Avatar, Tiles: Find the picture in the game data. If it's unlabelled, you can tell its shape by the change in numbers. For example, here's a dog:
SPR A
0,0,0,0,0,0,0,0
0,0,0,0,1,0,1,0
0,1,0,0,1,1,1,0
1,0,0,0,1,8,1,1
0,1,1,1,1,1,1,1
0,1,1,1,1,1,0,0
0,1,1,1,1,1,0,0
0,1,0,0,0,1,0,0
>
Paste the code into Google Docs or something, then hit "control f" or use the menu's "find" command, hit the down arrow to get "find and replace", "replace all" to change the numbers easily. For example if I replace 1 to 8 then the entire dog's body will change to the same color as its eye.
Transparent Backgrounds:
You can make the player avatar, sprites and items have transparent backgrounds. Open "game data", add BGC * ("BackGround Color") underneath the COL line if there is one, for example:
NAME cat
DLG a
POS 0 8,12
COL 2
BGC *
BLIP 1
The player avatar is unlabelled in the game data but starts with "SPR A" and will be the one right before your Cat sprite in a new game.
It is very likely your animations will glitch and look super fast in the game editor after you make their backgrounds transparent. It doesn't matter, they'll appear normal in-game.
Troubleshooting:
Some people have added a few more colors into vanilla Bitsy in a similar way as my instructions above. However when I tried it, it didn't work correctly, whereas Bitsy Color worked with just a copy-paste.
