Indie game storeFree gamesFun gamesHorror games
Game developmentAssetsComics
SalesBundles
Jobs
TagsGame Engines

PixelCNC Has Moved: deftware.org

CAM software developed by artists for artists to create unique and original works on a 3-axis CNC router or mill. · By Deftware

Relief Carving Z Axis issue

A topic by hegartype created 25 days ago Views: 56 Replies: 4
Viewing posts 1 to 3
(+1)

Hi all, 

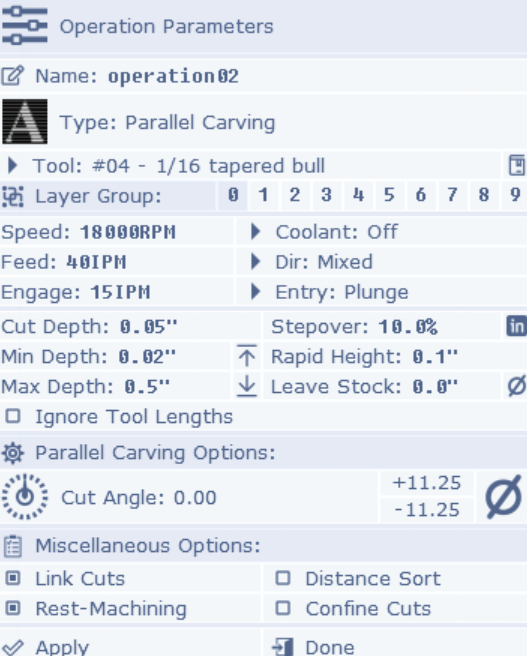
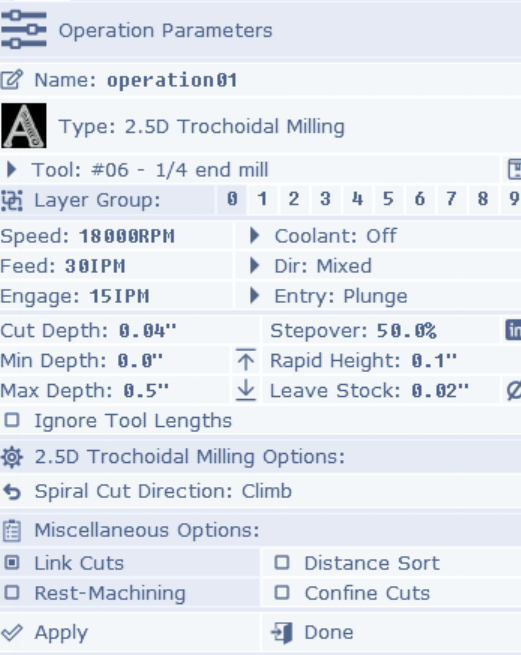
I'm doing a relief carving, roughing, finishing and perimeter passes, I followed the tutorial, everything looks right, the roughing pass carves out, I change the bit, re-zero the Z, and when I start the finishing pass the bit is floating along above the work piece a 10th of an inch or so.  I'm sure it is something simple I am missing, but I am stumped.  Pics of roughing and finishing settings attached.  Any help is appreciated.
Developer

Hi Hegartype,

The two main reasons that a different tool is cutting higher than it should (or lower) is because either the coordinate space is shifted on the machine, typically caused by the Z zero being off, and/or the machine losing position while cutting - which can happen if it plunges straight into material faster than the machine's Z-axis drive motor can handle powering through.

There's also the possibility that the first operation had its Z position offset while cutting, causing it to cut lower than it was supposed to.

The test is to zero your machine's Z origin and after running an operation jog the machine to a point that you know should be zeroed out (for any or all axes) and see if the tool is where it should be - especially after a roughing operation.

Depending on the machine, a 50% stepover for a 1/4" endmill can be quite a large bite to take, and I could see a machine losing steps downward, causing it to offset downward and cut lower than it's supposed to. I've seen this when roughing out a relief carving too quickly with a 1/4" ballnose cutter on a machine that had an underpowered Z-axis.

Let me know if you have any other questions or need help with anything else :]

 - Charlie

(+1)

Hi Charlie, thanks for the quick reply, so I set up another job, tiny, 1.25x.95in or so, in Pixelcnc and in easel(sorry) the easel rough and finish ran essentially perfectly, and in Pixelcnc the finishing pass was above the work surface again, just a couple millimeters, cutting air.  It has to be something to do with my project set up, what other info can I share to help sort this?

Developer

Hi Patrick,

Thanks for sending that over. The G-code all looks as it should. Your cut depth for the roughing pass is at 0.03", so if your machine origin is set to the top-surface of the workpiece then it will cut at 0.03" depth increments, i.e. -0.03" -0.06" -0.09" etc. The finishing pass has a cut depth of 0.02" and -0.02" is the coordinate it's bottom out the first layer of cuts at. This is expected behavior, and what you want to see (unless your cut depths weren't actually 0.03" and 0.02"!)

It's definitely a machine/controller issue if the G-code is correct - which means there could be something with how your controller is dealing with setting the Z origin when changing tools - whether it's actually establishing the absolute machine origin or just setting a tool offset or work coordinate offset somewhere that only their software knows to use.

If you're using an external tool touch probe to zero your machine's Z origin it's probably not setting the machine Z origin where it needs to be because this requires knowing where the top surface of the material is (or the bottom, depending on which you're using as the Z origin for toolpaths) as well as the exact Z distance between it and where the external touch probe surface that tools touch off on is. Different machines/controllers will handle this in different ways that is not always friendly to conventional G-code when using the separate tool probe for setting Z origins/offsets, as they've designed the probe to work with their software and their setup - leaving their end-users to figure out how to use any other software themselves. There's surely an article, forum post, or tutorial on the internet that will explain how to do this properly with your specific machine/controller.

What you want is for jogging the tool to X0,Y0,Z0 to be where you've chosen for your machine origin when running G-code.

Also, I suggest enabling the Distance Sort option when generating Parallel Carving toolpaths that use the Rest-Machining option, which will greatly speed up the runtime for finish operations by removing a lot of unnecessary rapids between cuts. Or, if the flutes on your cutter are long enough, you can set the operation's Cut Depth to reach the bottom of the canvas and have your finishing operation cut all in one go! This takes some careful consideration and requires that your machine will be able to handle the material removal varying as the steepness of the relief varies.

 - Charlie

Developer

Hi hegartype,

Can you send your G-code files that PixelCNC output to me at: support@deftware.org?

 - Charlie