
Indie game storeFree gamesFun gamesHorror games
Game developmentAssetsComics
SalesBundles
Jobs
Tags

Eraserhead Studio

8
Posts
6
Topics
3
Followers
41
Following
A member registered Jun 04, 2018 · View creator page →

Creator of

Recent community posts

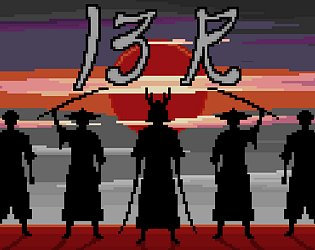
Hello friends and a happy new year to all of you! 

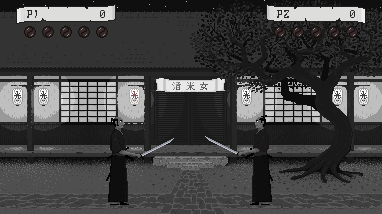
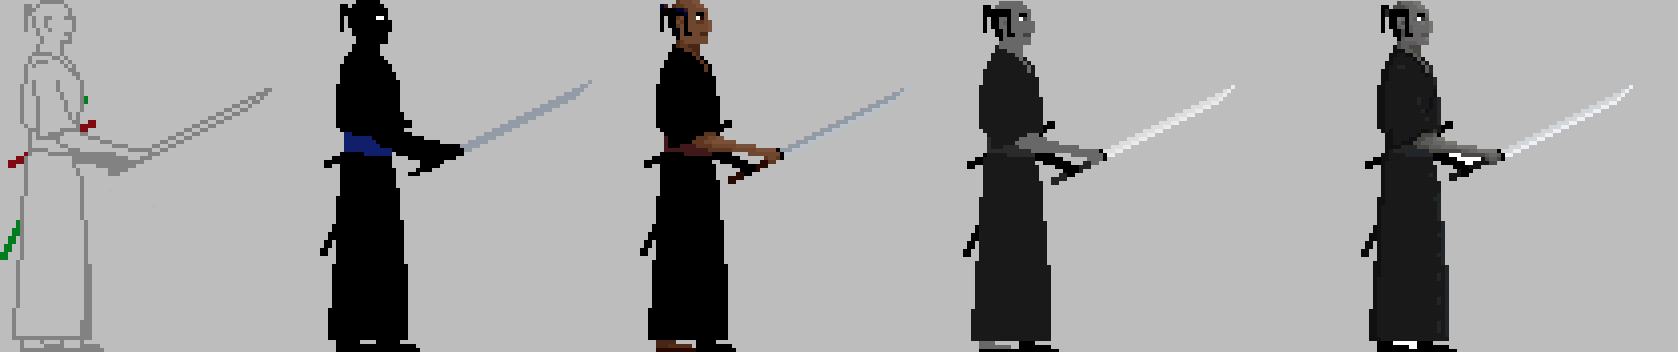
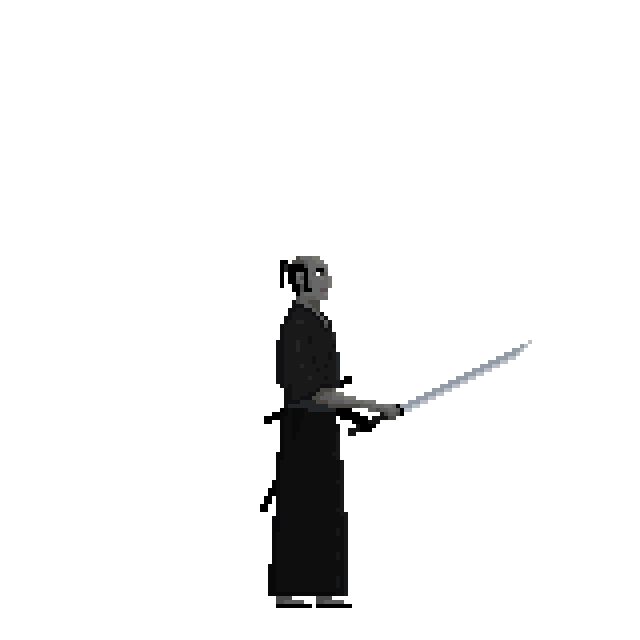
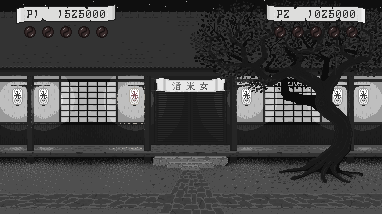
 In my September post I stated the goal for the year to be the release of a first public build of 13 Ronin. I followed this statement with a list of features the release should contain, although I haven’t managed to complete all of those features I’m still happy to have something to release. Lacking from the list is a background animation of a pair of women drinking tea, the color of the opponent (it should be white, but is grey) and an idle animation variation. The idle variation and the color of the opponent will be added later on. The tea-drinking women will probably be cut in favor of some other animation.

Big disclaimer

Please keep in mind that this is not a completed game, it's not even a demo, it's work in progress and a lot of stuff will be changed, improved and added before even this first level is finished. With all that said, you're very welcome to download it and give it a go, and hopefully give me some valuable feedback. This release is Windows only.

  1. Click this link to go to my DropBox-account
  2. Download file 13Ronin, 1st Public Build.zip
  3. When download is finished extract the zip-folder’
  4. Open folder and double-click 13Ronin.exe
  5. Press ‘1’ to start game

When playing, press ‘ESC’ to return to start-screen, and press 'ESC' once more to exit game.

Controls

Keyboard:

Moves:
Crouch,  Arrow key down Jump up, Ctrl key
Jump forward, Ctrl key + arrow key forward
Jump backward, Ctrl key + arrow key backward
Turn around, Space + Arrow key backward 
Walk forward, Arrow key forward
Walk backward,  Arrow key backward

Attacks: 
Head cut, Space + Arrow key up 
Kick, Space + Arrow key forward and down
Throat cut, Space + Arrow key forward 
Throw gravel, Space + Arrow key down

Blocks: 
Block Head cut, Shift + Arrow key up
Block Throat cut. Shift + Arrow key forward

X-box style gamepad:

Moves:
Crouch, Directional pad down
Jump up, Button X
Jump forward, Button X + Directional pad forward
Jump backward, Button X + Directional pad backward
Turn around, Button B + Directional pad backward 
Walk forward, Directional pad forward
Walk backward, Directional pad backward

Attacks: 
Head cut, Button B + Directional pad up 
Kick, Button B + Directional pad forward and directional pad down
Throat cut, Button B + Directional pad forward 
Throw gravel, Button B + Directional pad down

Blocks: 
Block Head cut, Button A + Directional pad up
Block Throat cut, Button A + Directional pad forward 

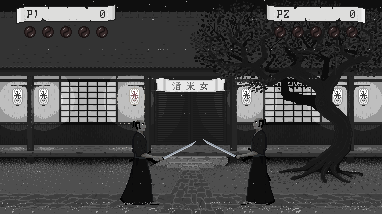
 This release is heavily flawed with an unintelligent opponent and unbalanced gameplay, but still, it’s a game that can be played, isn’t that something?

Happy new year!
/jan.

www.eraserheadstudio.com


(1 edit)


DevLog #7 - Fight or flight? 

Since I had no previous experience of coding a computer player I turned to our friend google for advice. I found a number of threads on the subject, some talked about AI, but most of them talked about reaction based solutions, but since I’m not interested in AI and rather want to mimic the feeling found in old-school fighting games I decided to go for the reaction based solution. And when I use the phrase “reaction based”, I’m referring to an implementation that selects action-based on one or several conditions e.g. if the opponent hit then block. 

Feeling a bit over-confident, I stopped reading and headed over to Visual Studio just to realize that this was not as easy as I had thought. Soon I had a bunch of if-statement and a code hard to follow. I refactored the code, but still I wasn’t pleased

Along came Halloween and at my workplace, we had an amazing party (I was dressed as the Invisible Man). After dinner, I chatted with a colleague, and talking about the computer player he asked if I was using a decision-tree for action selection. Decision trees? What’s this, yet another gap of knowledge.


The name itself told me that this was something I had to read up on. So, the day after, still recovering from the party, I started reading. And oh yes, this was what I’ve been looking for. (Thanks Mikael for the suggestion)

Decision trees
The full definition is somewhat longer, but simplified, a decision tree is a tree structure describing conditions and results. Every node is a condition deciding upon which branch to follow until reaching the leaf and the result of the path taken. This was exactly the kind of data structure I needed to find a structure around the computer player logic Using a fluent builder I could put all conditions in a tree and let the leaves contain what actions to perform.


Decision tree for the computer player.

DecisionTreeNode
My implementation of the decision tree is very basic, it consists of a DecisionTreeNode-class that I use for the tree as well as for the nodes and the leaves. 

The Condition-property is only applicable to condition nodes. It’s a delegate that when called will evaluate what child node to step into. It returns the name of the child to step into.

The Result-property is only applicable to leaves. It’s a delegate with actions associated to the leaf.


The GamePlayState-class contains all data needed when deciding computer action.

DecisionTreeBuilder

I’m quite fond of fluent coding so when building the DecisionTreeBuilder it was a natural pattern to choose. Using this pattern makes classes easy to use and code easy to read.
 
This is how I build the decision tree

var decisionTree =

    DecisionTreeBuilder
        .Begin(
            "Reacting",
            state =>
                state.Player.IsReacting()
                    ? "Elapsed"
                    : "Opp new action")
        .AddNode(
            "Elapsed",
            state =>
                state.Player.IsTimeToReact(state.GameTime.TotalGameTime)
                    ? "Facing"
                    : "Done 1")
        .AddNode(
            "Facing",
            state =>
            {
                return
                    state.Player.IsFacingOpponent()
                        ? "Reachable 1"
                        : "Reachable 2";
            })
        .AddNode(
            "Reachable 1",
            state =>
                state.Player.IsWithinReach(state.Opponent)
                    ? "Opp attacking"
                    : "Opp approaching")
        .AddNode(
            "Opp attacking",
            state =>
                state.Player.ActionToReactUpon is AttackAction
                    ? "Defend"
                    : "Attack 1")
        .AddLeaf(
            "Defend",
            state =>
            {
                state.Player.ResetReaction();
                state.Player.ParryHeadCut();
            })
        .AddLeaf(
            "Attack 1",
            state =>
            {
                state.Player.ResetReaction();
                state.Player.HeadCut();
            })
        .Parent()
        .AddNode(
            "Opp approaching",
            state =>
                state.Opponent.IsAdvancing() &&
                state.Opponent.IsFacingOpponent()
                    ? "Idle 1"
                    : "Advance 1")
        .
        .
        .
        .Build();


AddNode will create and append a new node to the current nodes’ children and then go into the newly created node and make it current. AddLeaf will create and append a new leaf, but not go into it. Parent will go to the parent node and make it current. Build will return the newly composed tree. 


The choice to use strings for names makes it easy to follow the code but also makes it easy switching between the diagram and the code. The Parent-, and Name-properties together with the GetFullName method make nice tools while debugging.

Player
In my game I have a HumanPlayer-class and a ComputerPlayer-class, both implementing an abstract class Player. The main difference between the Human- and the ComputerPlayer-class is how the Update-method is implemented. The HumanPlayer-class is using input from keyboard and gamepad to control the player character while the ComputerPlayer is using the decision tree. 


The code for using the tree looks like this:

var leaf = _decisionTree.Evaluate(state);
leaf.Action(state);

Nice, isn’t it?

Happy coding!
jan.


In my last blog post I showcased some of the audio I’ve been working with for my upcoming game 13 RONIN, now it’s time for graphics. But first a celebration. The 4th of October is a day dedicated to the cinnamon roll here in Sweden (yes, it’s true), which we, of course, celebrate by baking, buying and eating lot’s of (you guessed it) cinnamon rolls. Since I’m a fan of the pastry myself, I happily took part in the celebration. 

But I also had another reason to celebrate. From October and till the end of the year I’ve reduced the number of hours I’m putting in on my day job from 40 to 32 in favor of spending more time working on 13 RONIN. Big kudos to my boss for approving this! 

Main character

How do you go about drawing a samurai with realistic proportions when you don’t know how to draw?

I started by googling images on human proportions and created a reference image I could use as background layer while drawing. 


In parallel to this, I watched a lot of old samurai movies and Kendo-tournaments and with still images from these kind of videos as reference I drew my character.


At the beginning of this project, I intended to use silhouette-looking sprites mostly drawn in solid black. This changed over time, I had a few different ideas, but finally settled on using gray-scaled sprites with very low-saturated colors for light and dark areas.


I decided on this color scheme to keep consistent with the black and white samurai movie theme. The low saturated colors are there to make the sprites stand out from the background, but also to make the visuals more interesting. With this style, I’ve found a reasonable balance between aesthetics and time spent drawing.


Background

In the early days of this project, I was more into ninjas than samurais and the initial idea for the game was that you as a white dressed samurai had to fight a bunch of bad, bad ninjas dressed in colorful outfits. To get started I drew a forest background.


Soon I discovered that even the best of the ninja-movies weren’t that good and I found myself switching to samurai-movies and my approach to the project changed. Now I wanted to create a fighting game looking like Limbo, with black ninjas emerging from the dark. Some time later I re-discovered my love for low-resolution pixel-art and the Limbo-aesthetics was dropped. The code-project still carries the somewhat humorous working title of the ninja-project, it’s called “Ninja in the dark”.

I wanted to start drawing something basic, something I thought I had the skills for and choose to draw a building which I later on turned into a tavern.It’s yet not finished and I can’t promise it will fit into the final game, but it will be the background of the first public build.


Energy and score

After finishing the background I took some time to draw the graphics for player score and energy symbols. I tried a few different ideas and settled on the score written in a custom font upon a scroll-like background.

For energy symbols I also tried a few different ideas before stealing the yin-yang symbols from The way of the exploding fist and turning them red. I do love that game.

In-game graphics

There are a lot of animations to finish before the game is playable, but this is at least a taste of what will come.


Happy coding! /jan.


For more info, please check out my home at Eraserhead Studio.

It's been a long hot summer with wildfires crossing our country. We Swedes have a tendency to complain about the weather, mostly we think it's too cold, but after this summer I think most of us welcome fall and the cooler air.

During the summer I've been working on a little bit of everything but mostly I've been focusing on sound. But before I go into that topic I'd like to present the milestone I'm currently working towards.

First public build

Before Christmas I like to release my first public developer build including:

  • One player mode.
  • One level, the tavern, featuring:
    • Windy rain.
    • People drinking inside the tavern.
    • Flies buzzing around a lantern.
  • An opponent dressed in white.
  • Move forward, backward, turn, dodge, turn dodging, jump, front- and backflip.
  • Four different attacks and ways to parry them.
  • One death sequence.
  • Blood splatter.
  • One idle animation variation.
  • One MIDI song arranged with classical instruments.
  • Sound effects, only normalized, not processed in any other way.
  • HUD including score and energy.
  • Camera shake.

This might not look like much, but for a one-man team, only working weekends and evenings it might even be too much.

Sound

If you've read my earlier posts you know I ordered an Arturia keyboard that happened to be broken on delivery. This caused a lot of annoyance and delayed my music production but now I've finally got all my gear set up.

The keyboard is an Arturia KeyLab 49 and the speakers Audioengine A2+. Included with the keyboard was a DAW called Ableton Live. I don't know if this software is good or bad, I just know that I couldn't get my head around it. Instead, I've chosen to work with Studio One Prime, which is a free but limited version of Studio One, and has a user interface I feel comfortable working in.

SFX

To create a feeling of being inside an old samurai movie I'm going to use sounds from various movies as basis for the sound effects. So while waiting for the new keyboard to arrive I've spent a few summer evenings extracting sounds. It's amazing how much panting, grunting and screaming there are in those old movies. After a while I had to skip the speakers and use my headphones instead, if I hadn't I'm sure my neighbors would have thought I'd started some kind of torture dungeon and sent the police on me.

Something I hadn't thought of, but became apparent during this process was the fact that there is almost always a howling wind in the background of old Japanese action scenes. This of course made a lot of the sound useless.

Despite this unfortunate fact I now have quite an impressive collection of sounds including footsteps, screams, shouting, panting, growling, sword swooshes, sword clashes, and hits.

So far I've converted the sound effects to stereo, I've normalized them and cleaned them from as much noise as possible without distorting the sound I want to keep. For my first public developer build I consider them done, but before releasing a demo of the game I will process them further.

(I'd love to include some sound samples here, but I don't think it's possible, so please visit my site www.eraserheadstudio.com for sfx and music.)

Music

When on vacation, visiting my father in my hometown of Boden, I borrowed his Yamaha keyboard and a few evenings later I had the main melody for the first game song ready. I call it “Ronin encounter” and this is the song that will be included in the first developer build.

I've not yet decided what style of music I want for the game. For a while I had my mind set on 8-bit music like the music made for the C64. It's a style of music that would sit well with the low-resolution retro graphics, but since I want the game to remind the player of old Japanese movies it might be better to use a musical style resembling the style found in those movies. Nothing is set in stone, but for now, I'll go with the latter.

The final product will include at least three different songs, one for the intro-screen, one for the highscore-screen and one or more for the gameplay. To make the music match the quality of the sound effects and also enhance the feeling of an old movie I'll give the music an old vintage sound.

(I'd love to include the music here, but I don't think it's possible, so please visit my site www.eraserheadstudio.com to listen to both the original mix and the vintage sounding one.)

If you wonder what instrument the strange "plucking" sound comes from, it's called "Shamisen" and is a Japanese three-stringed traditional instrument not unlike the western banjo. Shamisen is featured in many samurai-movies and often played by a geisha and sometimes accompanied by a man singing in a dark voice.

That was all for this post, please let me know what you think about the effects and the music. Do you think it will work?

Happy coding!
/jan.

I've been browsing but I can't find it there either. Maybe I have to browse through it again.

Thanks anyway!

Okey. Thanks!

/jan.

Hi everyone,

I realized I had no visitors to my DevLog so I tried to search for it and discovered that I can't find it. And when searching for my studio name it says I have 0 projects, but I do have 1. Is it because it's only a devlog and not a published game? But it should still appear among the devlogs, right? So, what am I missing? :-)

My game is called 13 RONIN, when searching for it I found a lot of other games with the words "13" and "ronin" in the title, but not my game :-(

Thanks!
/jan.

Banner950x297

Ester (Eraserhead Animation Editor) is a new tool I've build that will make it easier for me to describe what different animations a spritesheet contains and their different characteristics e.g. how long each frame should be displayed. I can then export the description, as a json-file, and then together with the spritesheet load it into the game and use it to set up my "in game" animations.

This is how Ester looks with a spritesheet loaded and one animation created:

ester

I'll easily admit that building this tool has been a detour that's taken far too much time from any actual game development, but please let me give you the background.

Background

13 RONIN is a pixel-art game with animations based on spritesheets, just like the one below:

Animation Demo Spritesheet

The spritesheet together with a json-file describing the sheet are read into the game and turned into different animations. A process that works quite well.

Draw cropped

This is the "Draw"-animation beginning at row 3 and column 1 as described by the json-file below. In this example each frame is displayed for 150 milliseconds

Hero draw 320x410

Same animation as above but with individual frame times

The description file

The description file started out quite small, but since I prefer to hard-code as few things as possible and also want room for adjustment, the file grew.

This is a file describing the "Draw"-animation starting at row 3 and column 1:

{
  // General description of the spritesheet
  "spritesheet": { 

    // Size of sheet in columns and rows, 
    // where each cell is a sprite
    "gridSize": { 
      width: 13, // The sheet has a size of 13 columns 
      height: 5 // and 5 rows of sprites
    }

    // Size of a sprite in pixels
    "spriteSize": { 
      width: 160, // Each sprite has a size 
      height: 160 // of 160x160 pixels
    }
  }

    // Default values for animation frames
    "frameDefaults": {

      // Intended for describing hit-boxes and such. This
      // example would give a hitbox located at same position
      // as the sprite and of the same size
      "margin": { 
        "top": 0,
        "right": 0,
        "bottom": 0,
        "left": 0
      },

   // Offset value used when positioning and drawing
   // sprites.
   "offset": { 
     x: 10, // The sprites should be drawn 10 pixels
     y: 0 // to the right of the destination point
   }

   // Frame duration. Display each frame 200 milliseconds
   // before advancing to next frame
     "duration": 200
   },

   // Animations found in the spritesheet
   "animations": [

     // An animation
     {
       // Name used for identification
       "name": "Draw",

       // OPTIONAL. Will override default setting
       "offset": { 
         x: 0, // No offset for this animation
         y: 0
       },

       // OPTIONAL. Will override default setting
       "margin": { 
         "top": 0,
         "right": 0,
         "bottom": 0,
         "left": 0
       },

       // OPTIONAL. Will override default setting.
       // Frame duration for this animation is 150
       // milliseconds
       "duration": 150,

       // Start location in grid
       "index": { 
         x: 0, // This animation begins with image at
         y: 2 // row 3 and column 1
       },

       // This animation contains 13 frames starting
       // at "index"
       "frameCount": 13,

       // OPTIONAL. Using this property it's possible to
       // set frame duration for individual frames
       "frames": [
       ]
     }
   ]
}

Writing and maintaining the description files is very tedious and it's also very easy to make mistakes. Remember that the file above only contains one animation and that is an animation without any individual frame duration times. To get the animation seen in the second example above following "frames"-section has to be added:

"frames": [
  {
    "index": 0,
    "duration": 200
  },
  {
    "index": 1,
    "duration": 175
  },
  {
    "index": 2,
    "duration": 175
  },
  {
    "index": 3,
    "duration": 200
  },
  {
    "index": 4,
    "duration": 300
  },
  {
    "index": 5,
    "duration": 175
  },
  {
    "index": 10,
    "duration": 175
  },
  {
    "index": 11,
    "duration": 175
  },
  {
    "index": 12,
    "duration": 1000
  }
]

Tech

Ester is an electron based application using React as UI-framework. I'm not really a front-end developer and since this isn't the main focus of the blog I wont dwell and deeper into the subject, but for any one interested in trying out these technologies, there are a lot of posts written on the subject, so just use your magic friend google and you'll get lucky.

And please feel free to browse or clone the Ester-repo. I think the project- and component-structure is quite good, but I'm sure there could be a lot of improvements made on the JavaScript- and CSS-code. If you find something really horrific please let me know.

Using Ester

If you would like to give Ester a try, please visit my BitBucket account for further instructions.

If you find Ester useful, run into bugs or have ideas for new features, please don't hesitate from letting me know.

Please be aware that this is not a finished product, but something I'm working on as part of the game development project. Fatal crashes might happen and breaking changes be introduced.

You're also very welcome to clone and extend the product yourself.

Please visit Eraserhead Studio for more on the project.

Happy coding!
/jan.

NOTE. As always, everything I show, share or write about here is work under progress and subject to change.