On Sale: GamesAssetsToolsTabletopComics
Indie game storeFree gamesFun gamesHorror games
Game developmentAssetsComics
SalesBundles
Jobs
TagsGame Engines
(1 edit)

Hi, thanks for doing this! 


I've done a few game jams so far, but every time I end up relying on a global Singleton script that sends out signals to everything else. (I use Godot but I think these concepts are universal) The issue is that it becomes a mess and I have an inkling there's better ways to organize it. 


My question is if you have any tips/tricks/resources on how to organize a project/code so that it's easy to trace what's happening and have it make sense later?

(1 edit) (+1)

As soon as you said "global Singleton" and "signal" I went, "Oh, a fellow Godot user!"
While these concepts exist elsewhere, they are not as commonly referenced in game dev - but they are staples in Godot.

Here is a random collection of tips and thoughts on how I organize things in Godot (my fav engine):

SINGLETONS:
Personally, I've been increasing my use of global singletons for optimization purposes. (For example, I use them for my audio library so I don't have to search everywhere to find a sound effect.) This also helps me front load some parts of my games at more appropriate times (like during menus) so my framerates don't drop.

I always have a "GLOBAL" script that holds certain library functions I want everything to have access to (like playing audio). My global singleton holds references to key nodes that I set upon loading. For example, I use "var CAMERA" in the global singleton and then the ready function in my Camera's script starts with "GLOBAL.CAMERA = self". This way, anything can easily reference the camera with "GLOBAL.CAMERA" without having to waste time referencing the tree root or figuring out how far down the tree I set my camera. I can move my camera up or down my tree during dev time and it will always be findable at runtime.

Other items I have done this with include: HUD, PLAYER, CURRENT_LEVEL, and DATABASE...

SIGNALS:
I like using the built-in signals, but for a lot of things, custom signals can make things harder to manage. I know it isn't the "preferred" way to do things in Godot, but I don't mind tightly coupling some things even though it reduces reusability. There are a lot of tradeoffs in coding: readability, speed, efficiency, reusability... We all have to choose what we want to prioritize with each script we write. For game mechanics, reusability isn't my highest priority. (That said, I have a growing folder called "Utilities" that I generally just copy-paste from one project to the next. So for *some* things I care about reusability.)


SUBNODE REFERENCES:
Anytime I want to reference a sub node in a script (eg: a sprite); I will create an onready variable at the top of the script.
"onready var MySprite = $sprEnemy"

Then I use the variable (eg: MySprite) in place of referencing with the "$". This way, if I later move or rename the subnode (which I do a LOT), I only need to change its reference once. Also, I use a consistent naming convention for both subnodes and subnode references (eg: the sprite for something is ALWAYS labeled as "MySprite"). This way, there is never any question what is being referenced and it makes script reuse easier.

LABELING:
I also recommend being mindful about folder use and naming conventions. In my current project, I have a folder called "Enemies" and everything in there has a name that starts with "Enemy_". I also have a folder named "Levels" and every item starts with "Level_" or in some projects "lvl". Personally, I prefer to keep my scripts in the same folder as my scenes rather than make one HUGE folder labeled "Scripts".

Use subfolders! Under my Assets folder I have sub-folders labeled "UI", "Audio", "Fonts", "Shaders", and "Art". Under "Art" I usually have subfolders like Enemies, NPCs, Player, Background, etc. Under "Audio" I have "SFX" and "Music" separated. I prefer to name my assets with what they are "red_spaceship_coneshape.png" rather than how they are intended to be used "level1_bkg_music.ogg" because I might change my mind about how it is to be used later.

ART:
As often as possible, I like to use black & white art assets and color them in using either shaders or the self-modulate function. this allows me to shift color pallets on the fly. I'll even have colors named in my GLOBAL script "MyBlue = Color(#41d7d7)" and then reference them "set_blink(GLOBAL.MyRed, GLOBAL.MyBlue)" for things like hit effects.

ANIMATIONS:
Tweens are your friend. Not really an organizational tip, just a fact.

Thank you for the response, it's really easy to follow and I've learned a lot from it!

I never thought of caching a node to a singleton like with GLOBAL.CAMERA, that'll definitely be useful in my projects! I use the $ method to assign nodes to variables like you mentioned, but it'll be very useful to globally cache nodes in case I need to rearrange.

That suggestion about the art seems like a lifesaver, but to clarify is it done through shaders? And could you clarify how I'd set the color of a sprite if it's not too much trouble (or point me in the way of the documentation)?

I love tweens, I started using them to add screen shake and make health bar animations more satisfying, but I feel like I'm only scratching the surface!

(1 edit)

Happy to help!

On Art:

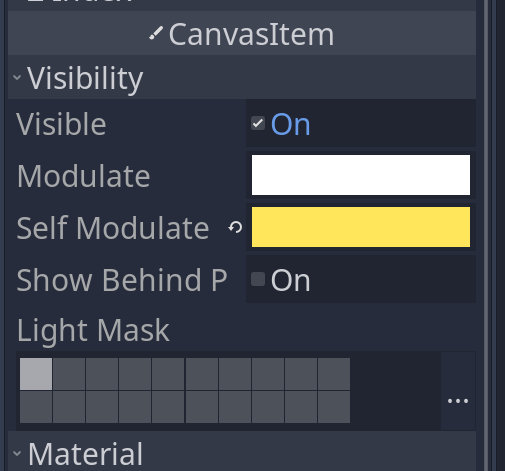
For 2D games, load a sprite node and click on it in your "Scene" tab. Look at your "Inspector" tab under "CanvasItem". You'll see an item labeled "Visibility". Click on the arrow to expand it and you'll see 2 color bars named "Modulate" and "Self-Modulate". Changing the colors of these changes the color of the entire sprite. (If you have a complex bit of sprite art, you can split this into different pieces and make each one a different color.) I find this works really well for simple sprites. Also, if you change the "modulate" color of a node, it will change the color of all its child nodes!

You can set this at runtime with
"$MyNode.self_modulate = WhateverColorYouAssign"


For more complex sprites, you can use a gradient shader. Here's a full tutorial on how to do just that: 
(www.youtube.com/watch?v=i7VljTl4I3w)

There are times you may wish to use both a shader AND self-modulate/modulate. Try playing with it!

Also, I like to tween the alpha channel of self-modulate/modulate in order to make things vanish!

(1 edit)

Thanks for replying!


I was aware of modulate, I was wondering how you can change the palette of a sprite, like each color in a sprite separately (unless I misunderstood what you meant). Do you usually just do the splitting and modulating method you mentioned? Or is there some magic you can do with shaders?


Example: If I'm using a 4-color GBA palette and want to switch it from a green color palette to a bubblegum one

There are two ways you can handle this:

With Shaders: If you follow the shader tutorial I posted, you can simply create a new set of gradients using your new color palette (or change the gradient you were already using). If using the gradient doesn't work for you, there is a LOT of "shader magic" you can do in Godot, and one option is to simply preset colors right in your shader code (or as an exported parameter) and just change your colors there.

With Modulate: You can do the "split" art method and just set up a Singleton of color references (either as individual variables or in a dictionary), and adjust your color references as need be. I've never personally changed colors quite so drastically as shifting from a green to bubblegum palette, but I am likely to decide that I don't like the shade of green I'm using and change it accordingly.

If you are being very limited with your palette (like only using 4 colors), then you could name your color variables by function (eg: shadow, highlight, midtone, background, etc.) I normally label mine as the colors they are (MyGreen, MyRed, MyBlue, etc.)

Does this help?

Yeah I think I understand it now! I watched the shader video and it makes some sense but I'm still intimidated by the shader coding language. That'll just come with practice though!

The only thing I'm a little unclear on is how you animate the sprites with the modulate method, cause it seems like it would be a chore to have to update the animation for the highlights, midtones, shading, etc..

By the way, I really appreciate you taking the time to do this, I can imagine it's a bit like IT answering our barrage of questions

Haha! Yeah, this is a bit like doing IT or teaching, but everyone is a whole lot nicer. ;)

On animating:
If you are using the "split" art method (which is just a version of the "paper doll" method), you wouldn't generally change the art color during animations. Like, when you walk across the room, your clothes don't change color. And since setting modulate/self-modulate sets it for the node, if you are using an "animated sprite" node, all images in that animation would be colored the same.

Like, if you had a fully-colored animated baby character, you might have separate art for the face, hair, mouth eye whites, irises, pupils, arms, legs, shirt, and diaper. Each of these would be their own sprite node with their own color and you then can use an "animation player" to move each piece separately.

Does that all make sense? If not, I can try to make some images to show what I mean.

I'm glad to hear that we are nicer than your average IT customer!

I think I understand visually what it would look like  a bit better, but to me it seems tedious to have to switch the animations for all of the different pieces, which makes me think I'm missing something. 

Like for instance if I want to switch from "idle" to "run" animation, I would have to tell the hair, the face, the iris, etc to switch their animations to "run". 

Also how would you split each frame, is that done in engine or do you have to do it in a sprite editing program?

Would you mind telling me the official name for this method so I can try and find some documentation for it? I looked up paper doll method but it seems to be mainly referencing skeleton animation which seems different

There are different terms, but sometimes it is called a "cutout animation".
Here is a video tutorial: (www.youtube.com/watch?v=lMFuEc1XsOQ)