Thank you for sharing your project! The sound effects are done with expertise, I truly feel. They really enhanced the experience.
Also, I found the hint coin! :-)
I did check out that link, but I honestly didn’t fully comprehend it. The explanation you provided has given me a lot more clarity. Thank you!
I had a sort of aha moment when I was customizing the datePicker and changed the text output to include the year beside the month at the top.
canv.text[""fuse month_names[p.month-1]," - ",p.year (0,5)+canv.size*.5,0 "top_center"]
I’m not a strong programmer, but I feel like that line’s syntax could only work evaluating right to left. Am I understanding that correctly? (More so about nesting the fuse command in there, I feel.)
Also, is the fuse command the only way to concatenate strings?
Edit: I guess I didn’t need the fuse part. I just edited it to:
canv.text[month_names[p.month-1]," - ",p.year (0,5)+canv.size*.5,0 "top_center"]
Nevermind, I have a lot more learning to do.
x:1 y:1 z:1
if x=1&y=1&z=1 "success" else "failure" end
That helped me quite a lot. Thank you!
I did have an issue modifying the datePicker contraption though, but got it to work eventually.
I created an additional field with the selected date (v) versus the navigated-to date (p). I only wanted to invert the day of the month cell when it matched the exact date that was selected (not selecting new days of the month as the months and years were cycled through).
I don’t think I need to post the whole code block, but for some reason the if statement only works when I put the conditions in their own brackets:
if (index=p.day-1) & (p.month=v.month) & (p.year=v.year)
canv.invert[cell+1 cellsize-2]
end
Any idea as to why the above code works, but removing the brackets causes it to fail?
(The line of code in question is at the bottom of the prototype script in the datePicker contraption, if someone requires more context: if index=p.day-1 canv.invert[cell+1 cellsize-2] end
.)
The Forbidden Library is perfect as an alternative way to play. Thank you for taking the time to build that. There’s so much to learn about Decker!
I’m still of the mind to make the RPG completely mouse driven in Native-Decker (and still accessible with native shortcut key functionality). Playing with a controller/keyboard and holding buttons down with the kb module would just be a bonus. Thank you for sharing that link!
As a side note, reducing my art to 16 colours has been an absolute joy. It really helps to create a cohesive aesthetic. I also love that persistent variables need to exist in widgets. Laying out the game’s state physically on a card with fields and grids is so cool. It encourages you to keep things simple and focus on what matters. Brilliant!
I was just wondering if your thoughts have changed regarding exposing key up/down events? … or perhaps there is a way to accomplish what I’d like to do?
For context, I’m working on a classic NES console-styled RPG with basic controls (d-pad, 2 buttons). I’m going to make it work with mouse/pointer controls regardless (for accessibility), but it would be amazing to control it with the keyboard (which allows for classic controllers to be used with external key mapping applications). Essentially, I’d like to hold down a key to move a character in a given direction on a grid-map (like the movement seen in the path finding tutorial deck). I’m not sure if that is possible though.
I noticed that when shortcut keys are enabled for buttons, the buttons invert when the key is pressed. Even multiple buttons will remain inverted until the keys are released. I believe, up to 6 keys are understood at a time on Win10 OS hardware (the inverting feedback doesn’t always work consistently, but usually 3 keys at a time are tracked properly). I made an alpha-numeric button keyboard in Decker and mashed keys, like a caveman.
I like Decker quite a lot. The lower resolution and limited palette foster creativity, I find. I’ll still work on my RPG regardless of key events being exposed or not. I’m just curious about your thoughts now, being 2 years since your last comment on the matter.
Thank you for sharing such a wonderful program!
First off, I applaud Decker’s goal of a small, effective code base and I’m totally fine with how it works. I absolutely adore it!
I’m just curious though if Extended ASCII has been considered.
If it’s viable, perhaps the native Decker fonts don’t support it, but import a font with a special “Extended ASCII” property and maybe Decker can apply the character codes from 128 to 255 to that specific font’s rendering. This would support most of Western Europe. UTF-8 wouldn’t be needed.
However, Extended ASCII is 8-bit versus regular ASCII being 7-bit. I have no idea how Decker deals with font characters internally, but I know that Decker renders characters beyond 127 to a question mark so it deals with Extended ASCII at some level. This also means that Extended ASCII would have to be accepted in string values in Decker’s scripting language.
I apologize if Extended ASCII has already been addressed.
Antics, I know it’s not ideal, but you could make your own font that is all uppercase letters that works with accented characters. For example, type in lowercase and the normal Latin uppercase characters are rendered; use capital letters to render accented letters. If you’re versed with programming outside of Decker, you could write a script to convert normal strings of text into your custom font compliant strings. As long as you don’t need more than 26 accented character variations, it’d work (you could use other keyboard character as well). All caps isn’t bad to read on screen for games like RPGs and such, though it might not be good for visual novel games with large amounts of text.
It’s something to consider, at least.
I find myself wanting to make alternate sizes of the same font or use an existing font to build off of for something entirely new.
I find it efficient to copy the source font, increase the height and then drop the baseline of all glyphs and then edit each glyph as needed.
To accommodate adjusting the baseline of the entire font, I made two buttons that translate all glyphs up and down.
on click do
f:currfont[]
i:0
while i<96
f[i]:f[i].translate[(0,1) 1]
i:i+1
end
view[]
end
I’m unsure if using a while loop is the best way to access all the glyphs of the current font, but this script seems to work fine. (Font glyphs must range from 0 to 95 though.)
I hope some find this feature useful.
And please let me know if there is a better way to translate an entire font.
I’ve been making several fonts and I believe a 4-directional shift feature of the active glyph image would help immensely (saves having to redraw the entire glyph just to nudge it).
This is a mock-up to illustrate the interface change idea.
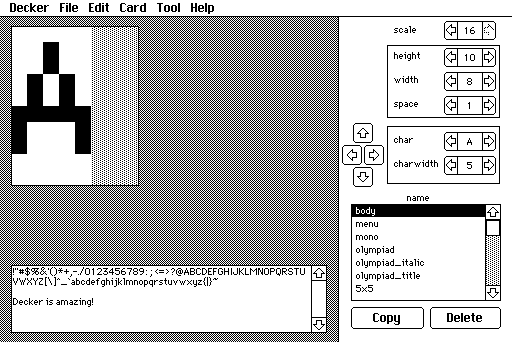
To avoid accidentally losing glyph details, it should wrap the pixels (as one row or column is removed from the edge, it’s added to the opposite side).
If someone would provide the script for each directional button, that would be wonderful. If it seems useful, perhaps this could be an update to the existing font editor deck.
I’ll be sure to share the fonts I make!