Thanks for the patronage! ^__^
To answer your questions:
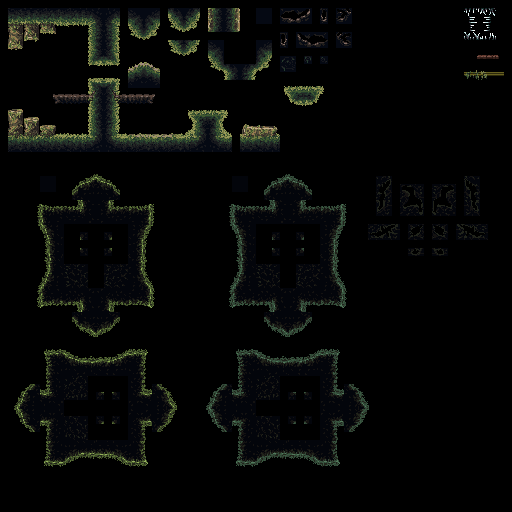
1: There's an example tileset called tileset_template which is a bit more readable than the normal tilesets, it's probably the best reference when making new tilesets.
Tiles are arranged in columns where only the tile's x coordinate matters, except that slopes are arranged in alternating rows of alternating floor/ceiling tiles with different collision checking, and autotiling using tiles from the rows you've currently selected in the tileset. The layout goes like this:
- 1-block uphill (1 tile)
- 1-block downhill (1 tile)
- 2-block uphill (2 tiles)
- 2-block downhill (2 tiles)
- Solid blocks (5 tiles)
- Decorative tiles without collision (5 tiles)
The exact coordinates for each type of tile are defined in the macros script, lines 100-105. They are checked in reverse order when collision checking (pixel_vacant script is the only place that handles collision checks, but the editor also uses the tile types), so setting all slope types to 0 and then also the solid type to 0 should remove collision checking from slopes entirely. (You might wanna remove them from pixel_vacant as well to save on processing power)
2: To start a completely new project, import the source file, then go to "included files" and delete the world map and level files:

When editing the world map and levels, files will be created in the game's AppData folder (the sandbox location where save files normally are created - this can be changed in the game's platform Preferences). This is convenient during development, but don't forget to add them as included files when you plan to make a release.
3: There are two autotile functions.
- Press T to enter "Auto Floor/Ceiling" mode. Click to place points (you must do this from left to right). Press Enter to create a floor under the points, or Insert to create a ceiling above it. In both cases, all the space between the points you created and the edge of the room is filled with random tiles from the currently selected row of tiles, creating slopes to match the points as accurately as possible.
- Press Shift+T to enter "Terrain Chunk" mode. This is similar to the "Auto Floor/Ceiling" mode, but instead of going to the edges of the room, it creates tiles around a center point (which is stored when you press Shift+T). You can create points both above and below the center point, and when you press Enter, the area delimited by these lines get filled with tiles.
The idea is that you draw a handful of lines and then the functions fill them up with random tiles, so you can design a level in just a few quick strokes (and the randomness looks more natural than human-placed tiles).
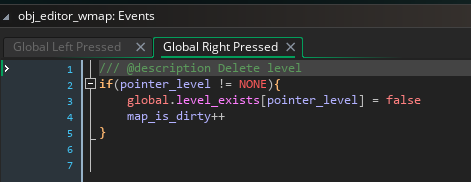
4: This is a bug, thanks for finding it! I'll try to upload a new version with this fixed as soon as feasible. In an existing project, you can fix it by changing the obj_editor_wmap Global Right Mouse event like this:


