
Indie game storeFree gamesFun gamesHorror games
Game developmentAssetsComics
SalesBundles
Jobs
TagsGame Engines

ahmwma

168
Posts
2
Topics
163
Followers
184
Following
A member registered Mar 18, 2017 · View creator page →

Creator of

Recent community posts

(2 edits)

Hi! No stupid questions, it's always good to ask if you're confused -- and this looks like a fun project!
I'm going to take a guess at rewriting your script, and then explain the changes I made.

on click do
play["sound2"]
sleep["play"] 
    if haveicefish.value
    go["card3"]
    else
    go["card2"]
    end
end

And now I'll walk you through it:

sleep["play"]

sleep[] is used to make pauses/delays in Decker. 
In this case, I'm telling Decker to sleep[] until it's done "play"-ing that sound.

if haveicefish.value
go["card3"]
else
go["card2"]
end

Since it's a binary choice like this, we can put everything together into one If... Else... statement. 
(I'll get back to the .value thing in a moment.)

I'm only checking for haveicefish.value now. If the player doesn't haveicefish Decker will use the script written under else instead.

(And if the script under "else" would be "do nothing", you don't need to have an "else" section at all.)

Additionally, if you need more branching possibilities you can use elseif

if haveicefish.value 
go["fishparty"]
elseif havesmallfry.value 
go["bigpond"]
else
go["smallpond"]
end

You can also check if multiple things are True, if one or the other is True, or is something is False in these ways:

if thing1.value & thing2.value # AND
if thing1.value | thing2.value # OR
if ! thing1.value # NOT

Finally, each If... statement needs it's own end, separate from the end of the overall script.

on click do
    if truething.value
    alert["yay!"]
    end
end

Hopefully this all made some amount of sense so far! Let's talk about the other thing...

haveicefish.value

So, I've been using .value here because I'm actually not sure what you're checking. (I might just be missing something.) But I'll explain what I'm doing with that. 

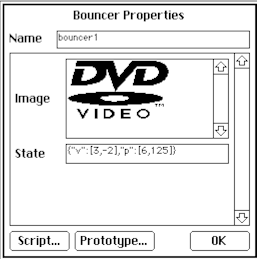
Variables in Decker are typically stored in widgets. 
If it's a binary true/false situation I might store it in a button styled as a checkbox:


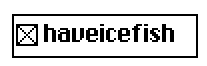
if haveicefish.value would check to see if this checkbox is marked/True/value=1
Checkboxes can be made to be true or false in your various scripts like this:

haveicefish.value:1 #writes the value true/checked/1 to this checkbox
haveicefish.value:0 #writes the value false/unchecked/0 to this checkbox

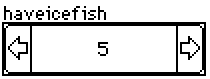
If you're doing something that isn't just true/false and you need to store a number (perhaps the number of fish caught?), you might put that in a slider or a field. This slider's .value is the number that it has stored in it.


It really depends on what you're trying to do though, so please ask! Especially if I've rambled about things you don't need, or if I've made something more confusing.

---

One more note about storing things in widgets... sometimes I'll store all my widgets that track game flags and variables that I'll need to check later on a "behind-the-scenes" card and point to them in my scripts like this:

if fishstatus.widgets.haveicefish.value

This would look for the card "fishstatus", look at the names of it's widgets, find the widget named "haveicefish" and see if it's value is true (a marked checkbox, I guess) before proceeding with the rest of the if statement. 

It can be longer to write (depending on how you name things), but it's often handy to store this stuff -- in their widget containers -- on a separate card together.

I hope something in here helped.

(1 edit)

Scripts typically can only run while you're in Interact Mode (or from inside the Listener). Likewise, the canvas.brush attribute you mentioned, when it's used in a script it only meaningfully changes the brush setting for that one canvas when the canvas is clicked in Interact Mode, y'know? (I think you knew that, I'm just clarifying for anyone wandering by.)

So, yeah, I don't think it's possible to change your Drawing Mode tool or brush via scripting.

But, in case it's of use to you and your project: 

The Toolbars do extend downwards with an arrow at the bottom if you have more than the default amount of brushes.


 And as a further example, this is how the 'stamp'-style brushes from the brushes example deck appear on the toolbar:


The last one is quite a large stamp, relative to the others, but it's neatly constrained to it's own little rectangle and it's not too hard to figure out which one is which.

I hope this helps, I'm excited to hear that someone is making use of custom brushes!

Thank you so much for checking it out!

Well, the good news is that I don't think you're doing anything wrong and there does seem to be a way to continue authoring your project on iPad.

I had to ask a friend with an iPhone to test this for me, so I hope this works the same for you. Safari on iOS doesn't seem to want to open .deck files at all, so we'll use the other file format that Decker projects can be saved to -- HTML.

1. Save your project as a .html file instead of a .deck file
If you're not sure how to do that: in the Save As menu, write .html at the end of the file name.
This will have a slightly larger file size than the same project as a .deck but that's fine and normal.

2. When you want to open your project again go to a copy of Web Decker hosted online.
For example: The Decker Tour Deck is online, unlocked, and always there for you.
(Yes, it does seem like you have to do this instead of opening the .html project file from your device's File system.)

3. Use the File > Open menu inside of that online instance of Web Decker to open your project.

Then make sure save as .html again when you're done!

---

Your existing .deck file should be able to be opened in Web Decker on a non-iOS device and saved as an .html file so you can continue using it on iPad with this method.

Web Decker is nearly identical to Native Decker when it comes to authoring projects. One of the main differences between them, unfortunately, is that there's also a web browser involved in Web Decker. And every web browser has it's own slightly frustrating quirks. I'm sorry you've run into this one.

Anyway! If the method above works for you, I'd love to know.

This is so very lovely! Well done!

&  is AND,   |  is OR.

if thing1.value & thing2.value # AND
if thing1.value | thing2.value # OR
if ! thing1.value # NOT

Do these examples work for what you need? There's more in this post as well.

Enjoyed this a lot. So many stories.

(1 edit)

It might be easier to use the more general "Bouncer" version of this contraption:  https://itch.io/post/8380177

You can open up the properties menu of the contraption on the card where you want to use it and paste a different image into the image box:

I think most people prefer to use the native Decker application on a computer to author their projects rather than any kind of web Decker, if the option exists.

But it is possible to reduce the amount of extra space around the program on a phone screen.

If you hold your phone in a horizontal rotation and select Decker > Fullscreen in the menu bar at the top it brings everything in closer.

And optionally you could also select Decker > Toolbars, which makes a variety of drawing tools available in the remaining gaps on the sides.

(Even if you're not drawing anything it can be useful to be able to switch between Interact mode and Widget mode with a single click -- or tap -- with the buttons at the top of the left side toolbar.)

I really enjoyed exploring this! Your art makes lovely use of 1-bit. Well done.

bumping with my efforts from the latest jam :)

hoping other people will add theirs too! there's some very cool new stuff!

A wild walk around the wood(s)... I have experienced things here.

Thank you too, for reading! Good luck out there!

Thank you so much!

You're right, the norm doesn't matter! We all have our own levels of what we need in terms of people vs. time alone, for our own well being. (I'm often torn between wanting to see what the people I care about are up to... and my extremely low battery for this stuff. It's tough to find the balance.)

But anyway... always happy to cross paths with you, fellow introvert.

thank you!! <3

So cute! Happy New Year!


Thank you!!

Yep, everything was made directly in Decker. Turning on the Toolbars makes it a very comfortable little art program and it's nice to be able to do everything in one place for projects like this.

Perhaps I have put a plastic bambino in a plant pot... it doesn't grow leaves or anything but once in a while it does make a weird noise to let me know there's some unmissably cool olszoj art to check out.

Thank you very much for playing~

Thank you so for checking it out! I'm so glad it could resonate with people.

Oh yeah, that is the same kind of feeling!

Thank you for checking it out (and relating to it)

Thank you Kosmo! ... And yea..... 😭

🚗 wow??? w o w. 

The style of this is great!

Still a while to go, but something is coming together.

Ahhh! I worried a little whether or not the metaphor would work for other people while I was making it, and I'm very glad people (people I didn't already know!) could connect to it too.

Thank you so much for checking it out!

Thank you! Good friends make such a difference, I'm so glad you have them.
Happy new year to you too!

[nods nods] I think, between the time I started this and the time I published I got a lot less scared of losing people. I'm still *sad* about it, but I can accept it more.

Things (usually) fit together in the big garden we were in before, but it's very different to be on a small windowsill together. It's worth trying, so many of us are trying, but it's also okay if it doesn't all work out.

Heheh I did think about your magnificent array of houseplants a few times while drawing. You are an admirable plant caretaker Zel, literally and metaphorically. 🌱

Thank you for checking it out!

Pow! 🍃 Thank for for reading, MindApe!

I found myself nodding along to so much of this. Small discords with people I enjoy have absolutely been my sanctuary lately, even though it bothers me sometimes that it doesn't leave a mark on the open web. I feel like I don't exist visibly to a lot of people I care about until I resurface to post something.

(I should spend more time building a website...)

Thank you so much for sharing your thoughts about it! The park vs. garden aspect of it... the different feelings and ways of communicating depending on whether we're in a semi-private or public space. So true.

Absolutely let's talk more (and in more ways) in 2025! (I've got more jam stuff I need to finish so I should probably tunnel on that until the end of the year...) I'm excited to see what you're working on.

Happy new year! Happy deck month!

Thank you andy!

I hope everything is going well for you (and your beautiful cat), and the gardens you're tending.

Thank you for checking it out!

I'm not usually the reflecting type either, but it kinda hit me this year... I think (and hope) that it'll keep being worth it to reach out to people now and then. I'll certainly keep trying too. (Good luck to us both!)

We have indeed! Thank you for listening to me while I found my words.

(1 edit)

Yeah, I'd say you have the right idea of what Canvases usually do... they store images and interact more easily with scripts. But there's a little bit more to say.

This is the default event handler for a new canvas:

on drag pos do
 if !me.locked|me.draggable
  me.line[(pointer.prev-me.pos+me.container.pos)/me.scale pos]
 end
end

(this one, and the other 'defaults' can be found in this section of the documentation if anyone wants to check them out!)

Opening a new canvas's script creates a couple of blank events ("on click pos do" "on drag pos do" and "on release pos do") for people who want to fill that in with their own code.

The blank "on drag pos do" event overrides the default behavior with... literally nothing. Absolutely nothing happens, until you script something else.  (Or you may have noticed that you can make a canvas to go back to the default behavior of drawing a 1px black line by deleting the blank "on drag pos do" section, which removes the override.)

You might also notice that the section of code above checks to make sure the canvas is not locked or draggable  before letting you draw on it. Being draggable removes the default ability to draw on a canvas in the same way that being locked does, and the draggables deck does make a note of that at some point but I understand it might not have been clear why it said that since it wasn't really the focus of the example deck.

This is, as far as I know, what's going on with that stuff.

---

But let's open the door to other things.

Drawing directly on the card has a range of tools coded in and ready to go, right? And Canvases... don't. But they could have some of them.

That script up there using me.line[] is the thing that makes a line when you drag your cursor across a new canvas. And if you poke around in the Canvas Interfacesection a little bit, you can find some other bits and pieces for scripting your own drawing tools for canvases:

.line[] makes lines
.brush[] lets you change which brush it is
.pattern[] lets you choose a color or 1-bit pattern to draw with
and there's stuff like  .fill[pos] to flood-fill, and so on

So you could, in fact, make a custom user interface that targets a specific canvas that provides most of the tools that are available when you're drawing on the card. I don't think it would exactly replace the card-drawing experience, as it is. I'm not sure about 'erasing' on a canvas and moving stuff around would be a lot harder without the selection box and lasso tool. So I'm afraid the small awkwardness of having to "Paste as new Canvas" might need to continue, honestly, if having the whole range of drawing tools as they exist on the card is your preference.

But, being able to create your own custom drawing UI where you draw in a special scripted way on a canvas is pretty fun if you have a cool idea for it. For example, Wigglypaint. (highly recommended,  and you can poke around at how unlocked decks were made)

Stunning, beautiful. Incredibly dreamy. Good work!

(4 edits)

Oh no! Don't worry, this was my bad. I didn't explain enough about 'sleep' -- it puts everything in Decker to sleep for the duration, including the ability to click buttons, or Jankytunes' ability to 'draw' music.

This is (usually) fine for the silly things I get up to but obviously you've run into one of the major downsides and I'm really sorry I didn't clarify this aspect of sleep[] in the previous post.

(I'm going to edit this shortly but I just wanted to assure you first that you're not doing anything wrong.)

Is your ideal outcome for this card a looping animation? And does it use consistent timing between frames?

EDIT: (I forgot about this one...) Inside of Wigglykit (there's a contraption which lets you paste a series of images inside of the properties menu that opens up from the widget. You can copy it from the Wigglykit deck or copy-paste this into your deck:

%%WGT0{"w":[{"name":"wp1","type":"contraption","size":[69,63],"pos":[115,92],"script":"on release pos do\n if snap.value me.pos:pos end\nend","def":"wigglyPlayer","widgets":{"c":{"size":[69,63],"draggable":1},"fr":{"size":[69,20],"value":{"text":["i","i","i"],"font":["","",""],"arg":["%%IMG2AEUAPwD/AP8A/wAsAQEAKwECABMBAgABAQMAKQELAAoBCAAhAQIABgEOAAEBAgACAQkAIAEEAAYBGwAgAQMACgEBAAMBDQADAQQAIAEDAA8BAgADAQUABQEDACEBAwAdAQMAIgEDAB0BBAAhAQMAHgEEACABAwAfAQMAIAEDAB4BAwAhAQMAHgEDACEBAwAeAQMAIQEDAB4BAwAhAQMAHgEDACEBAwAeAQMAIQEDAB4BAwAhAQMAHgEDACEBAwAdAQQAIQEDAB0BAwAiAQMAHQEDACIBAwAdAQMAIgEDAB0BAwAiAQMAHAEEACIBAwAcAQQAIgEDABwBBAAiAQMAHAEEACIBAwAdAQMAIgEDAB0BAwAhAQMAHQEEACEBAwAeAQQAIAEEAAoBAgACAQIADAEEACEBBQAGAQ4AAQEKACIBBQACARsAJAEfACUBCwAHAQEAAQECAAIBAgABAQEAAgEBACcBBgBAAQMA/wD/AP8AtA==","%%IMG2AEUAPwD/AP8A/wAuAQEAKgEBAAIBAwARAQUAKAEJAAMBAQAIAQgAIAEBAAgBHAAfAQMACAEEAAEBFQAfAQUACAECAAIBFAAhAQQADQECAAEBAwAHAQEAAgEDACEBAwAdAQMAIgEDAB0BAwAjAQMAHAEEACIBAwAcAQMAIgEEABwBBAAhAQMAHQEEACEBAwAdAQMAIgEDAB0BAwAiAQMAHQEDACIBAwAeAQMAIQEDAB4BAwAhAQMAHgEDACEBAwAeAQQAIAEDAB4BAwAhAQMAHgEDACEBAwAdAQQAIAEDAB8BAwAgAQMAHgEDACEBAwAeAQMAIQEDAB4BAwAhAQQAHQEDACIBAwAcAQUAIQEDABwBBQAhAQMAHQEEACEBAwAcAQQAIgEEAAoBAQADAQQABQECAAEBBgAiAQMACQEDAAEBEgAiAQcAAwEYACIBDwABAREAJQENAAMBAQADAQEABAEBAAQBAQAlAQwAOgEBAAEBAgD/AP8A/wC1","%%IMG2AEUAPwD/AP8A/wAsAQEALAEBABYBBAAgAQEACAEJAAEBAQACAQIABwEHAB4BAwAIARAAAgEJACABAwAHARoAIQEDAAgBAQACAQEAAgEGAAEBCAABAQMAIQEDAA8BAgABAQEABAECAAIBAQACAQMAIQEDAB8BAwAgAQMAHgEEACABAwAdAQQAIQEDAB0BAwAiAQMAHgEDACEBAwAeAQMAIQEDAB4BAwAhAQMAHgEDACEBAwAeAQMAIQEDAB4BAwAhAQMAHgEDACEBAwAeAQMAIQEDAB4BBAAgAQMAHgEDACEBAwAeAQMAIQEDAB0BAwAiAQMAHgEDACEBAwAeAQMAIQEDAB0BAwAiAQMAHAEEACIBAwAcAQQAIgEDABwBBAAiAQMAHAEEACIBAwAcAQQAIgEDABwBAwAjAQMAHAEEACMBAwAEAQIAAwEBAAEBCAACAQoAJAEDAAEBHgAiAR8AAQECACIBCAACAQYAAgEHAAEBAQABAQIAKAEFAEEBAgD/AP8A/wC1"]}},"or":{"size":[69,20],"value":"[0,1,2]"},"fl":{"size":[41,20],"pos":[0,111]},"em":{"pos":[78,-49]},"cbo":{"size":[100,13],"pos":[78,0]},"cst":{"size":[100,12],"pos":[78,20]},"cd":{"size":[100,13],"pos":[78,38],"value":1}}}],"d":{"wigglyPlayer":{"name":"wigglyPlayer","size":[100,100],"resizable":1,"margin":[1,1,1,1],"description":"A viewer and storage location for wiggly animations, which is also suitable as a \"Fancy Puppet\" for use with Puppeteer.","version":1.2,"script":"on frames do fr.images end\non order  do or.data end\n\non set_value x do\n if x.frames fr.images:x.frames..copy[] end\n or.data: (range count x.frames) unless x.order\nend\non get_value do\n r.frames:frames[]\n r.order :order[]\n r\nend\n\non view do\n f:frames[]\n o:order[]\n c.border:cbo.value\n c.show:card.show\n c.draggable:cd.value\n c.clear[]\n if count f\n  i:f[o[(count o)%sys.frame/5]]\n  i:if fl.value i.copy[].transform[\"horiz\"] else i end\n  if get_stretch[]\n   c.paste[i 0,0,card.size]\n  else\n   c.paste[i .5*c.size-i.size]\n  end\n end\nend\n\non get_border do cbo.value end\non set_border x do c.border:x cbo.value:c.border end\non get_stretch do cst.value end\non set_stretch x do cst.value:x end\non get_frames do fr.value end\non set_frames x do fr.value:x end\non get_order_text do \",\" fuse order[] end\non set_order_text x do or.data: 0+\",\" split x end\non get_animate do view end\non get_flip do fl.value end\non set_flip x do fl.value:x end\non get_emotes do em.data end\non set_emotes x do em.data: x end\non set_emote x do or.data:() unless get_emotes[][x] end\non get_draggable do cd.value end\non set_draggable x do cd.value:x end\n","template":"on click do\n \nend\n\non drag do\n \nend\n\non release do\n \nend","attributes":{"name":["border","draggable","stretch","frames","order_text"],"label":["Border","Draggable","Stretch to Fit","Frames","Frame Order"],"type":["bool","bool","bool","rich","string"]},"widgets":{"c":{"type":"canvas","size":[100,100],"pos":[0,0],"locked":1,"animated":1,"volatile":1,"script":"on click pos do\n card.event[\"click\" pos]\nend\non drag pos do\n if get_draggable[]\n  card.pos:pos+(pointer.pos-pointer.start)\n  me.pos:0,0\n  card.event[\"drag\" pos]\n end\nend\non release pos do\n if get_draggable[]\n  card.event[\"release\" pos]\n end\nend","border":1,"scale":1},"fr":{"type":"field","size":[100,20],"pos":[0,-77],"locked":1,"show":"none"},"or":{"type":"field","size":[100,20],"pos":[0,-49],"locked":1,"show":"none","style":"plain"},"fl":{"type":"button","size":[60,20],"pos":[0,148],"locked":1,"show":"none","style":"check"},"em":{"type":"field","size":[100,20],"pos":[109,-49],"locked":1,"show":"none","style":"plain"},"cbo":{"type":"button","size":[100,20],"pos":[109,0],"locked":1,"show":"none","style":"check","value":1},"cst":{"type":"button","size":[100,20],"pos":[109,31],"locked":1,"show":"none","style":"check","value":1},"cd":{"type":"button","size":[100,20],"pos":[109,61],"locked":1,"show":"none","style":"check","value":0}}}}}

This might also work for what you're doing.

( your project is looking amazing!)

Shapes? Rotated. Very relaxing, thank you.

This is wonderful, and so cute. Well done!

An absolute experience. I enjoyed this.

(1 edit)

I do think most of these things are intended behavior.

But, hmm, yeah I do see what you mean about the palette turning gray in the "Stroke..." menu while transparency mask is active... That's confusing.

I hadn't noticed that because I tend to use the Toolbars.

(Found in the menu bar under Decker > Toolbars)

This is with transparency mask on -- the background transparent white has turned gray but the sidebar palette white (which is now opaque) still looks white.

But yeah, I see what you mean about it being weird when you're working directly from the menu bars at the top.

For the other stuff, the difference between the two black colors isn't relevant very often. For most users, I think just using '1' all the time is fine.

For '0' and '32' however... it generally makes sense to me that you can only draw with opaque white while transparency mask is active because it's also one of the only times when you can see the difference between the two whites. And I tend to think of this use of the word mask not as in "thing you look through" but as in "thing that masks off areas of white" like masking fluid in watercolor painting, but that might just be my own association with it.

Anyway I wonder if the toolbars would be helpful to you for now? It doesn't answer all of the things you mentioned but it does sidestep one issue (and I think they're very useful in general while drawing in Decker).

(1 edit)

Well, gosh! I'll try!

Where to begin.... Yeah, if you're drawing directly in Decker you create the image data by drawing with the usual tools on the back of the card and then Copy -> (switch over to widget mode) - > Paste as new Canvas.

(And just in case anyone didn't know... turn on the Toolbars in the Decker menu... only one click to switch between modes and tools. Very handy.)

The best and most flexible place to draw is directly on the card but Canvases ("the image container widget") interact more easily with scripts and modules. And therefore, usually, animation. So, yep, move things into canvases when you're done drawing (or if you're ready to test something before you commit the time to finish your drawing! )

(The thread linked previous is an exception! That one was about making a looping animation while still being able to draw on the card.)

---

Depending on what I'm doing I will sometimes layer canvases on the card... it works just fine for small stuff. 

Basically, to do that, you change the visibility of the canvas widgets in a script -- hiding one and showing another in the same moment, and then creating a delay before doing the same thing again for the next image.

But... if you're making something super complicated... well, having several stacks of overlapping canvases can get a little unwieldy? 

Especially if you need to edit one single frame of it later. (Ask me how I know... no, actually don't....)

But there are other ways to do it! These days I often use copy[] and paste[] in a script instead. That is to say.... the image information is still all stored in canvases but instead of changing the visibility of lots of things in a big stack of widgets, I just change the image data on one single Canvas.

Soooo, examples:

Changing the visibility of three stacked canvases with .show (and sleep[] for the timing) might look like this:

frame1.show:"solid"
sleep[10]
frame1.show:"none"
frame2.show:"solid"
sleep[10]
frame2.show:"none"
frame3.show:"solid"
sleep[10]
frame3.show:"none"

While copy[] and paste[]-ing three images onto one canvas in sequence might look like this:

targetcanvas.show:"solid"
targetcanvas.paste[frame1.copy[]]
sleep[10]
targetcanvas.paste[frame2.copy[]]
sleep[10]
targetcanvas.paste[frame3.copy[]]
sleep[10]
targetcanvas.show:"none"

Personally, I find the second one easier to write and read but everyone is different and there's more than one way to make a sequence of images play. :)

A bonus visual example of what I mean.... take this animation:


In widget mode it's just one canvas and a button...


And over here (stored somewhere else) a sequence of images canvases that are 'played' on that one canvas when you click that button.

And this way it's still easy to copy the image back out of a canvas, edit it, and then paste it back in if I need to.

---

I tend to think of Zazz as a set of small tools for creating animated flourishes -- everything it does creates a loop but there's a few different kinds of loops.

And all of these things could be done by scripting it yourself! (but having it ready to go in a module makes it much simpler.)

Listing off a couple zazz options that I think are handy for the stuff I like to make:

.flipbook[] is like a normal looping gif where it plays a series of frames over and over on a canvas (also the thing in the previously linked thread is a secondary usage of flipbook -- to test how animations look, even if they're going to be handled by something else when they're done)

.bob[] makes a canvas bob up and down

.march[] makes a canvas move around different waypoints on the card.

And those are all really nice and useful on their own, but you can also mix them together, like this:


The butterfly's wings are a tiny .flipbook[] animation, the small up and down movement is from .bob[] and the back-and-forth is because the butterfly is .march[]-ing between waypoints (hidden widgets) on the two flowers.

Or, here's a case of using zazz.flipbook[] as a small part of a bigger interactive kind of thing:

In this example, a draggable canvas is being used with another module (called 'rect', from the 'draggable' example deck) that helps build certain kinds of interactions when you want your player to be able to drag things around.

When the rect module sees that the draggable canvas is overlapping the hidden 'rect'angle (lol) of the treasure map, it plays a zazz.flipbook[] animation on the canvas as if it's looking for something.... And then the thingy turns yellow if overlapping the 'rect'angle of the "X".

These are very silly little examples, but hopefully this helps explain my perspective on Zazz

It's a set of tools that are very helpful for certain kinds of looping effects and they generally combine well with other things.

---

So, for Puppeteer... the name is very well chosen. 

We're preparing Puppets and Props for a Decker stageplay. 

They move around positions on the card however we tell them to.

The main 'downside' is that there's a little more set-up involved here. It's really not bad at all but, for example, each Puppet needs it's own separate storage card (dressing room?) full of all the canvases for each of it's poses and expressions. It takes little longer to get everything put in the right places, but it's very powerful and flexible after that.

And planning a complicated scene with Puppeteer is a bit like going through rehearsals of a stage production. Tweaking the timing and positions and what expressions the actor-puppets should have, and so on.

(Obviously this is more of a 'vibes' explanation than a technical one....)

If zazz was the tool for looping animation, I usually think of Puppeteer as a tool for things that move forward in time. Cut scenes, visual novel conversations, interesting flourishes (sometimes).

This is one of the little examples from backstage in The Riddle:

You can see the little circles (tiny buttons) that are used to mark locations, and the directions for telling the bird puppet where to move around, how fast and when to change pose.

And technically Puppeteer does have some 'looping' traits such as the built-in blink, the mouth movement while talking with Dialogizer (you still have to draw them, but the coding side is handled) and fancy puppets -- which are probably a little too much for this conversation, but there's even more complexity available here for someone comfortable scripting in Lil.... 

But yeah, generally I would use Puppeteer for "scenes", rather than loops or idle animations.

---

And one more option for making moving pictures: Contraptions. 

These are really just basic widgets and Lil scripts pre-assembled together into a new kind of custom widget -- you can make your own but also there's a bunch of options already pre-made for your convenience in the contraption bazaar thread.

This small section of Desker has two small zazz.flipbook[] animations -- the cat's tail and the curtain. 

It also has three contraptions -- the eye contraption for the cat's eyes, the pop out contraption for the window opening and closing, and the rotor contraption for the inside of the plasma ball in the top right.

---

Anyway, this was a lot. Sorry if it's confusing! 

Basically, we have a lot of little tools available that have slightly different abilities and no one single "correct" workflow. 

It's completely fine to just use what makes sense to you for now, and then try new things later when you feel like it.

(And, of course, I'm happy to clarify anything I said here... !)