


 ((count a1) take a2) join a1

# (("x","aa"),("x","bb"),("x","cc"),("x","dd"))
A member registered Aug 02, 2018 · View creator page →
Creator of


Recent community posts
Welcome to the Decker community!
There isn't currently any mechanism for visually grouping sets of cards within a deck while editing.
If you're comfortable with programming, you might be able to achieve the project structure you describe by writing pieces of a large game as separate decks and then using a Lilt script to glue the pieces together; Lilt has most of the same scripting interfaces as Decker itself and can also copy and paste cards, widgets, and other resources between decks. I can provide more detailed examples if needed.
From a scripting perspective it's fairly easy to write queries that find cards based on a naming convention. For example, in Valentine-er all the cards containing border designs use a "back_" prefix in their names, and the script which populates the list of options does essentially:
select where key like "back_*" from deck.cards
If you happen to remember the names of cards within a project, you can also use the Listener to quickly navigate to them via the keyboard like so:
Does any of that help?
Just what it says on the tin. You can try it out right here!
and the result:
This tool uses the PDF Module to produce printable cards; I think there's great potential for other "Print-Shop"-esque tools made with Decker. Thoughts, questions?
I think I follow.
Let's say we have a canvas named "char" and some buttons that are meant to animate that canvas to their position.
We can give each button an identical script calling a helper function we will write called "seek" which takes three parameters: a thing to move (them), a widget giving a destination (there), and the number of frames the animation should take (steps):
on click do
 seek[char me 30]
end
(Remember: "me" in this case will be each button itself!)
On the card (or possibly the Deck-level script), we'll define seek[] thusly:
on seek them there steps do
 a:them.pos
 b:(there.pos+.5*there.size)-.5*them.size
 each t in (range steps)/(steps-1)
  them.pos:a+t*b-a
  sleep[1]
 end
end
The variables "a" and "b" store the initial position and the final position of "them", respectively. The expression:
there.pos+.5*there.size
Is the position of the destination plus half its size, which is to say its centerpoint. By subtracting half the size of "them" from the centerpoint of "there", we'll get the position which will center "them" on "there".
To tween the object smoothly from "a" to "b", we need to compute a series of uniform steps from 0 to 1. Consider the following examples:
 (range 3)/2
# (0,0.5,1)
 (range 5)/4
# (0,0.25,0.5,0.75,1)
 (range 8)/7
# (0,0.142857,0.285714,0.428571,0.571429,0.714286,0.857143,1)
Given a time "t" between 0 and 1, we can linearly interpolate between "a" and "b" with:
a+(t*(b-a))
Which in Lil can be written more concisely as
a+t*b-a
Since arithmetic expressions have uniform precedence.
For extra fun, we could replace that linear interpolation with an easing function from Ease like "ease.inOutBack[]"
on seek them there steps do
 a:them.pos
 b:(there.pos+.5*there.size)-.5*them.size
 each t in (range steps)/(steps-1)
  them.pos:ease.inOutBack[t a b]
  sleep[1]
 end
end
How's that?
All the parameters of every zazz function are documented. zazz.scroll[] only takes two parameters: a target and a scroll direction.
It is not possible to scroll less than one pixel per frame, but we could use a lower "duty cycle" by scrolling only every N-th frame. The "sys.frame" field automatically increments 60 times per second, so we could for example call zazz.scroll[] only when sys.frame modulo 4 equals zero to scroll every fourth frame, or at 15FPS:

on view do
 if !2%sys.frame zazz.scroll[A 1,0] end
 if !3%sys.frame zazz.scroll[B 1,0] end
 if !4%sys.frame zazz.scroll[C 1,0] end
 if !5%sys.frame zazz.scroll[C 0,1] end
 go[card]
end
It is possible to directly manipulate the card background (card.image) instead of using a canvas widget, but it's limited in some ways; see the Image Interface documentation. If you have a hand-drawn card background this can also make it easy to accidentally destroy your doodles, so use caution! For a quite elaborate example of such an animation, try clicking the first "e" in "Decker" on the title screen of the guided tour deck.
When I'm frequently making changes to a script I do often defer logic to the card-level script for editing convenience, possibly by giving the widget a stub script like:
on click do
 reset_game[]
end
With "reset_game" defined on the card or deck script. It is possible to quickly jump to a widget's script by enabling "File -> X-Ray Specs" from within the script editor and then ctrl+clicking in the widget's bounding box to view its script; ctrl+clicking outside any widgets switches to the card script. This is a very useful tool for getting a "bird's eye view" of what's happening on a card. Alternatively you could use the F-keys on your keyboard to switch between Interact and Widgets mode (F1 and F2, respectively), click a widget, and press cmd/ctrl+R to edit its script.
I think in your example you may be tripping over Lil's order of operations (or lack thereof). Without parentheses, expressions are carried out strictly right-to-left. Parens may be useful for visually grouping arguments, but do not inherently denote lists. The following expressions are equivalent:
(me.size/2, me.size)
me.size/(2, me.size)
me.size/2,me.size
I think you intended:
(me.size/2),me.size
When the position for canvas.text[] is specified as an (x,y) pair, anchors control the positioning of the text relative to that point: "center" means the string will be centered upon that point.
When the position for canvas.text[] is instead specified as a (x,y,w,h) rectangle, anchors control the alignment and justification of text within that rectangle. Thus, to wrap and center text within the bounds of the canvas you'd want something like
canvas.text[somestring 0,0,canvas.size "center"]
Or, incorporating a margin,
local margin:15
canvas.text[somestring margin,margin,me.size-margin*2 "center"]
How's that?
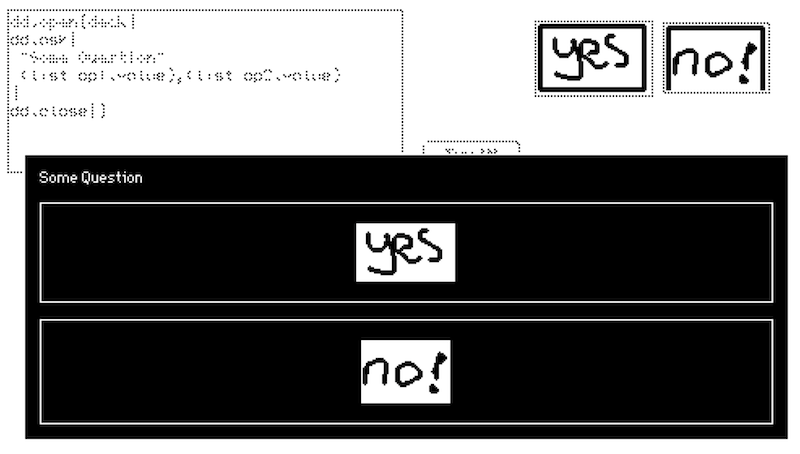
dd.say[] and dd.ask[] accept rich-text, so one alternative might be to represent your input options as hidden rich-text fields. You could also use rtext.cat[] to convert an image stored in a canvas into a rich-text table, or use any other method of constructing it on the fly.
Suppose you have a pair of fields named "op1" and "op2". Their "value" attribute is their rich-text, which is represented in Lil as a table of text runs and attributes. It is important to wrap each table in a list with the "list" primitive like so; otherwise the comma operator will join the rows of those tables and make all the options in the prompt "stick together":
dd.ask[
 "Some Question"
 (list op1.value),(list op2.value)
]